How can I overclock my video card? |
|
|
Author: W1zzard
Date: 2004-05-16 07:56:19
|
|
ATI overclocking tools:
ATIToolRivaTuner
Rage3DTweak
Radeonator - discontinued - use Google to find.
PowerStrip
RadLinker/RadClocker
Some ATI cards are protected against overclocking. If you change your overclock and you get no performance increase your card is probably locked. Test this by setting the clock speeds to values so high that your card would immediately crash on applying the new settings. If it's still running your bios is overclock-locked.
To remove the lock on the 9500 you have to flash a hacked bios which you can get from here.
To remove the lock on the 9000/9200/9600 you have to use modified drivers which you can get from here.
See the related articles section on the bottom of this page on how to flash a video bios.
NVIDIA overclocking:
coolbits.regYou will also need the nVIDIA DetonatorXP drivers, use the latest stable version.
When you run this file to edit the registry, it changes the values of the keys that allow you to use the factory overclocking utilities from NVidia.
Double-click the coolbits.reg and you'll see a window that says, "Are you sure you want to add the information?"

Click Yes and the program will edit the registry. Once it's edited you'll see a window telling you the information has been successfully entered into the registry.

Click OK and reboot.
Now Right-click the desktop and select "Properties" from the menu.
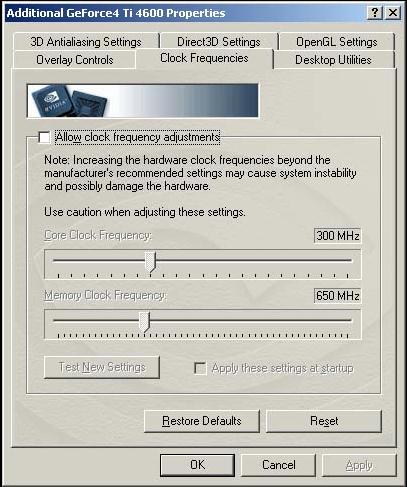
Select the "Settings" tab. A button labeled "Advanced" will appear. The "Clock Frequencies" tab is where the new core/memory speeds can be adjusted

You will not be able to apply the new settings without clicking the
"Test New Settings" button. Once the highest stable speeds are found you will need to check "Apply these settings at startup" so the video driver will automatically set the card to these speeds every time you boot into windows. If the higher speeds cause problems hold 'CTRL' as Windows loads to prevent Coolbits from loading the overclocked settings.
Step-By-Step Guide to Video Card OCing
- Clock down your CPU first. You want to be sure any instability you find isn't caused by an unstable CPU overclock.
- Increase your GPU clock speed (Leave memory at stock speed). 5 or 10 MHz increments are good. Run a quick stability test (only a few minutes). This step is done only to find the maximum value. Repeat this until you get signs of instability or artifacts.
- Now run a longer stability test with your last stable overclock
- If this is not stable clock down another 5 Mhz till you are stable. Now you have found the maximum clock speed of our GPU.
- Next is video memory. Clock your GPU down to stock speeds and start overclocking your memory.
- Again in large steps to quickly find the maximum.
- After you found your maximum memory speed combine both overclocks. I suggest you take a few Mhz off both speeds when overclocking both GPU and memory. The reason to do this is that your video card will get hotter overall. Heat from the GPU could migrate through the PCB and cause the memory to become warmer and thus limiting your overclock, or vice versa.
- Now run a complete stability test. If your see signs of instability, clock down either GPU OR memory and find out what is causing the instability. Do this until your system is stable.
- Congratulations your video card is now close to its maximum overclock. It might be possible to squeeze another few Mhz out of your core or memory but variations in ambient room temperature, for example, could cause instabilities.
Feb 25th, 2025 02:44 EST
change timezone
Latest GPU Drivers
New Forum Posts
- Nvidia's GPU market share hits 90% in Q4 2024 (gets closer to full monopoly) (572)
- What local LLM-s you use? (64)
- [Intel AX1xx/AX2xx/AX4xx/AX16xx/BE2xx/BE17xx] Intel Modded Wi-Fi Driver with Intel® Killer™ Features (279)
- The TPU UK Clubhouse (25778)
- AMD RX 7000 series GPU Owners' Club (1300)
- TPU's Nostalgic Hardware Club (19998)
- Retired AM4 Workstation Case Swap - 1st Post (2)
- Testing max ram overclock pn Ryzen 1700 (75)
- AIO - 120mm cpu cooler? (31)
- Windows 11 General Discussion (5705)
Popular Reviews
- ASUS GeForce RTX 5070 Ti TUF OC Review
- MSI GeForce RTX 5070 Ti Vanguard SOC Review
- MSI GeForce RTX 5070 Ti Ventus 3X OC Review
- MSI GeForce RTX 5070 Ti Gaming Trio OC+ Review
- Corsair Virtuoso MAX Wireless Review
- Corsair Xeneon 34WQHD240-C Review - Pretty In White
- darkFlash DY470 Review
- Palit GeForce RTX 5070 Ti GameRock OC Review
- AMD Ryzen 7 9800X3D Review - The Best Gaming Processor
- Gigabyte GeForce RTX 5090 Gaming OC Review
Controversial News Posts
- NVIDIA GeForce RTX 5090 Spotted with Missing ROPs, NVIDIA Confirms the Issue, Multiple Vendors Affected, RTX 5070 Ti, Too (467)
- AMD Radeon 9070 XT Rumored to Outpace RTX 5070 Ti by Almost 15% (304)
- AMD Plans Aggressive Price Competition with Radeon RX 9000 Series (272)
- AMD Radeon RX 9070 and 9070 XT Listed On Amazon - One Buyer Snags a Unit (247)
- Edward Snowden Lashes Out at NVIDIA Over GeForce RTX 50 Pricing And Value (241)
- AMD Denies Radeon RX 9070 XT $899 USD Starting Price Point Rumors (239)
- NVIDIA Investigates GeForce RTX 50 Series "Blackwell" Black Screen and BSOD Issues (239)
- AMD Radeon RX 9070 XT Launch Allegedly Set for March 6 (152)