 4
4
Lian Li PC-A70 Review
A Closer look cont. & Case Inside »Packaging
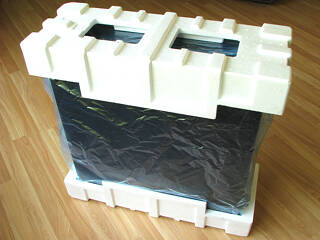
When the case arrived, the packaging looked like it went through a war. There were some tears in the box, and some parts were slightly crushed. Though this has nothing to do with Lian Li themselves, it would be nice to get everything there undamaged. Another thing that jumped out at me was the shear size of the box; it's absolutely massive.
Once the box was opened and the case taken out, we see the packaging did its job of protecting the case. However, some of the front panel 5.25" bezels were knocked out of place and I found them free-falling around the case which did scratch them up somewhat.
Contents
- Screw Driver
- 16 x Copper Standoffs
- 3 x Cable ties
- 1 x Spare Thumb Screw
- 6 x PSU Screws
- 1 x Adjustable Clamp
- 8 x #6-32 Screws
- 14 x HDD Screws
- 35 x Drive Screws
- 14 x Rubber Rings
A Closer Look
Here's the behemoth Lian Li PC-A70 unveiled from its box standing 595mm high, almost two feet. The PC-A70 has a very simplistic design like most Lian Li cases. The biggest "thing" that stands out about this case to me is the shear size of it.
On the top of the case a small flip up door contains access to USB, Firewire and Audio I/O ports. How good this location of the ports is, is arguable. By this I mean if the case is put on the floor next to your desk, it would be fairly easy to access the ports. However if the case was seated on, or up high next to your desk, because of the size of the case it might be a bit difficult to get to them.
Two 120mm fans are mounted on the front of the case, and the fans both have air filters over them. A metal rack sits over the fans holding the washable air filters in place, which is easily removed for cleaning. When the front panel is removed, the Power/Reset switches are exposed as well. Lian Li uses a small circuit board for the switches which is mounted to the case.
Due to the PC-A70's large size, it has two spots for PSUs to be mounted - In the top of the case and in the bottom. The default place is the bottom and the top has another internal 3.5" cage in it with a fan and a grill to cover the area where a PSU can be mounted. The cage is held in via four screws with rubber dampeners, so it's very easy to remove and position the PSU there.
Jan 4th, 2025 09:22 EST
change timezone
Latest GPU Drivers
New Forum Posts
- Anyone using Equalizer APO with SB X4? (0)
- Questions about 9900x performance for purely gaming and the dual-CCD (37)
- Next Gen GPU's will be even more expensive (900)
- TPU's Nostalgic Hardware Club (19724)
- AAF Optimus Modded Driver For Windows 10 & Windows 11 - Only for Realtek HDAUDIO Chips (247)
- Sim Racing Hardware Setups (9)
- Folding Pie and Milestones!! (9314)
- Windows 11 downloads terabytes of "Updates" in two days. (55)
- Where can i resell domain names I registered with namecheap (1)
- Need a 4k curved monitor (17)
Popular Reviews
- DDR5 Thermal Testing & Analysis
- INTUAURA Lakeview In-Ear Monitors Review - The Power of DSP!
- ASUS ROG Falchion Ace HFX Hall Effect Keyboard Review
- SCYROX V8 Review
- HIFIMAN Arya Unveiled Headphones Review - The Next Best?
- AMD Ryzen 7 9800X3D Review - The Best Gaming Processor
- SilverStone SETA H2M Review
- GPU Test System Update for 2025
- Intel Arc B580 Review - Excellent Value
- Klevv Genuine G560 2 TB Review
Controversial News Posts
- AMD Radeon RX 9070 XT Alleged Benchmark Leaks, Underwhelming Performance (204)
- 32 GB NVIDIA RTX 5090 To Lead the Charge As 5060 Ti Gets 16 GB Upgrade and 5060 Still Stuck With Last-Gen VRAM Spec (173)
- Potential RTX 5090 and RTX 5080 Pricing in China Leaks (173)
- AMD Radeon RX 9070 XT Boosts up to 3.10 GHz, Board Power Can Reach up to 330W (167)
- NVIDIA GeForce RTX 5070 Ti Leak Tips More VRAM, Cores, and Power Draw (161)
- NVIDIA GeForce RTX 5070 and RTX 5070 Ti Final Specifications Seemingly Confirmed (152)
- NVIDIA GeForce RTX 5090 Features 575 W TDP, RTX 5080 Carries 360 W TDP (145)
- AMD Radeon "RDNA 4" RX 9000 Series Will Feature Regular 6/8-Pin PCI Express Power Connectors (133)


