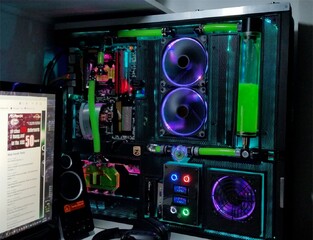
To view this case mod, go here.

Specs:
Updated
Original
I used my existing Gigabyte UD5h m/board with 4770K cpu and 16G DDR3 GSkill Trident ram for this build but added new reservoir and radiator.The pump is my old trusted Swiftech MPC655 variable flow. Boot drive is the Samsung 850 Pro booting Win 10.D: Drive is 2x WD 3TB Black hard disks in raid 1.Power supply is also my old Coolermaster 750 Bronze.
Mods:
I recently replaced my old trusted Asus GTX770 Direct CU Graphics card with an EVGA Founders 1080 and mated it to the Phanteks Glacier 1080 GPU water block. While I was at it I also replaced my faithful, but old, Swiftech APOGEE GTX LGA775 CPU water block.I bit the bullet and bought the crazy expensive 3M 500mm PCIe gen3 cable as I didn't want any heartache with stability "glitches" down the road.If you see the video "linked", you will notice that there are no visible harddisks.Due to size constraints, I decided that only components which gave me visual indications of their status were to be on the front, and all the others had to go on the back.By this I mean that logically you cannot tell whether harddisks are healthy or faulty by physically looking at them. So why even have them on the front? They're not exactly beautiful, lol!On the other hand, with the flow indicator running, it tells me the pump (also on the back) is working. The fans tell me the power supply is being cooled and the radiator water is being cooled.As you will notice from the system power up video, the lights can turn on independently of the PC power supply. As does the pump. I wanted it this way as it makes it easy to flush and prime the system.I installed a relay so that the pc cannot be powered on accidentally without the pump running. This is not fool proof as you can always power on the system via the button on the m/board. The pump has it's own 12v 5A power supply as have the lights.The 3x Thermaltake riing fans all feed off the one controller connected to the m/board. There are 2 rear 140mm Phanteks "pull" fans connected via PWM.Once again, thanks for having me here. Jim
Hi guys...First up, let me just say that it was the amazing custom builds on this forum which inspired me to build my own. Now that it's "finished, lol", I thought it was a good time to sign up and become part of this community. Thanks to all for reading ...
Attachments
Last edited:


