ATI heatsink pin removal |
|
|
Author: W1zzard
Date: 2005-03-27 18:39:26
|
|
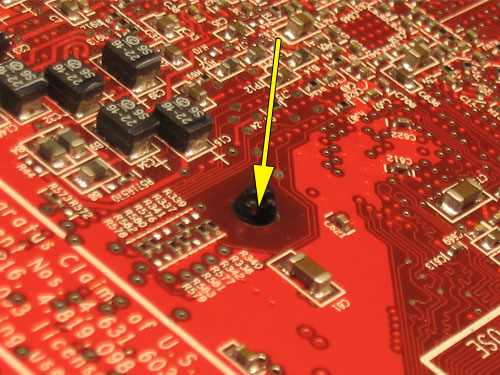
The heatsink pins consist of an inner pin and an outer pin, the inner pin is what makes the connection strong.
When using tools, be careful not to slip and damage the PCB.


Once the inner pin is removed, turn the card around and push down the outer pin with your thumb.

Do not use tools, since it is very easy here to slip and scratch the PCB.
If you can't do it with your thumb, use a big flat surface (coin) to press on the pin. For additional safety put a paper towel between coin and video card.
Now use a screwdriver or a ballpen (since it fits the hole it can't slip) to press down the pin, so that it safely goes through the video card. This step should not require much force. Look at the different spring compression between picture 2 and 3.


Now put the inner pin back in, use your finger to press it down till it rests firmly. Again, if you have to use tools here put a paper towel on the video card, just in case you slip.

Removing the pin
Pull the inner pin out. You can grab it with a fingernail or some pliers.When using tools, be careful not to slip and damage the PCB.


Once the inner pin is removed, turn the card around and push down the outer pin with your thumb.

Do not use tools, since it is very easy here to slip and scratch the PCB.
If you can't do it with your thumb, use a big flat surface (coin) to press on the pin. For additional safety put a paper towel between coin and video card.
Putting the pin back in
Align the pins with the holes in the PCB and gently press down the cooler, just enough that the pins go through the PCB a little bit.Now use a screwdriver or a ballpen (since it fits the hole it can't slip) to press down the pin, so that it safely goes through the video card. This step should not require much force. Look at the different spring compression between picture 2 and 3.


Now put the inner pin back in, use your finger to press it down till it rests firmly. Again, if you have to use tools here put a paper towel on the video card, just in case you slip.

Feb 10th, 2025 19:32 EST
change timezone
Latest GPU Drivers
New Forum Posts
- Paint + metal flakes from case screw holes, very worried. (Silent Base 802) (3)
- Monitor Battle! Help me choose between two contenders (18)
- It's happening again, melting 12v high pwr connectors (91)
- Dlss4 + 4090 = lower max oc than with dlss3 (67)
- TECHPOWERUP HWBOT Contest Submissions List (65)
- What's your latest tech purchase? (23123)
- Wanting to upgrade CPU (14)
- Shutters while shooting and seeing enemy even in CS 1.6 (75)
- AM4 and Combining Different RAM? (69)
- TECHPOWERUP HWBOT Contest with Cash Prizes (71)
Popular Reviews
- Civilization VII Performance Benchmark Review - 35 GPUs Tested
- Kingdom Come Deliverance II Performance Benchmark Review - 35 GPUs Tested
- ASRock Phantom Gaming B850I Lightning Wi-Fi Review
- Spider-Man 2 Performance Benchmark Review - 35 GPUs Tested
- Team Group T-Force XTREEM DDR5-7200 48GB CL34 Review
- Kingdom Come: Deliverance 2 Handheld Performance Review
- NVIDIA GeForce RTX 5080 Founders Edition Review
- AMD Ryzen 7 9800X3D Review - The Best Gaming Processor
- Corsair Frame 4000D Review
- Gigabyte GeForce RTX 5080 Gaming OC Review
Controversial News Posts
- AMD Radeon 9070 XT Rumored to Outpace RTX 5070 Ti by Almost 15% (286)
- AMD is Taking Time with Radeon RX 9000 to Optimize Software and FSR 4 (256)
- AMD Denies Radeon RX 9070 XT $899 USD Starting Price Point Rumors (239)
- Edward Snowden Lashes Out at NVIDIA Over GeForce RTX 50 Pricing And Value (239)
- AMD Radeon RX 9070 XT & RX 9070 Custom Models In Stock at European Stores (226)
- New Leak Reveals NVIDIA RTX 5080 Is Slower Than RTX 4090 (215)
- AMD's Radeon RX 9070 Launch Faces Pricing Hurdles (175)
- AMD Radeon RX 9070 XT Tested in Cyberpunk 2077 and Black Myth: Wukong (169)