 8
8
DUNU SA6 MK2 In-Ear Monitors Review
Fit, Comfort & Audio Performance »Closer Examination
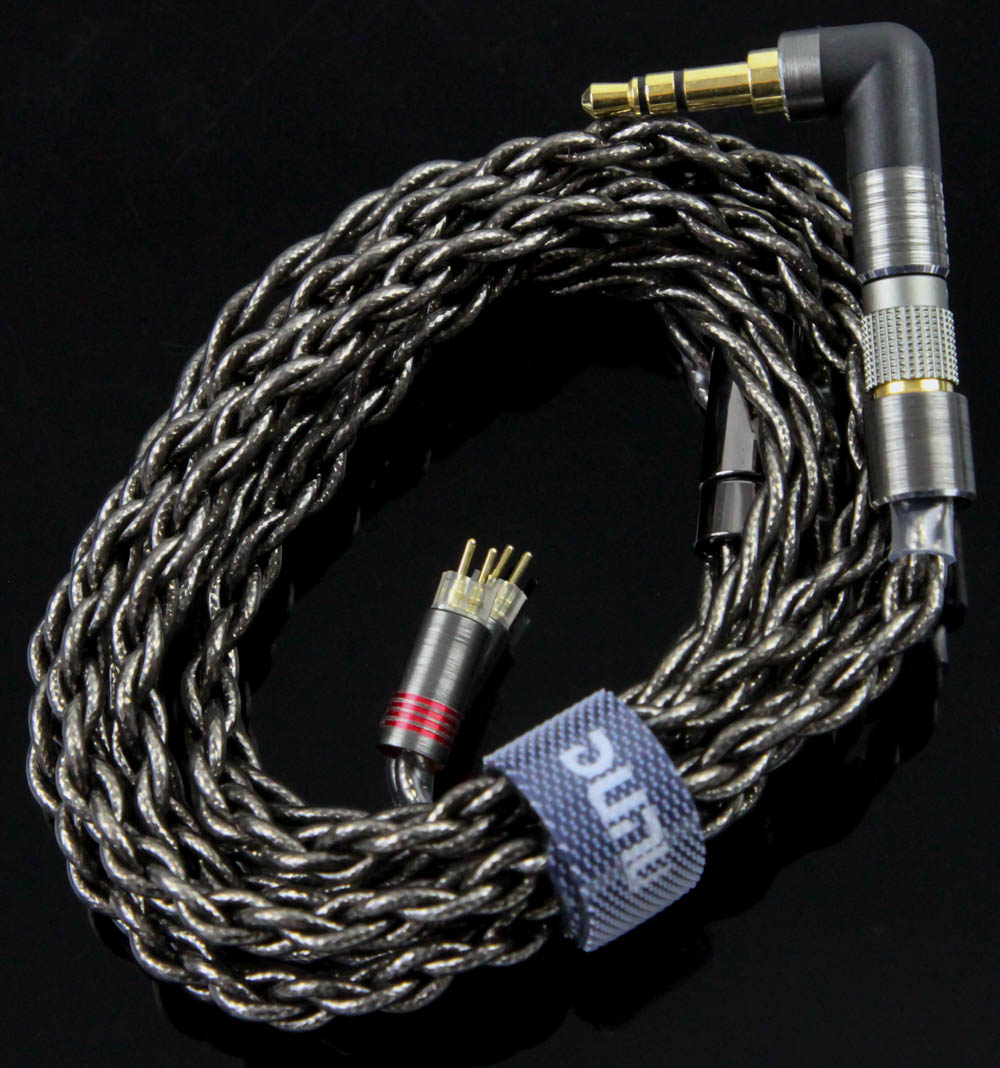
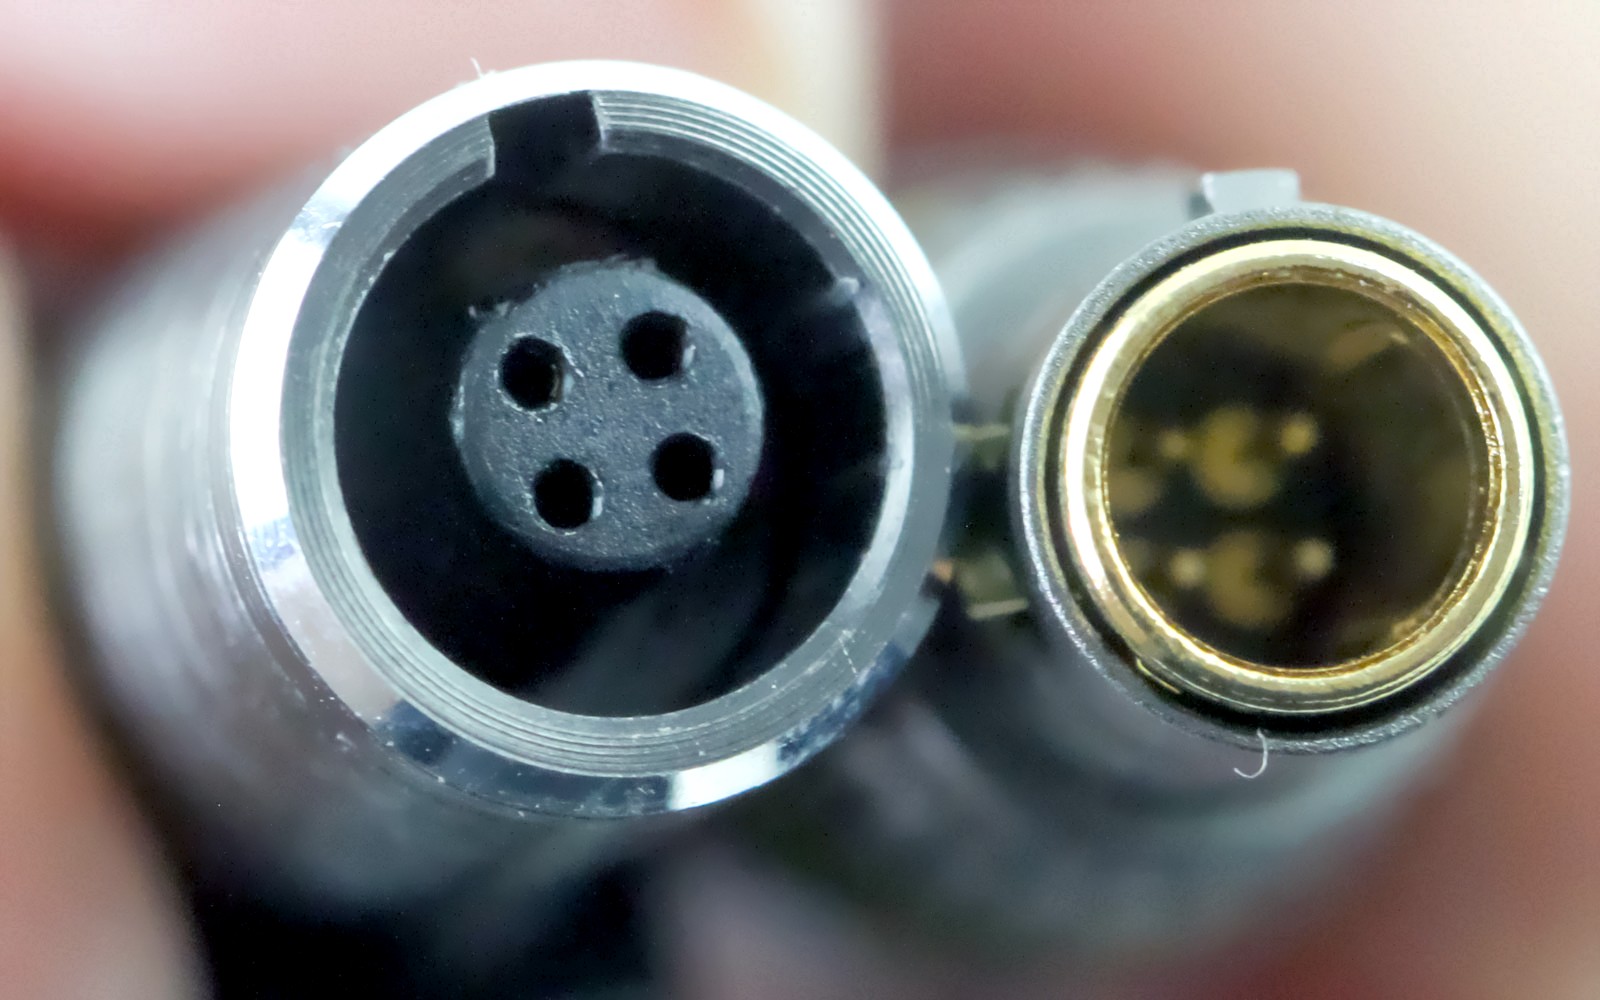
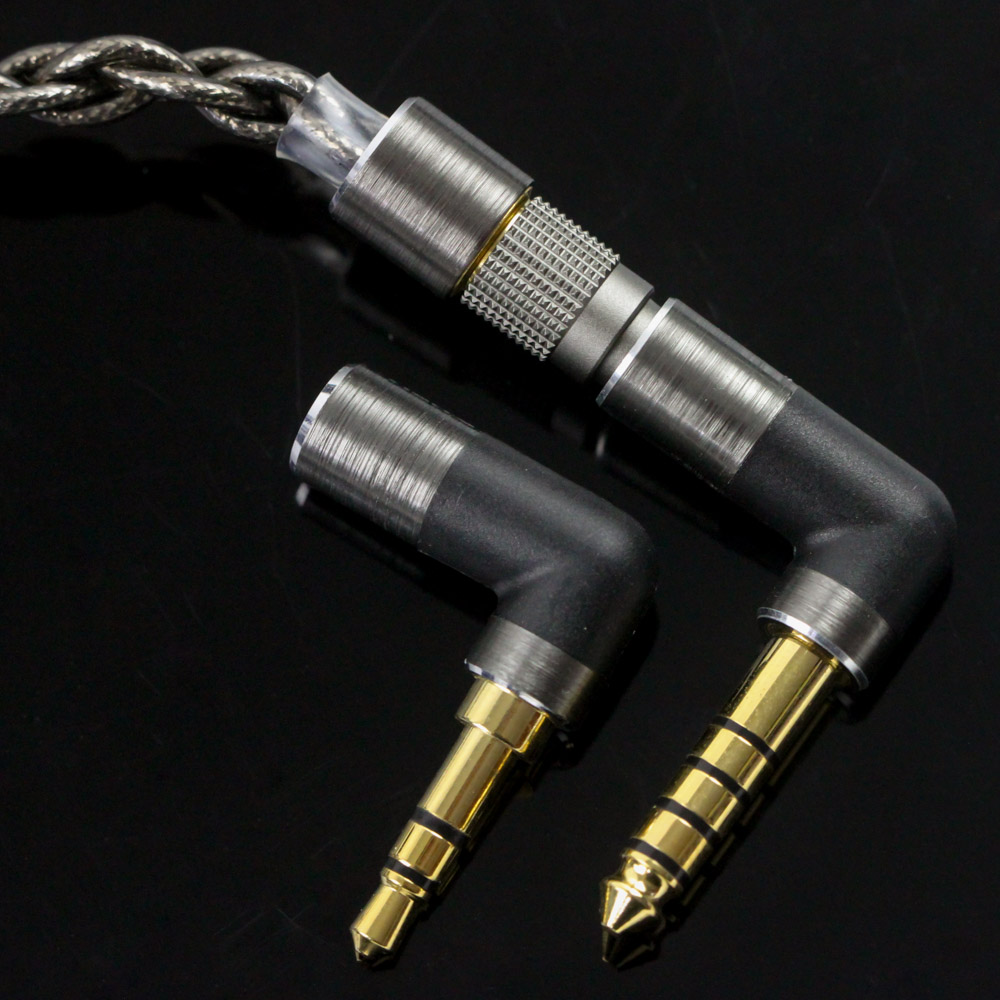
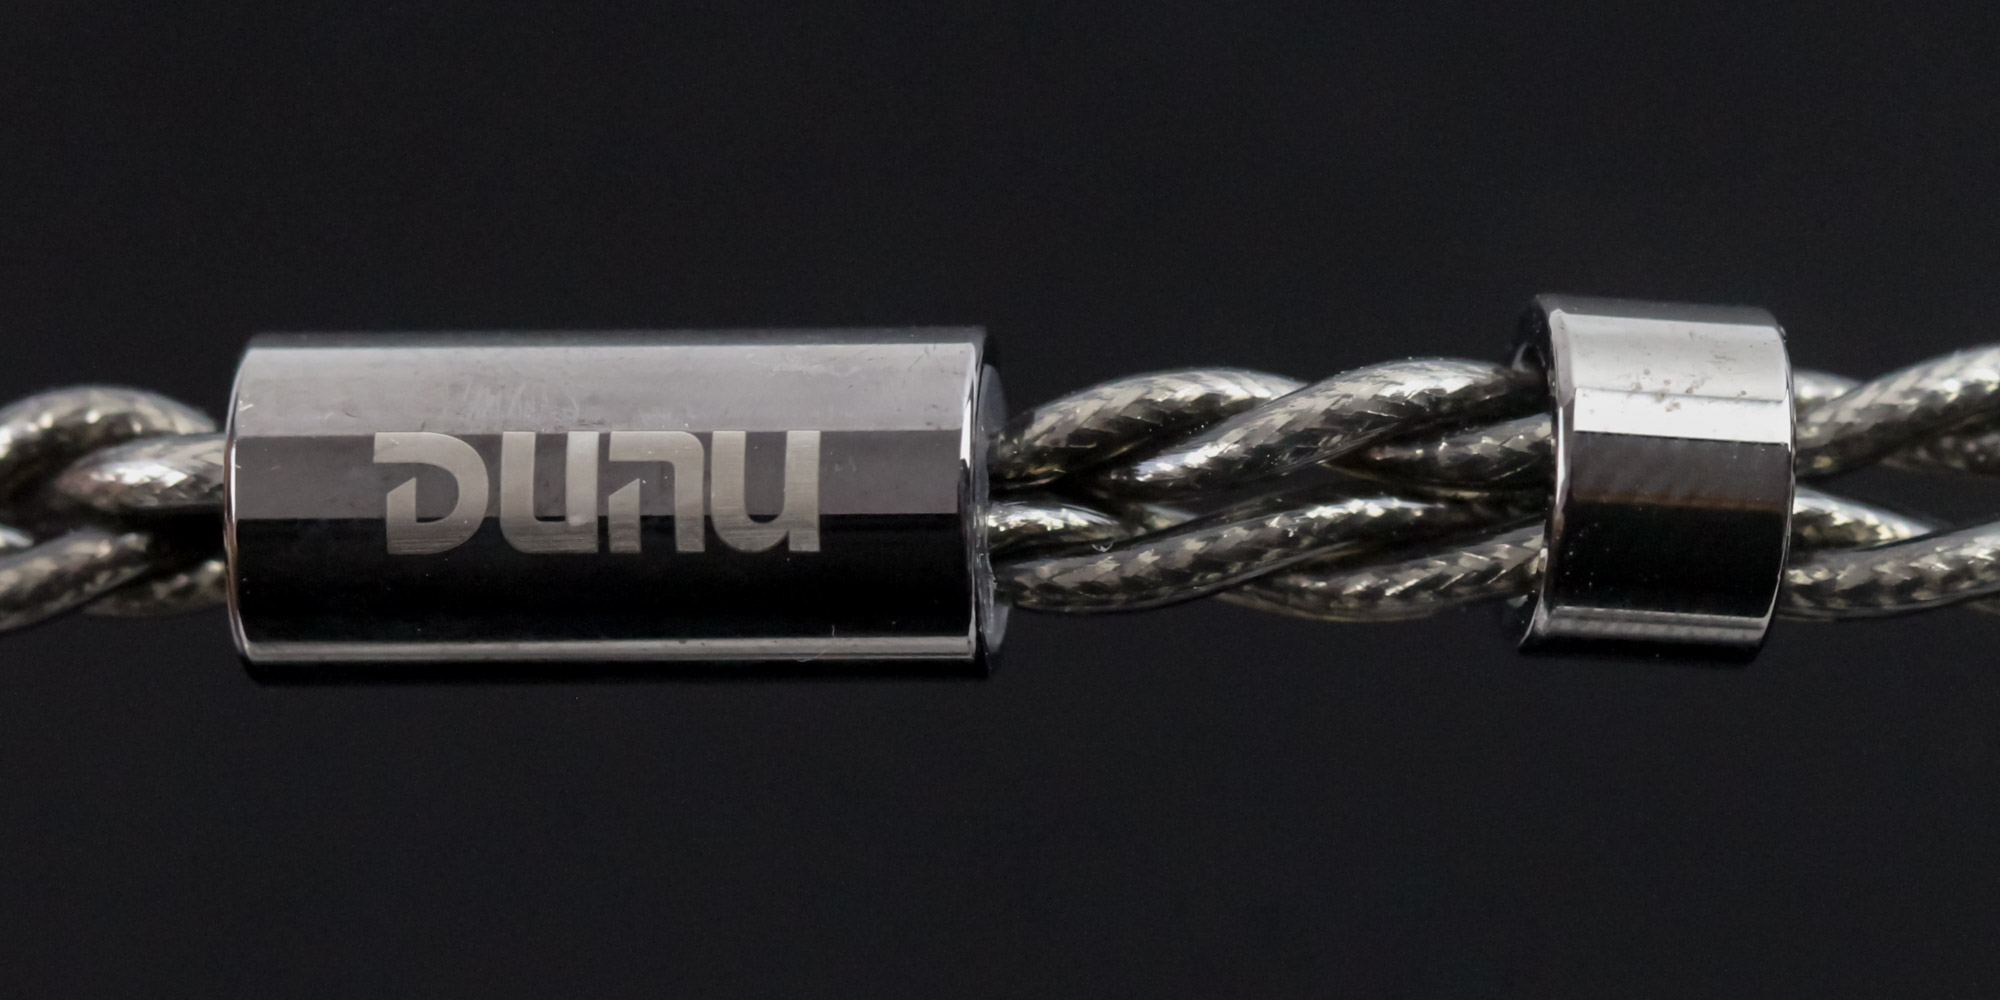
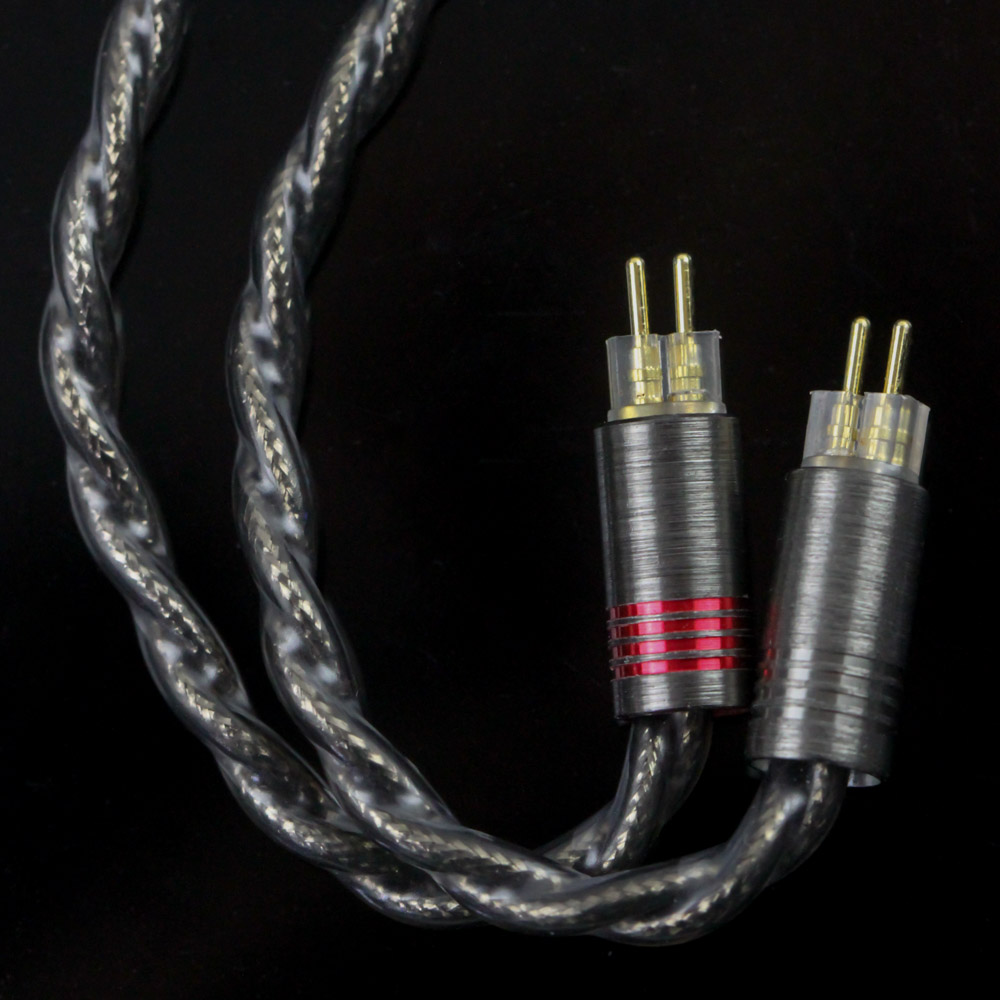
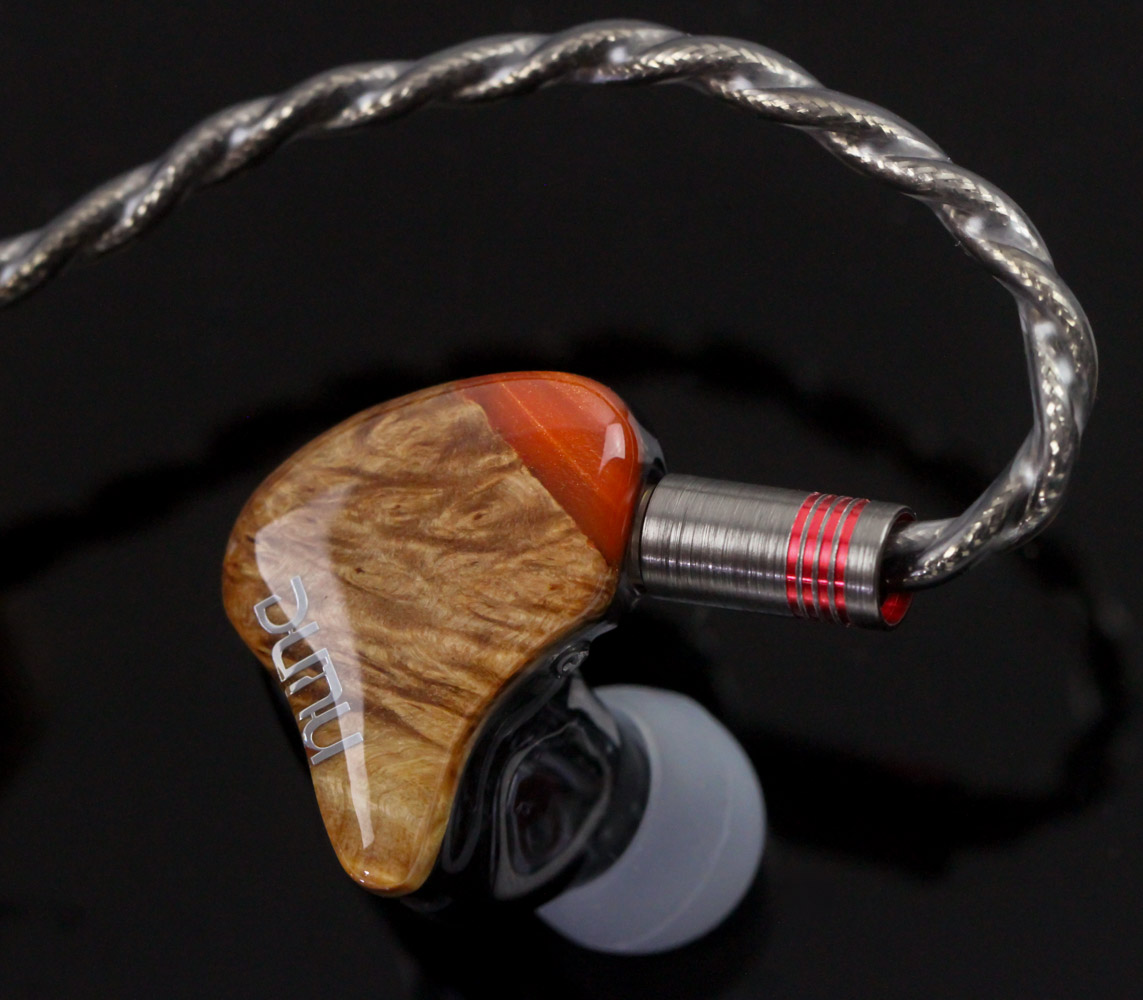
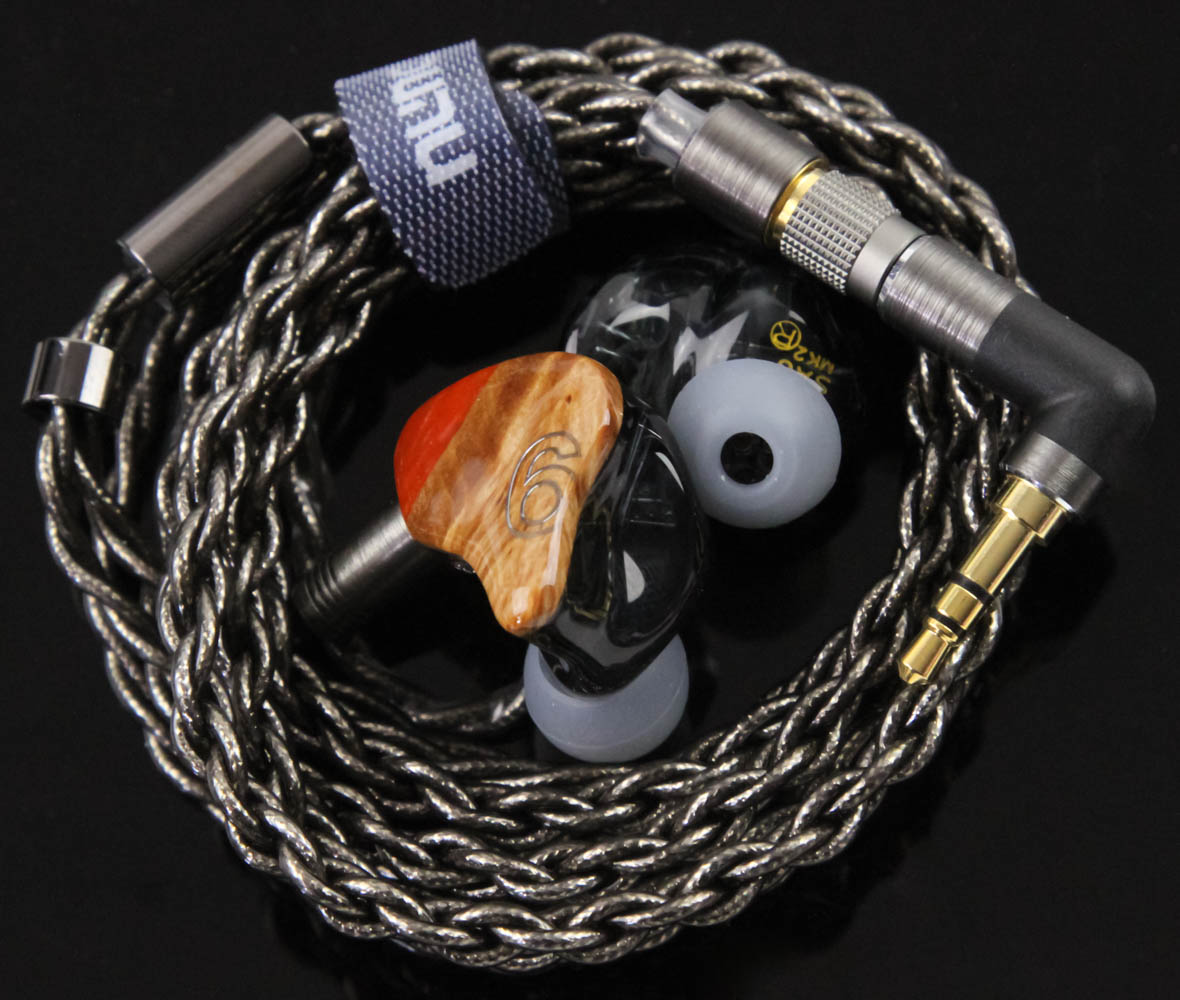
The DUNU SA6 MK2 ships with the brand's new Hulk Pro Mini cable which itself sells for $200. You do not get the 2.5 mm balanced connector here though but then again that is quickly going out of fashion to where I don't see that as a big deal. The cable uses DUNU's patented Q-Lock PLUS modular system meaning you can also purchase digital plugs that terminate in Type-C or Lightning connectors as seen here. You can choose between the pre-installed 3.5 mm single-ended connector or the provided 4.4 mm balanced plug, both of which come in a right-angled housing and install in a secure manner, unlike the friction-fit modular connections in many cables prevalent these days that can become somewhat loose over time. The cable itself uses the excellent Furukawa high purity monocrystalline copper conductor in a quad-strand configuration with aluminium foil shielding on each strand. The individual wire diameter is 26 AWG and the net result is a relatively light and supple cable with no microphonics that is also very easy to re-shape and does not hold any kinks. The dark brown/gunmetal color scheme is also nice and we see the trend continue with the metal housings throughout, including with a functional splitter and cable cinch. There are pre-formed ear hooks on the other end and the cable terminates in two 0.78 mm 2-pin connectors for the IEMs. The housings here are meant for recessed connectors on the IEM shells and have red rings on one side to help identify the right channel. All the metal plugs are gold-plated for oxidation resistance.

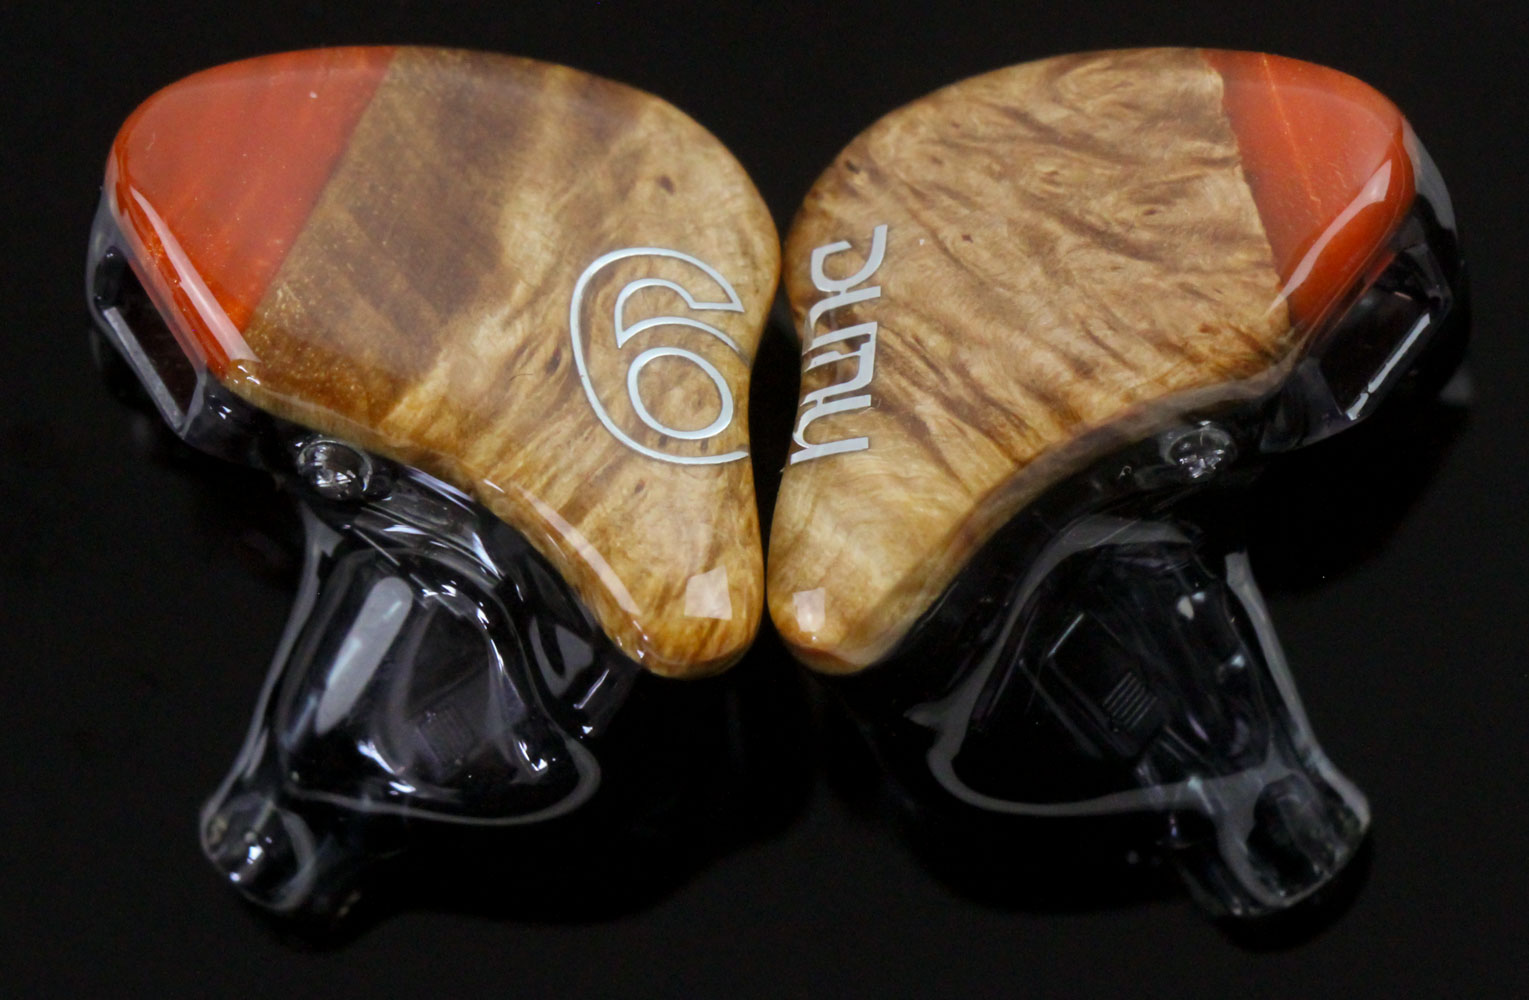
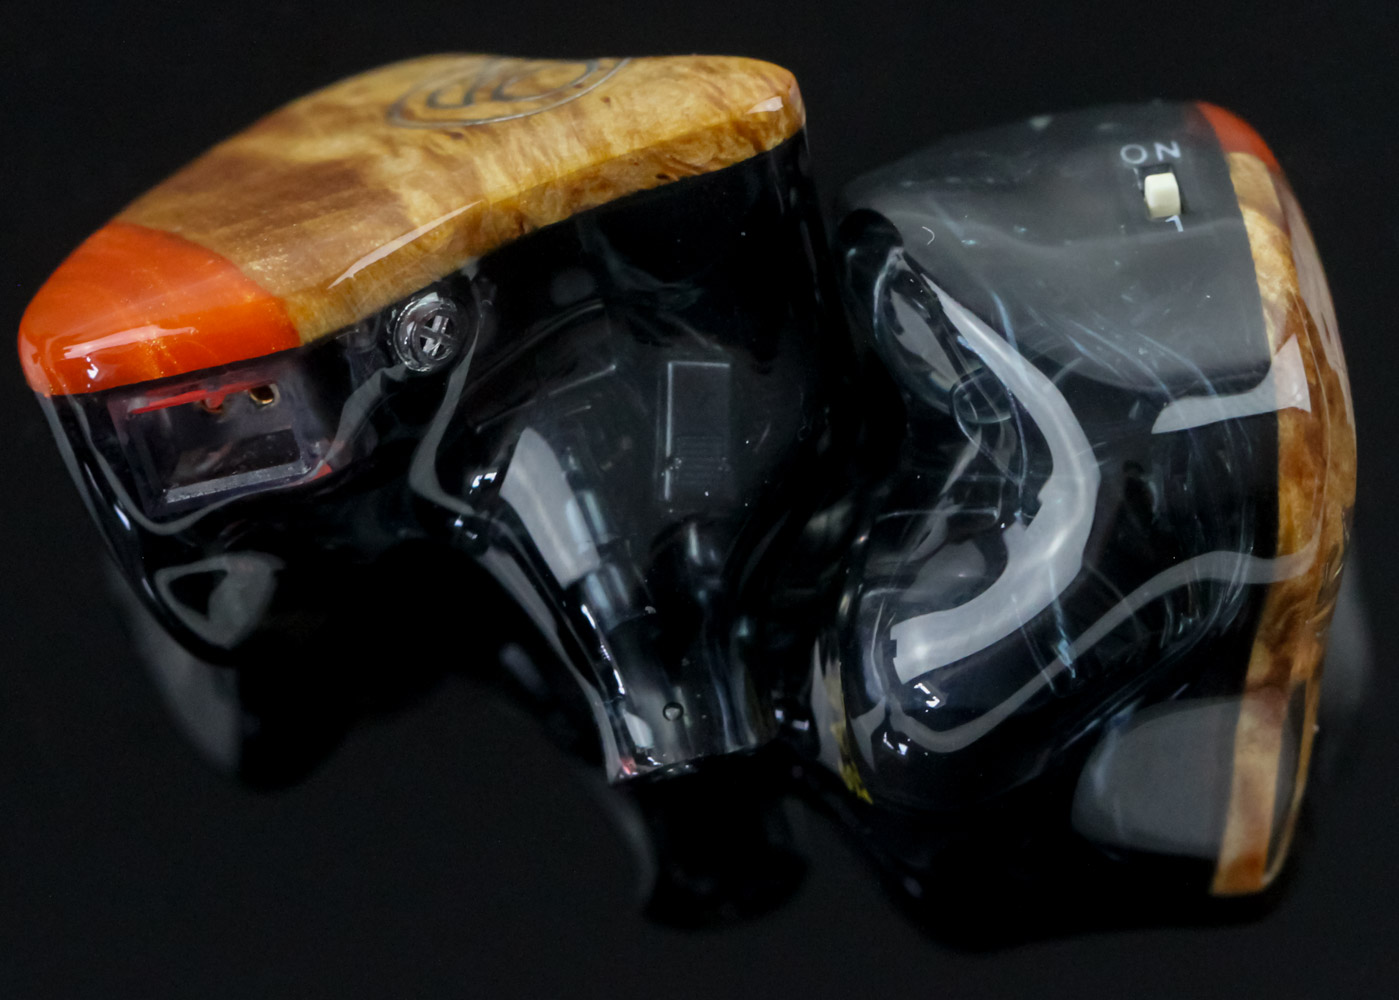
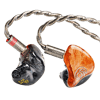
Now we get to the IEMs finally and I'd say the wait for the DUNU SA6 MK2 was worth it. The original SA6 used stabilized wood in different colors to where you did not have much control over what you would get except to rely on the person assembling the IEMs to try and pair them up well. With the new SA6 MK2, DUNU has gone with birch wood throughout, albeit even here there are some variables since the materials include not only the bark but also burls and any nodules present. As such, the texture and color of the wood will likely still vary even though overall they are more likely to be similar than different. Some resin is also added to the wood grain as part of the stabilization and wood slicing process which results in the orange section you see in addition to the stabilized wood itself. These face plates are glued neatly to German resin shells that get a smoky black color making them translucent to the naked eye. I personally think this set looks gorgeous but your mileage may vary.

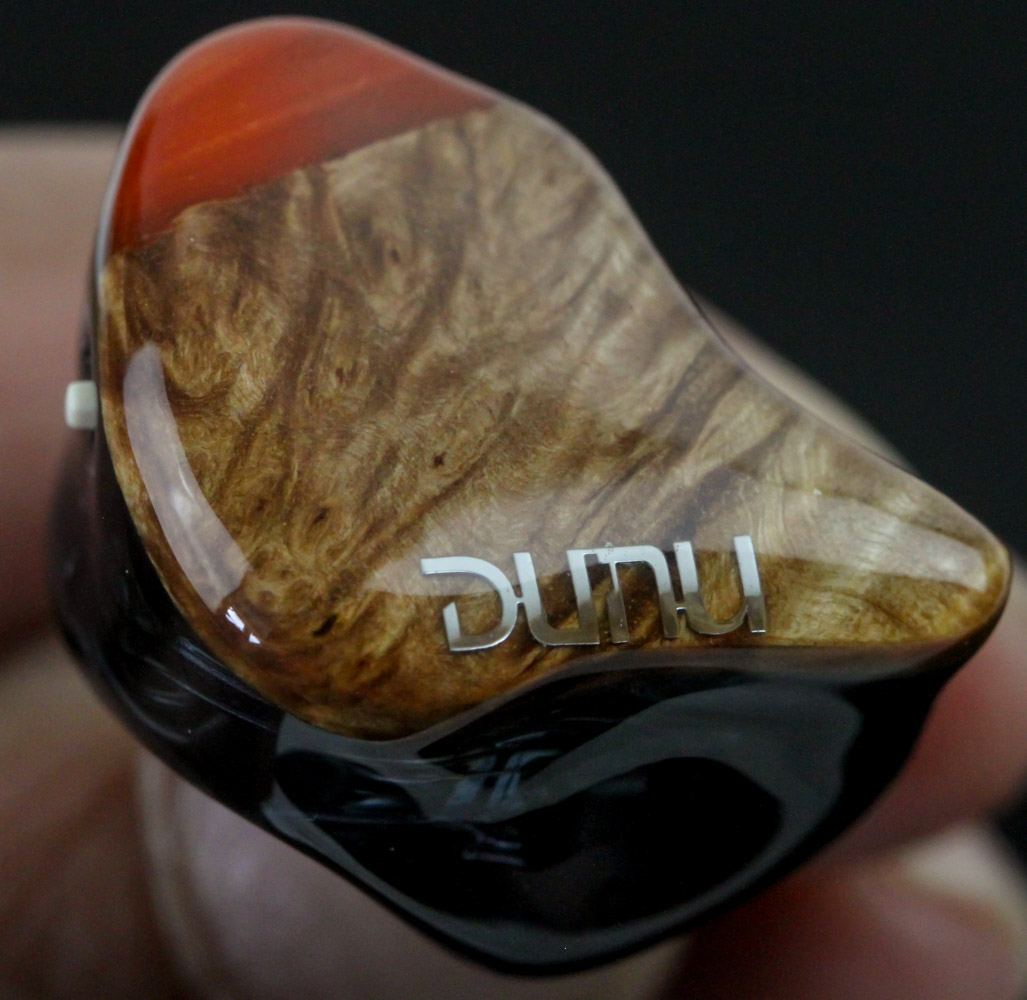
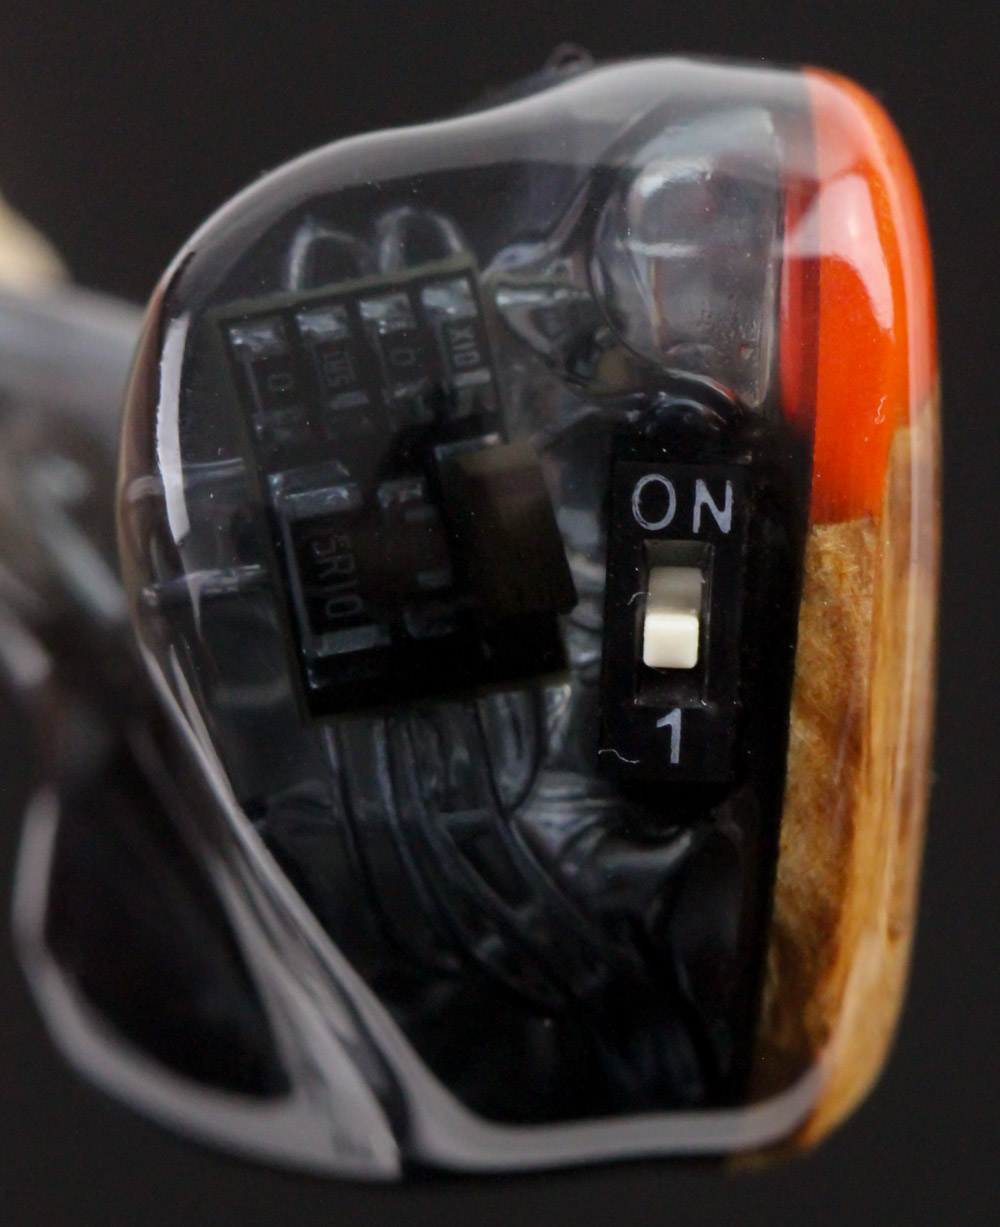
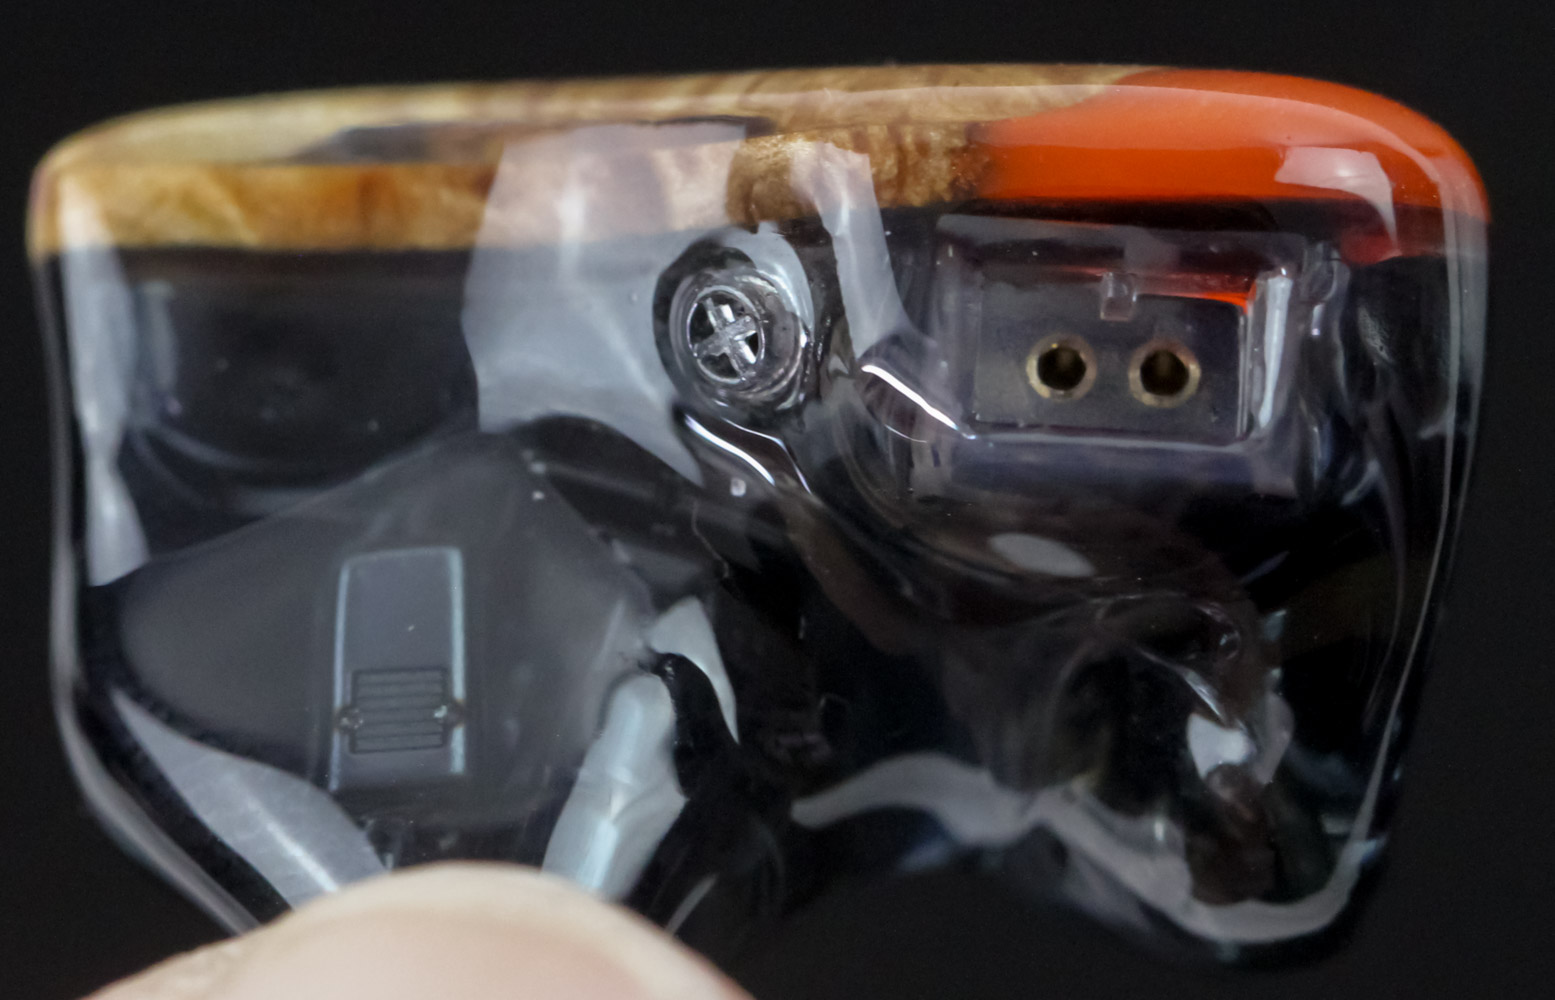
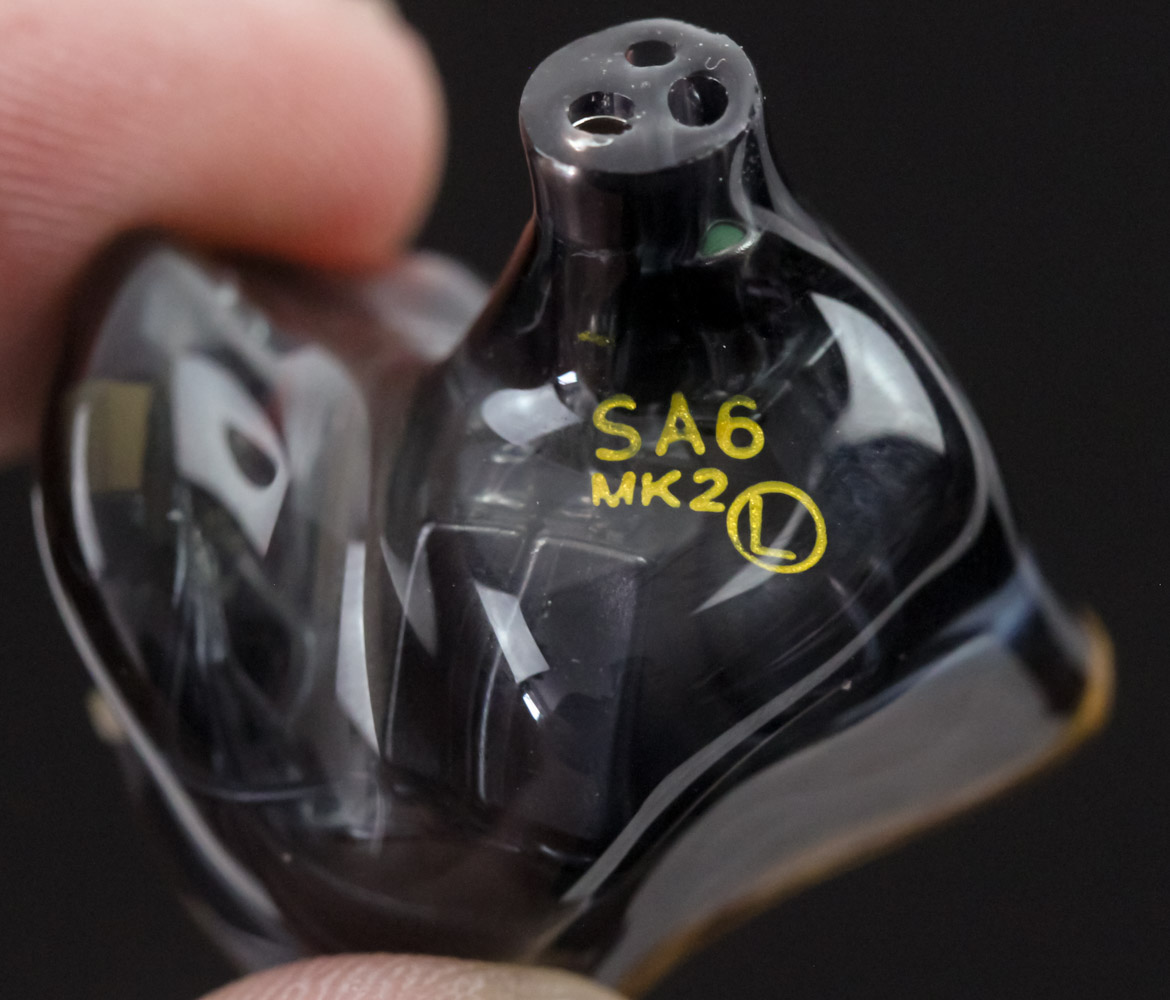
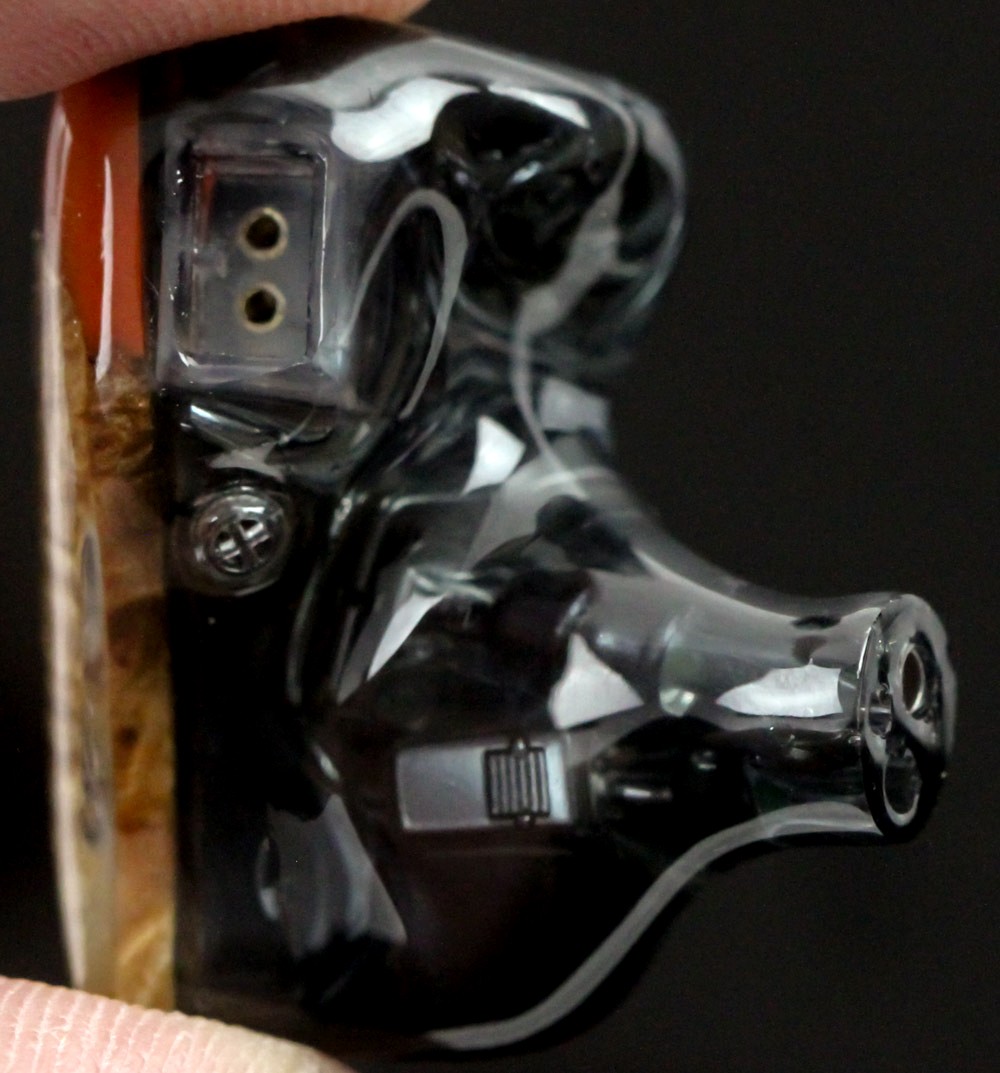
A closer look at the face plates show the more aggressive design used here with a much broader top that leads to a sharper bottom section. This is similar to what we find on custom-fit IEMs that follow the concha shape as you can see here and here. In practice, it's not as custom in that the overall ergonomic shape is still safe enough to fit most people well. The indent on the top side that is supposed to fit between the concha and antihelix might be an issue for some though. No matter how your specific face plates will look, there will still be a DUNU and 6 applique on the sides of the face plates for branding. The translucent shells allow for a sneak peek at the components inside and the resin used enables a cutout for the physical switch on the side enabling two different tuning modes. I can't get over the On/1 markings here though even if I've seen the same used on other DUNU IEMs—why not On/Off or 0/1 instead, especially when 1 is usually seen as on in such depictions? The other side has the expected recessed 2-pin connector with a clean notch on the top to where only specific connector housings will fit through. Next to it is a vent used for the vented woofer drivers here in case you were wondering why this all-BA set requires a vent. There are L/R markings on the inner side should you need them and the nozzle itself is relatively shallow and easy going with a gentle insertion depth and angle alike to where the ~6 mm diameter isn't as big a detriment as the number itself suggests. There are three openings in the nozzle for the acoustic tubes to feed into your ear canals and we do not find any filters/meshes otherwise.
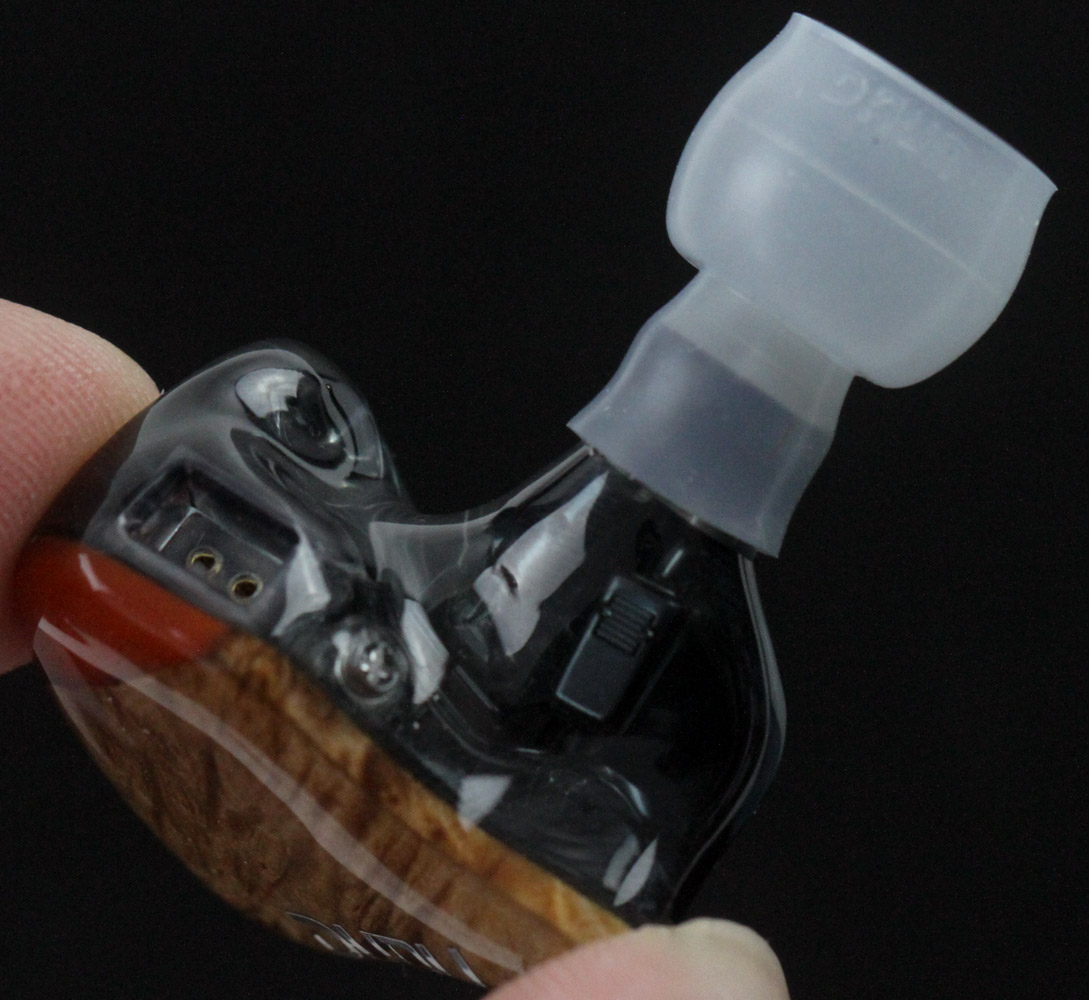

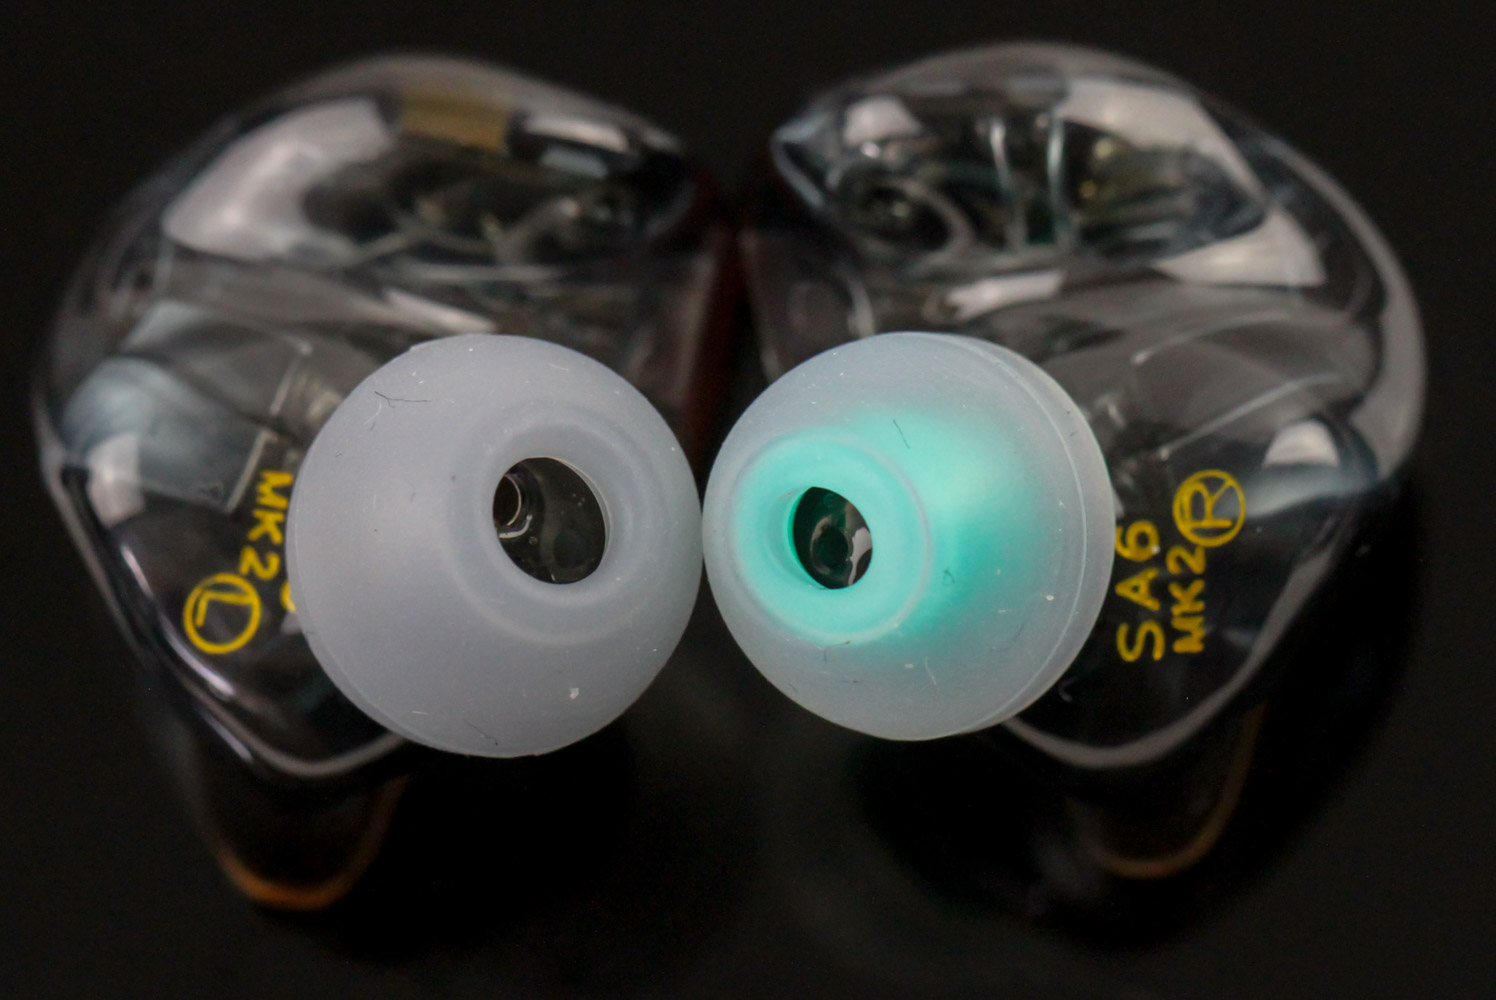
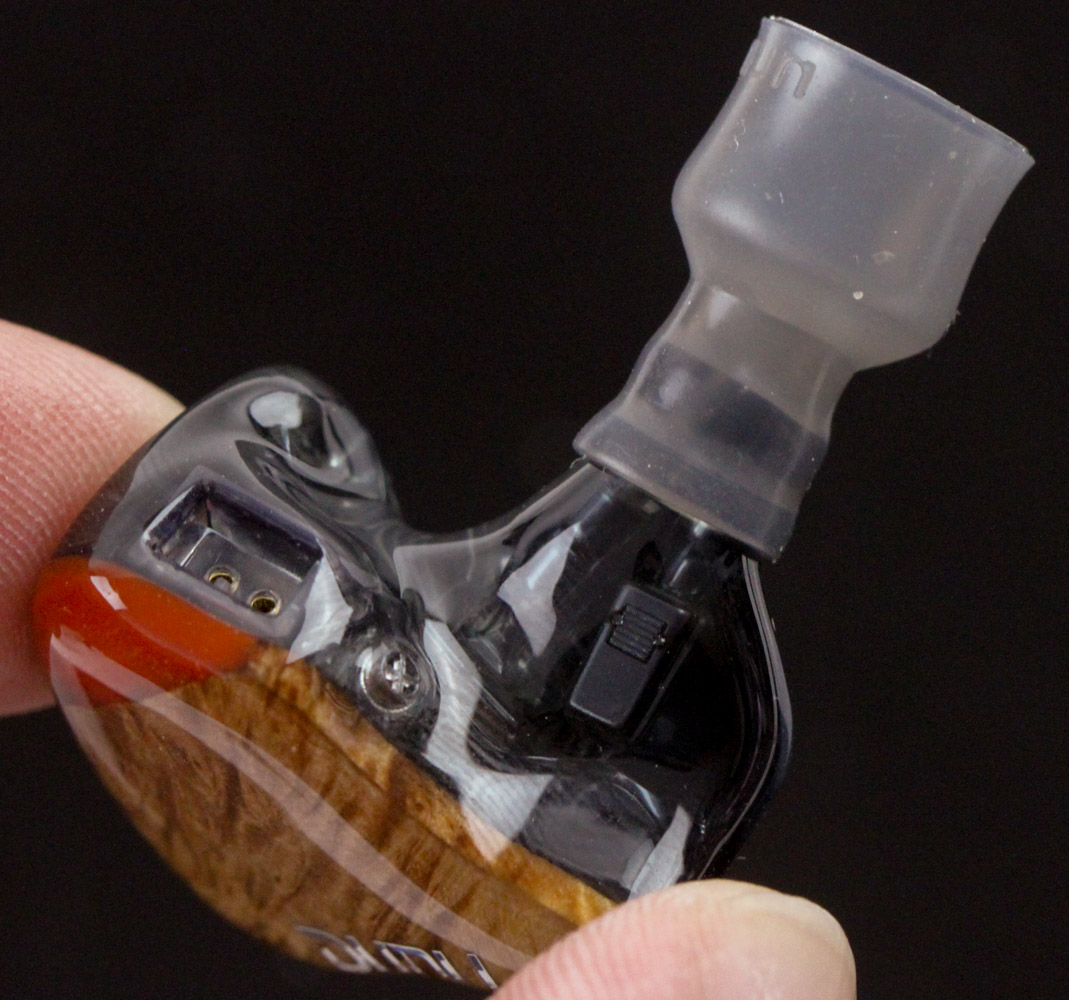
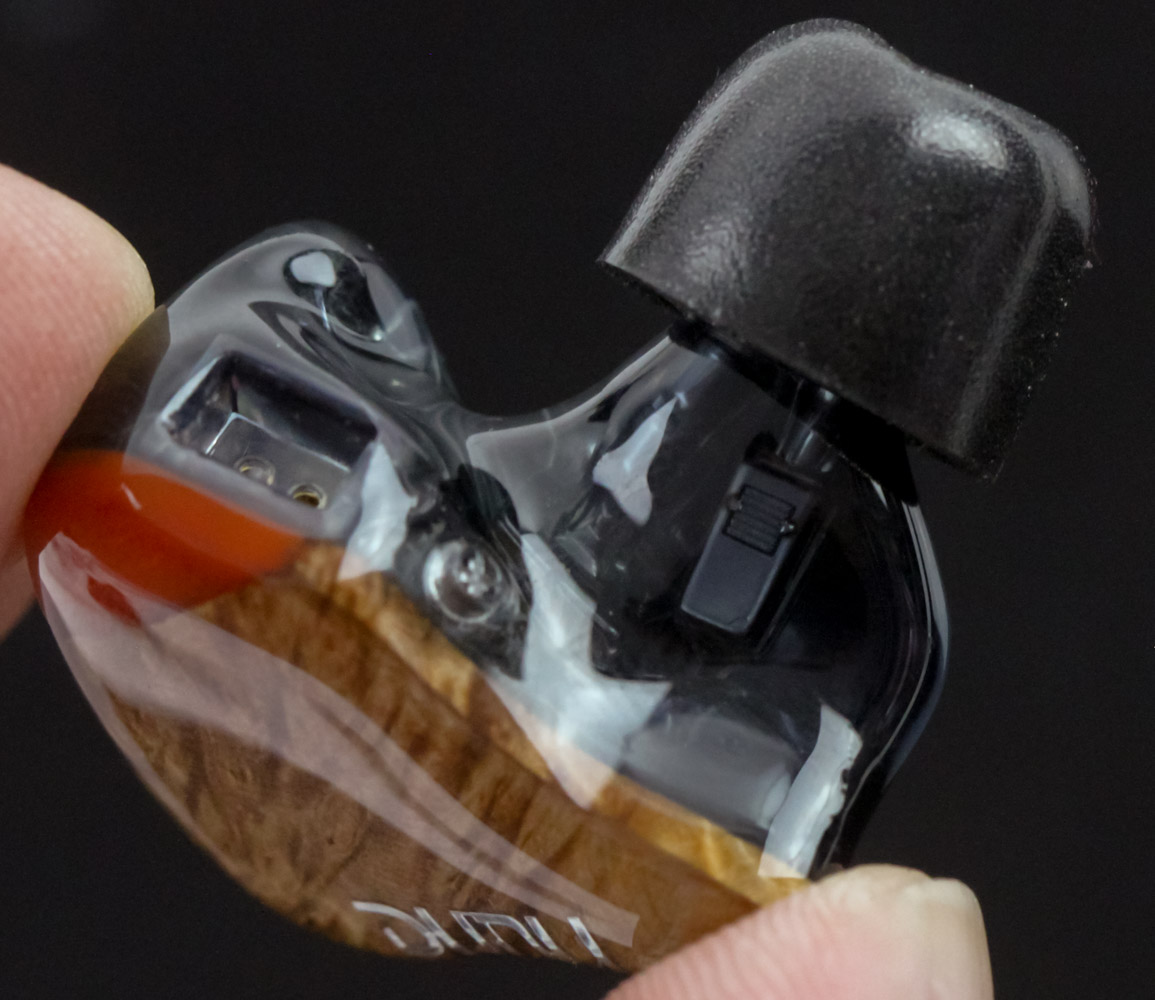
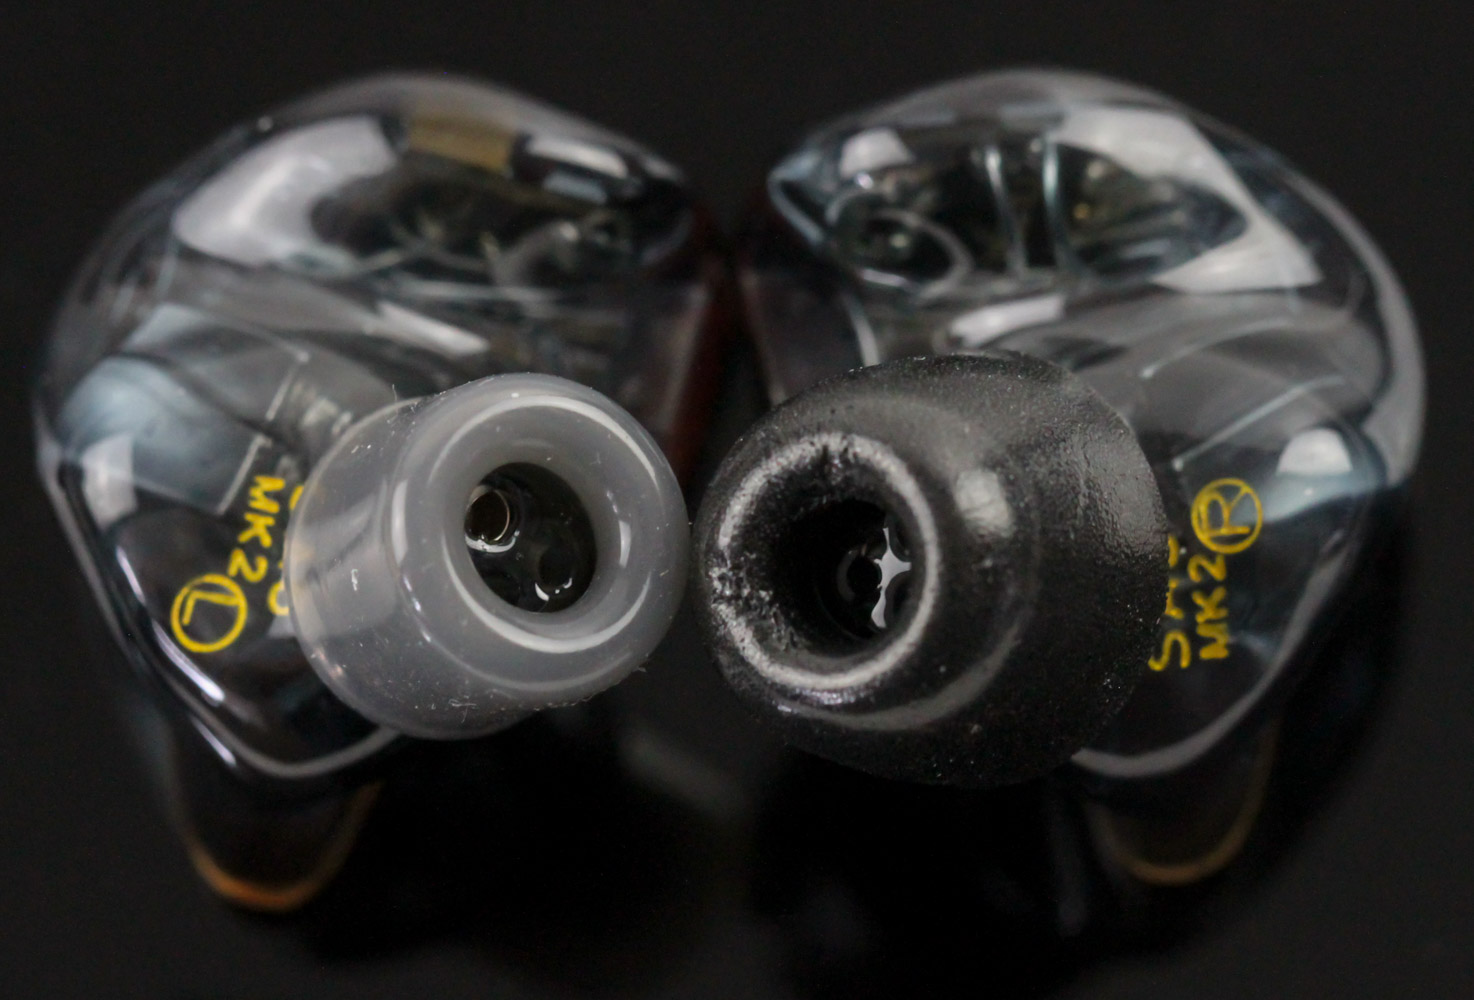
Fitting the different ear tips will require you to slightly stretch the inner bore to fit over the nozzle before pushing them in and going around to ensure they are not at an angle. There isn't a defined end point or notch in the nozzle so you effectively stop when the bore of the ear tips runs out of expansion room. Seen above are each of the included size M silicone and foam ear tips installed on the DUNU SA6 MK2. Try out the various tips and sizes, and keep in mind that both ear canals won't necessarily have the best seal with the same size or set, either.

Regardless of which tips you pick, the next step is to connect the cable by carefully identifying the matching channels and orienting the ear hooks around your ear when connecting the IEMs. Doing so is simple as you simply push the 2-pin connectors in place and they remain there via a friction fit. The recessed connectors in the shells helps further by avoiding any unnecessary extension on the cables too. The 3.5 mm—or 4.4 mm if you go that route—connection then goes to a source with the equivalent output, and I found myself using this set on the go mostly paired with the excellent Questyle M15 or the Qudelix-5K.
Mar 11th, 2025 12:36 EDT
change timezone
Latest GPU Drivers
New Forum Posts
- Have you got pie today? (16628)
- Nvidia's GPU market share hits 90% in Q4 2024 (gets closer to full monopoly) (835)
- WCG Daily Numbers (12792)
- Post your Old CDs, from back in the day thread. (32)
- TPU's Rosetta Milestones and Daily Pie Thread (2240)
- I'm looking for a good tool to make the 3D scanning of my mini-pc using the photogrammetry and my Kinect 2. (56)
- Folding Pie and Milestones!! (9415)
- RTX 5090 ridiculous price! (201)
- The TPU UK Clubhouse (25865)
- B550 phantom Gaming ITX/AX bios problem. (19)
Popular Reviews
- Sapphire Radeon RX 9070 XT Nitro+ Review - Beating NVIDIA
- XFX Radeon RX 9070 XT Mercury OC Magnetic Air Review
- ASUS Radeon RX 9070 TUF OC Review
- AMD Ryzen 9 9950X3D Review - Great for Gaming and Productivity
- MSI MAG B850 Tomahawk Max Wi-Fi Review
- NVIDIA GeForce RTX 5070 Founders Edition Review
- Corsair Vengeance RGB CUDIMM DDR5-8800 48 GB CL42 Review
- AMD Ryzen 7 9800X3D Review - The Best Gaming Processor
- ASUS GeForce RTX 5070 Ti TUF OC Review
- MSI GeForce RTX 5070 Ti Gaming Trio OC+ Review
Controversial News Posts
- NVIDIA GeForce RTX 50 Cards Spotted with Missing ROPs, NVIDIA Confirms the Issue, Multiple Vendors Affected (513)
- AMD Radeon RX 9070 and 9070 XT Listed On Amazon - One Buyer Snags a Unit (261)
- AMD RDNA 4 and Radeon RX 9070 Series Unveiled: $549 & $599 (260)
- AMD Mentions Sub-$700 Pricing for Radeon RX 9070 GPU Series, Looks Like NV Minus $50 Again (248)
- NVIDIA Investigates GeForce RTX 50 Series "Blackwell" Black Screen and BSOD Issues (244)
- AMD Radeon RX 9070 and 9070 XT Official Performance Metrics Leaked, +42% 4K Performance Over Radeon RX 7900 GRE (195)
- AMD Radeon RX 9070-series Pricing Leaks Courtesy of MicroCenter (158)
- AMD Radeon RX 9070 XT Could Get a 32 GB GDDR6 Upgrade (100)