 26
26
Fractal Design Define 7 Nano Review
Thermal Stress Test »Review System
| System Parts for Case Reviews | |
|---|---|
| Processor: | Intel Core i5-12600K Provided by: Intel |
| Motherboards: | ATX: ASUS ROG Strix Z690-E Gaming WiFi mATX: ASUS TUF Gaming B660M-PLUS WiFi D4 ITX: ASUS ROG STRIX Z690-I Gaming WiFi Provided by: ASUS |
| Graphics Card: | Gigabyte Radeon RX 6600 Eagle Provided by: Gigabyte ZOTAC GAMING GeForce RTX 3060 Ti Twin Edge OC Provided by: Zotac |
| Memory: | 32 GB XPG LANCER RGB DDR5 6000 MHz 32 GB XPG CASTER DDR5 6400 MHz 32 GB XPG HUNTER DDR5 5200 MHz Provided by: ADATA |
| HDD: | Toshiba MG08ADA400E 7200 RPM SATA III Provided by: Toshiba |
| SSD: | ATX:XPG GAMMIX S70 BLADE 1 TB mATX: ADATA LEGEND 840 512 GB ITX: XPG SPECTRIX S20G 500 GB ADATA Ultimate SU800 512 GB ADATA Ultimate SU720 500 GB Provided by: ADATA |
| Power Supply: | ATX: Fractal Design ION+ 650W 80 Plus Gold SFX: Fractal Design ION SFX-L 650W 80 Plus Gold Provided by: Fractal Design |
| Cooling: | be quiet! Pure Loop 120/240/280/360 Provided by: be quiet! |
Assembly

Installing the motherboard is quite easy thanks to the removable top cover. It is held in place by traditional screws and spacers. As you can see, the board is right up against the top edge with no cable management possibilites. Fractal does provide an opening on the top left corner of the board, but that is too small to route CPU power cables past the bulky heatsink of the ASUS board. To do so, we had to unscrew the board and pre-route the wires, which is not an ideal scenario.


Adding 2.5" drives may be done by either screwing them down to the 3.5" trays or utilizing the 2.5" plates in the same fashion. Once in place, simply put it back where you found them or screw it down on the shroud to show them off to curious onlookers. By rotating the tray 90° you can fit that second drive above it easily.


3.5" drives require you to use the separately included rubber rings by screwing the drive into them as an anti-vibration measure. The new tray allows for a 2.5" drive to be installed underneath the 3.5" variant, which bring the total storage capability of the Define 7 Nano to four out of the box (not counting the 5th mentioned ones in the marketing materials)

For the PSU, attach the plate to it and slide it into the Define 7 Compact through the rear. This is an easy and straightforward process. Due to the width of the chassis, it is nicely tugged away with space for cable routing.
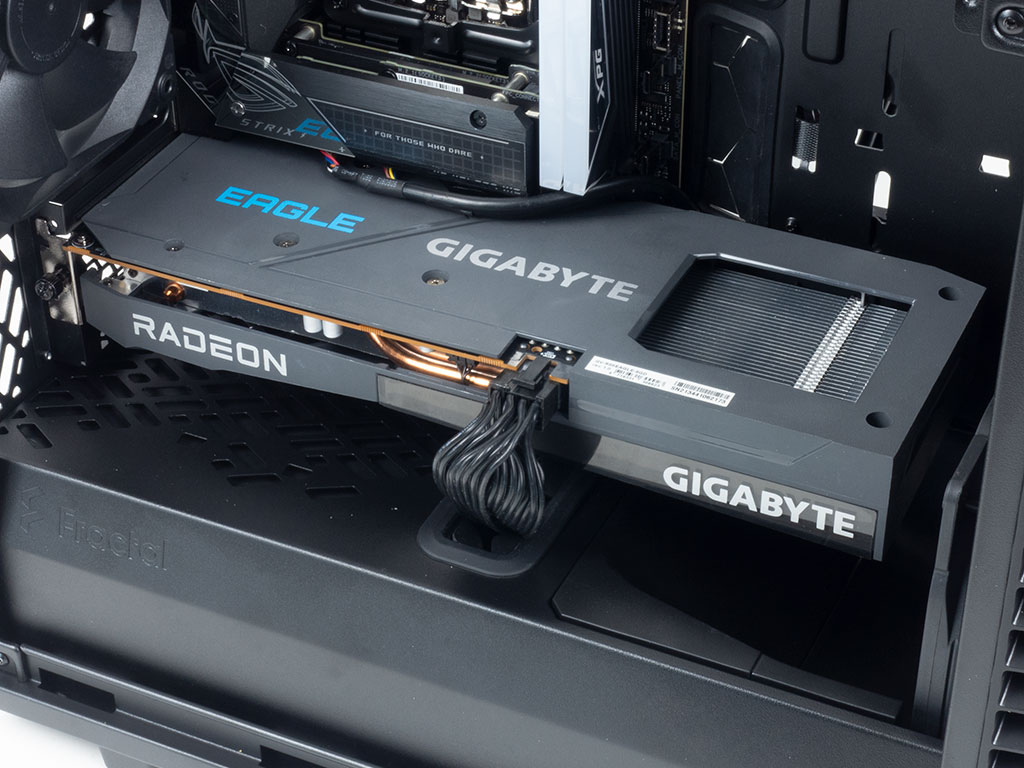
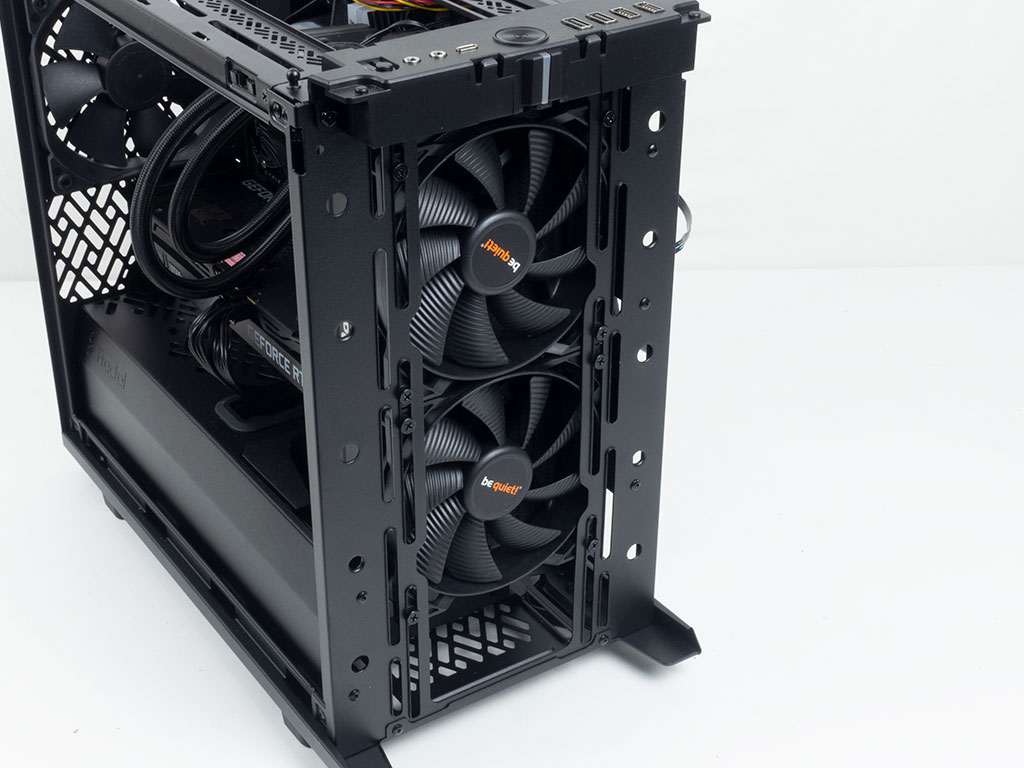
Installing the Gigabyte RX 6600 Eagle with its 285 mm length worked just fine initially as the AIO wasn't in place yet. As soon as the liquid cooler was installed, we had to revert to the the shorter Zotac 3060 Ti instead to make it all fit. Considering all the SFF cases out there, this limits you to having to choose between potent cooling or a long, performant GPU.


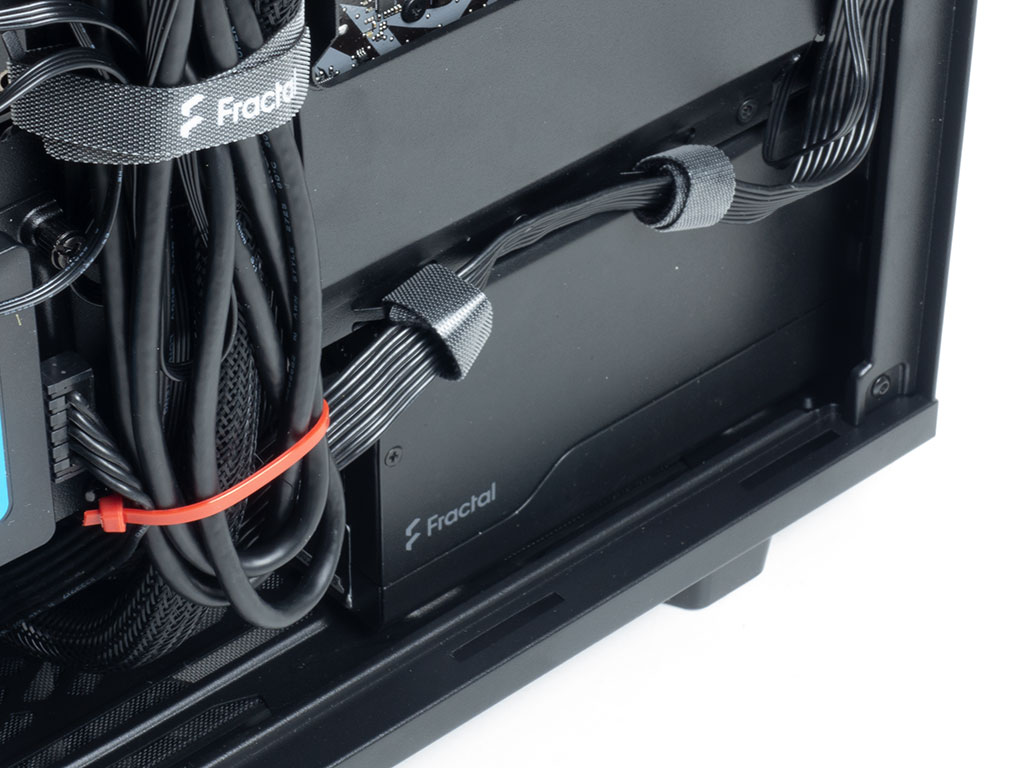
With everything installed, the chassis makes a pretty clean impression. There are wired going to the center of the board above the GPU because ASUS has opted for some unique stacked PCB design, but that is by no means Fractal Design's fault. In the rear all the wires are kept in an orderly fashion nicely thanks to the Velcro strips and we only had to use a single zip tie to keep some slack bunched up.
Finished Looks

Once turned on, it becomes apparent that the Define series still goes for the understated as much as possible. A white LED that lights up in the center of the front to let you know everything is up and running is the only lighting element specific to the Define 7 Nano.


You can clearly see the RGB elements through the clear window. In the rear, everything is where you would expect it in a modern chassis.
Jan 27th, 2025 21:18 EST
change timezone
Latest GPU Drivers
New Forum Posts
- Anime Nation (12982)
- NVIDIA RTX owners only - your opinion on DLSS 2.0 Image quality (404)
- Windows 11 General Discussion (5642)
- What DLSS/FSR Upscaling Mode do you use? (210)
- Gigabyte 5090 Aorus Master VRM Specs (1)
- BIOS for "Rx580 JieShuo" chip 215-0876406 (7)
- E-Waste laptop repair adventures. (6)
- Testing max ram overclock pn Ryzen 1700 (20)
- High CPU utilization in RDR2. ¿Is this normal? (0)
- Acer Predator AG3-710 to run Windows 11 (2)
Popular Reviews
- NVIDIA GeForce RTX 5090 Founders Edition Review - The New Flagship
- ASUS GeForce RTX 5090 Astral OC Review - Astronomical Premium
- MSI GeForce RTX 5090 Suprim Liquid SOC Review
- MSI GeForce RTX 5090 Suprim SOC Review
- NVIDIA GeForce RTX 5090 PCI-Express Scaling
- Palit GeForce RTX 5090 GameRock Review
- NVIDIA DLSS 4 Transformer Review - Better Image Quality for Everyone
- AMD Ryzen 7 9800X3D Review - The Best Gaming Processor
- KLEVV URBANE V DDR5-7600 32 GB CL36 Review
- XFX Radeon RX 7900 XTX Magnetic Air Review
Controversial News Posts
- NVIDIA 2025 International CES Keynote: Liveblog (470)
- AMD Debuts Radeon RX 9070 XT and RX 9070 Powered by RDNA 4, and FSR 4 (349)
- AMD is Taking Time with Radeon RX 9000 to Optimize Software and FSR 4 (239)
- AMD Radeon RX 9070 XT & RX 9070 Custom Models In Stock at European Stores (226)
- NVIDIA GeForce RTX 5090 Features 575 W TDP, RTX 5080 Carries 360 W TDP (217)
- New Leak Reveals NVIDIA RTX 5080 Is Slower Than RTX 4090 (200)
- AMD's Radeon RX 9070 Launch Faces Pricing Hurdles (175)
- Potential RTX 5090 and RTX 5080 Pricing in China Leaks (173)