 6
6
NZXT H210i Review
Value & Conclusion »Test System
| System Parts for Case Reviews | |
|---|---|
| Processor: | Intel Core i7-8600K |
| Motherboards: | ATX: MSI Z370 GAMING PRO CARBON AC MATX: Z370M GAMING PRO CARBON Mini-ITX: MSI Z370i GAMING PRO CARBON Provided by: MSI |
| Graphics Card: | Long: ASUS Radeon RX580 Short: HIS Radeon 5350 HD |
| Memory: | 16 GB XPG Dazzle DDR4 2800 MHz CL17-17-17 1.25 V 32 GB GB XPG SPECTRIX D40 3000 MHz. CL16-18-18 1.35 V 16 GB XPG GAMMIX D10 DDR4 2400 MHz CL16-16-16 1.20 V Provided by: ADATA |
| HDD: | Western Digital 320 GB 7200 RPM |
| SSD: | ADATA XPG SX850 256 GB ADATA Ultimate SU800 3D 256 GB ADATA Ultimate SU700 240 GB Provided by: ADATA |
| Power Supply: | Antec HCG High Current Gamer 650 W 80Plus Gold Antec HCG High Current Gamer 850 W 80Plus Bronze Provided by: Antec |
| Cooling: | be quiet! Dark Rock 4 be quiet! Dark Rock Slim be quiet! Shadow Rock LP Provided by: Thermaltake |
Assembly

Installing a motherboard within the H210i is done by traditional means, using the pre-installed spacers and supplied screws. While there is plenty of space on the side and bottom of the motherboard to get to leads, things are a bit tight at the top edge, so reaching the CPU power socket on an ITX board will proof a bit of a challenge, especially if you go for bulky air cooling. This is simply due to the fact that NZXT has chosen to install both 120 mm fans in this area of the case.


Adding an SSD in the front is easily done by popping the plastic frame out and screwing down a drive of our choice. Once secured, simply snap it back into place. There is an opening behind the vertical metal cover, so you will be able to route both power and data leads really nicely.

Adding a PSU bears no surprises as you simply slide it into place and screw it down from outside of the chassis. There is plenty of space for longer units, especially if you don't need the 3.5" hard-drive placement.
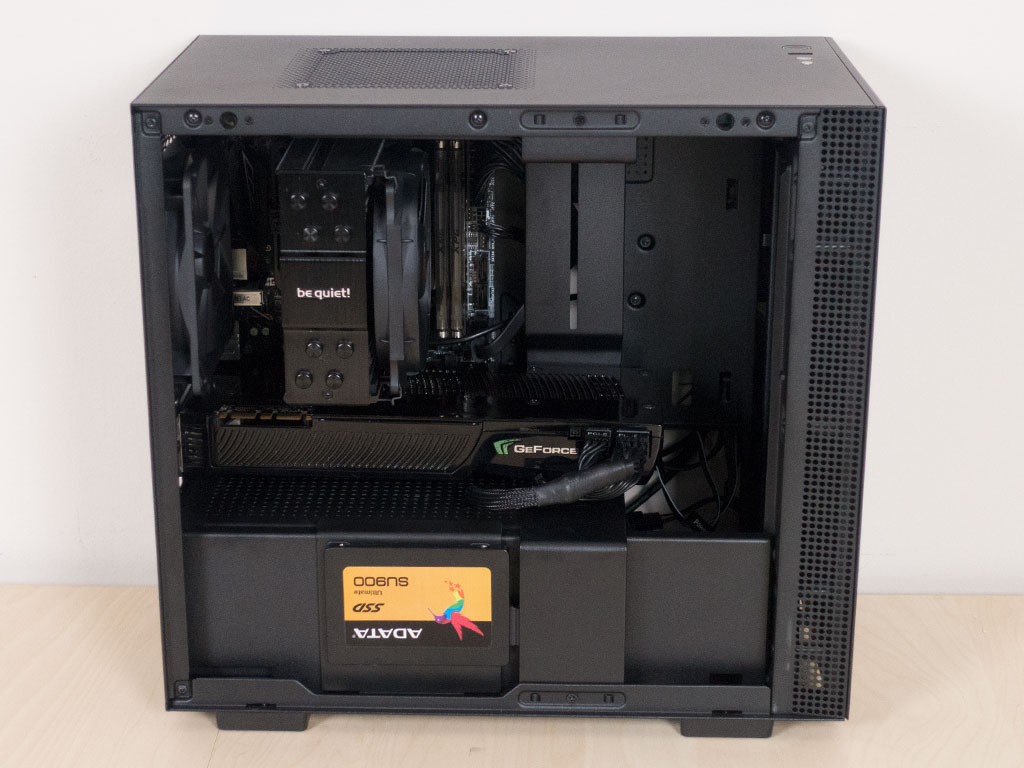
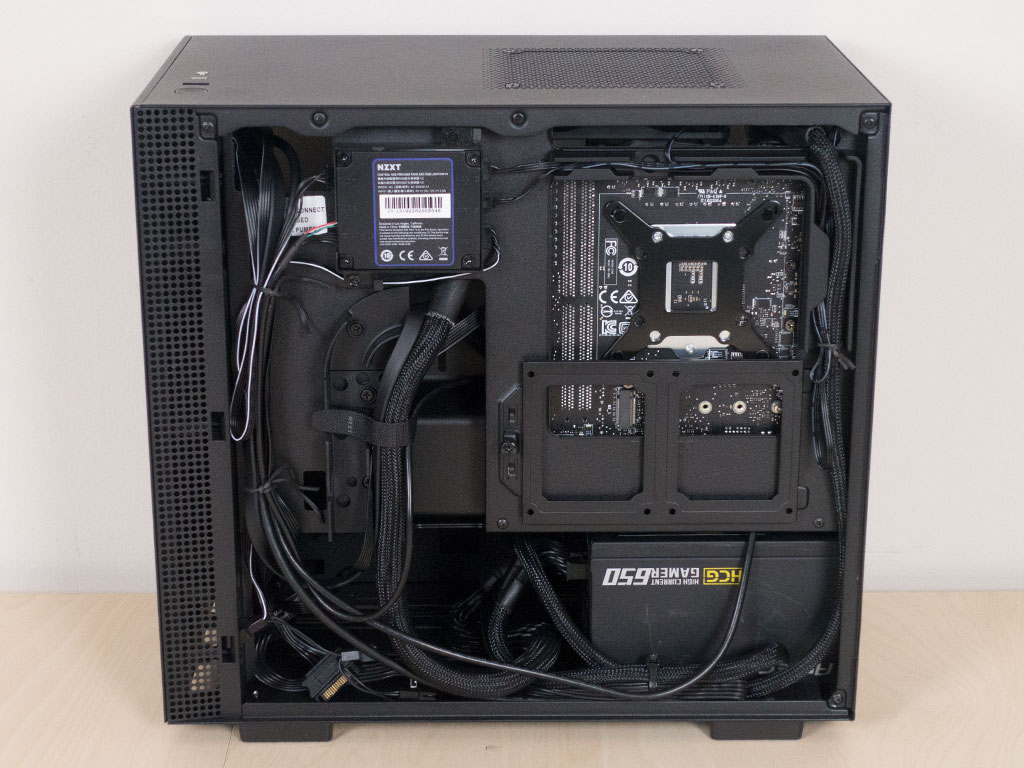
With everything installed, the interior of the H210i is fairly clean. The large opening of the shroud in the front makes it a little harder to really keep everything from view, but once you install the solid panel, these black leads should just blend right into the rest of the black chassis. Behind the motherboard tray, I tried using the cable channels for the major cables, while keeping the secondary ones off to the side. This makes things easy to upgrade and as tidy as possible. The channels really help with pinning down the ATX, GPU, and CPU power cables.
Finished Looks


Once the panels are put back into place and the system is turned on, the NZXT H210i manages to flaunt its clean design perfectly while showing off all the important hardware. While most of the installed parts don't come with embedded LEDs, the built-in strip lights everything up well. Naturally, the clear side window helps as well. A white LED lights up around the power button to let you know that the system is up and running.


When viewing the side, you can clearly see the components within the case, and the SSD is perfectly presented as well. There is plenty of space in the front of the chassis—those wanting to go for liquid cooling should run into no issues, such as having to really limit your GPU length. In the rear, everything is where you would expect it, with the PSU cable on the bottom and the GPU at mid-level. No surprises here as the internal layout of the H210i stays true to the trusted and traditional approach.
Mar 25th, 2025 09:45 EDT
change timezone
Latest GPU Drivers
New Forum Posts
- Issues with RTX4090 FE waterblock (Bitspower) (1)
- Is Whatsapp backup broken for anyone else? (1)
- maxsun rx590* vbios (1)
- RX 9070 availability (228)
- need help fixing a fake gt730 (1)
- Dicasver RTX 3060 6gb (1)
- Black screen of death W11 (11)
- Dataland Rx5700XT Fan spin at low rpm (12)
- The TPU UK Clubhouse (25946)
- Question about Intel Optane SSDs (43)
Popular Reviews
- Assassin's Creed Shadows Performance Benchmark Review - 30 GPUs Compared
- be quiet! Pure Rock Pro 3 Black Review
- ASUS ProArt X870E-Creator Wi-Fi Review
- ASRock Radeon RX 9070 XT Taichi OC Review - Excellent Cooling
- Sapphire Radeon RX 9070 XT Nitro+ Review - Beating NVIDIA
- ASUS GeForce RTX 5070 TUF OC Review
- AMD Ryzen 9 9950X3D Review - Great for Gaming and Productivity
- Quick Look: Jelly Key Mystic Snake Artisan Keycaps
- AMD Ryzen 7 9800X3D Review - The Best Gaming Processor
- XFX Radeon RX 9070 XT Mercury OC Magnetic Air Review
Controversial News Posts
- AMD RDNA 4 and Radeon RX 9070 Series Unveiled: $549 & $599 (260)
- AMD Mentions Sub-$700 Pricing for Radeon RX 9070 GPU Series, Looks Like NV Minus $50 Again (250)
- AMD Radeon RX 9070-series Pricing Leaks Courtesy of MicroCenter (158)
- MSI Doesn't Plan Radeon RX 9000 Series GPUs, Skips AMD RDNA 4 Generation Entirely (142)
- Microsoft Introduces Copilot for Gaming (123)
- AMD Radeon RX 9070 XT Reportedly Outperforms RTX 5080 Through Undervolting (118)
- NVIDIA Reportedly Prepares GeForce RTX 5060 and RTX 5060 Ti Unveil Tomorrow (115)
- Over 200,000 Sold Radeon RX 9070 and RX 9070 XT GPUs? AMD Says No Number was Given (99)