 13
13
Thermaltake Tide Water Review
Installation »The Cooler

A metal backside helps make the Tide Water sturdy.

The fittings are attached using these clamps which make the connection VERY secure. I tried to pull them out, but no go.

This small black thing in the middle is the pump. It is very quiet - you can not hear it when the fan is running. Also it does not create any form of vibration.


Heat from the water is transferred to the air via this tiny radiator. It uses a full-copper design and seems to be custom-made for this application. I'm tempted to rip this unit apart and use it as a silent CPU cooler for my Media PC...

Here you can see the fill level indicator and to the left of it the fill cap. In case your water level goes low, you can add additional water here. This will most probably not be needed in the first year of operation. The Tide Water comes prefilled with a maintenance-free coolant which includes anti-rust and anti-freeze additives.

The green reservoir is well sized and has only a tiny bubble of air in it. Its design makes it very hard for air bubbles to remain in the loop - nothing is more annoying than the sound of air bubbles in your watercooling setup.
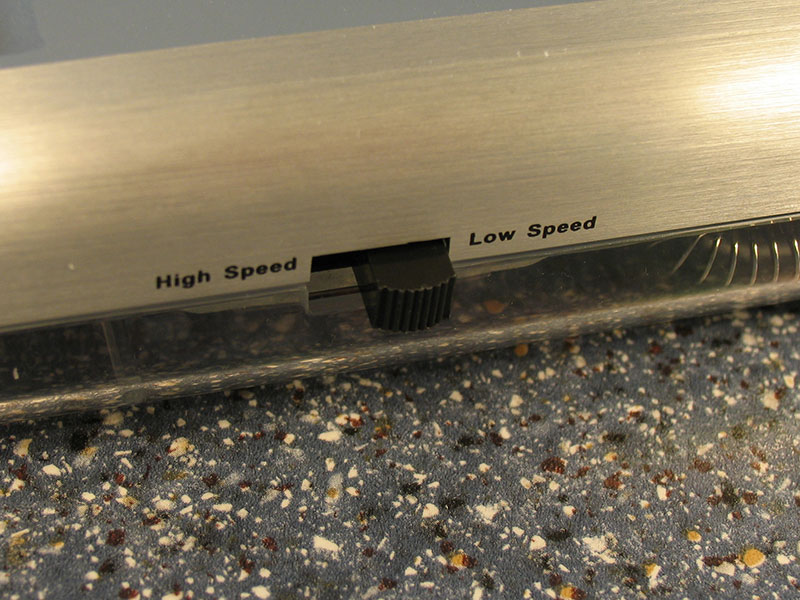
With this switch, located on the top of the Tide Water, you can switch between two fan speeds. Once you close your case this switch is not reachable. It would have made sense to add another switch near the back exhaust, or at least add a two-pin header where you could attach you own switch to.

Hot air is exhausted out of the case via an opening, which is two PCI slots wide.

The cooling fan sucks air in from the case and blows it out via the exhaust on the back.

To supply power to the pump and the fan, you have to connect this plug to an unused 5.25" power connector.
Mar 10th, 2025 06:06 EDT
change timezone
Latest GPU Drivers
New Forum Posts
- RTX 5090 ridiculous price! (194)
- RX 9070 availability (122)
- What is a good real price for the RTX 5090? (17)
- RX 9000 series GPU Owners Club (34)
- BIOS request 10DE:25A2 1043:13DC (8)
- Nvidia's GPU market share hits 90% in Q4 2024 (gets closer to full monopoly) (763)
- As we live the age of game remakes, which game you would like to see to have a remake? (358)
- Help me find bios (1)
- I'm looking for a good tool to make the 3D scanning of my mini-pc using the photogrammetry and my Kinect 2. (37)
- The TPU Darkroom - Digital SLR and Photography Club (4070)
Popular Reviews
- Sapphire Radeon RX 9070 XT Nitro+ Review - Beating NVIDIA
- XFX Radeon RX 9070 XT Mercury OC Magnetic Air Review
- ASUS Radeon RX 9070 TUF OC Review
- MSI MAG B850 Tomahawk Max Wi-Fi Review
- NVIDIA GeForce RTX 5080 Founders Edition Review
- NVIDIA GeForce RTX 5070 Founders Edition Review
- Corsair Vengeance RGB CUDIMM DDR5-8800 48 GB CL42 Review
- AMD Ryzen 7 9800X3D Review - The Best Gaming Processor
- ASUS GeForce RTX 5070 Ti TUF OC Review
- MSI GeForce RTX 5070 Ti Gaming Trio OC+ Review
Controversial News Posts
- NVIDIA GeForce RTX 50 Cards Spotted with Missing ROPs, NVIDIA Confirms the Issue, Multiple Vendors Affected (513)
- AMD Plans Aggressive Price Competition with Radeon RX 9000 Series (277)
- AMD Radeon RX 9070 and 9070 XT Listed On Amazon - One Buyer Snags a Unit (261)
- AMD RDNA 4 and Radeon RX 9070 Series Unveiled: $549 & $599 (260)
- AMD Mentions Sub-$700 Pricing for Radeon RX 9070 GPU Series, Looks Like NV Minus $50 Again (248)
- NVIDIA Investigates GeForce RTX 50 Series "Blackwell" Black Screen and BSOD Issues (244)
- AMD Radeon RX 9070 and 9070 XT Official Performance Metrics Leaked, +42% 4K Performance Over Radeon RX 7900 GRE (195)
- AMD Radeon RX 9070-series Pricing Leaks Courtesy of MicroCenter (158)