 2
2
Vantec NexStar 3 SuperSpeed USB 3.0 Review
Performance »Assembly

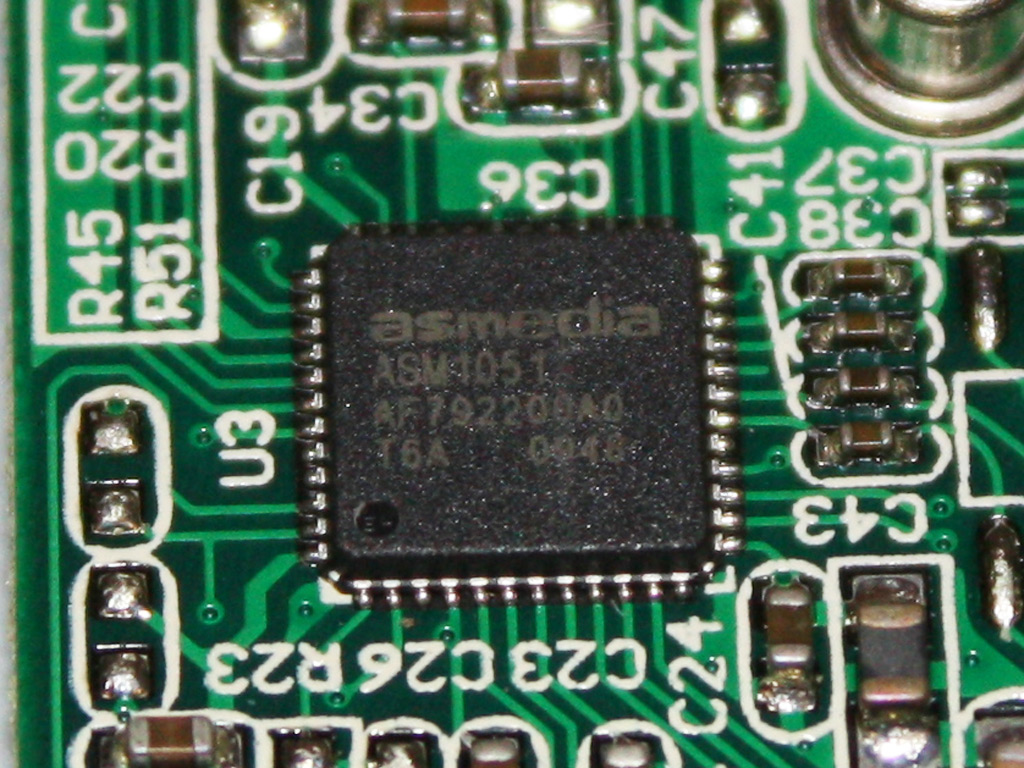
Vantec ships the NexStar 3 SuperSpeed without the rear screws installed, thus the tray can be taken out easily. It will be interesting to see what ICs are used with USB 3.0 enclosures. Vantec has chosen the asmedia ASM1501. You can find additional information about the IC here.


Before you wonder why we are installing a simple 7200 RPM SATA II drive into the enclosure, as such a drive will never push the interface to its limits, the reasons should be rather obvious. First off, the internal interface is SATA II to USB 3.0, thus a SATA III drive is out of the questions. Secondly, using a 2.5 inch SSD is not the intended purpose of the NexStar 3 SuperSpeed, as it is a 3.5 inch enclosure. To secure the drive, simply use the four included screws to hold it in place.

Then slide the entire tray into place and connect the LED cable to the three pin connector. Lastly, close things down and screw the two black screws in - done. Vantec has gone for a simple but effective installation method by going with a wide spread, trusted and true tray design.

Turning the enclosure on results in no vibration from the tray or hard drive. The blue LED lights up brightly and those who rather not have such an illumination can simply unplug the internal cable.
Feb 23rd, 2025 15:04 EST
change timezone
Latest GPU Drivers
New Forum Posts
- TPU's Nostalgic Hardware Club (19987)
- March Benchoff - socket 754 AMD - PiFast (1)
- It's happening again, melting 12v high pwr connectors (890)
- Sharing WiFi internet across the street (27)
- What's your latest tech purchase? (23199)
- EFI partition too small, can't update Windows 11 on laptop (8)
- Advice needed for buying a new PSU (13)
- Testing max ram overclock pn Ryzen 1700 (70)
- What local LLM-s you use? (61)
- Discrete case for dual GPU (18)
Popular Reviews
- MSI GeForce RTX 5070 Ti Ventus 3X OC Review
- ASUS GeForce RTX 5070 Ti TUF OC Review
- Ducky One X Inductive Keyboard Review
- Galax GeForce RTX 5070 Ti 1-Click OC White Review
- darkFlash DY470 Review
- MSI GeForce RTX 5070 Ti Vanguard SOC Review
- Gigabyte GeForce RTX 5090 Gaming OC Review
- MSI GeForce RTX 5070 Ti Gaming Trio OC+ Review
- Palit GeForce RTX 5070 Ti GameRock OC Review
- Fantech Aria II Pro Review
Controversial News Posts
- NVIDIA GeForce RTX 5090 Spotted with Missing ROPs, NVIDIA Confirms the Issue, Multiple Vendors Affected, RTX 5070 Ti, Too (432)
- AMD Radeon 9070 XT Rumored to Outpace RTX 5070 Ti by Almost 15% (302)
- AMD Plans Aggressive Price Competition with Radeon RX 9000 Series (271)
- AMD Radeon RX 9070 and 9070 XT Listed On Amazon - One Buyer Snags a Unit (247)
- Edward Snowden Lashes Out at NVIDIA Over GeForce RTX 50 Pricing And Value (241)
- AMD Denies Radeon RX 9070 XT $899 USD Starting Price Point Rumors (239)
- NVIDIA Investigates GeForce RTX 50 Series "Blackwell" Black Screen and BSOD Issues (216)
- New Leak Reveals NVIDIA RTX 5080 Is Slower Than RTX 4090 (215)