 3
3
Vantec NexStar TX NST-210S2-BK Review
Value & Conclusion »Installation

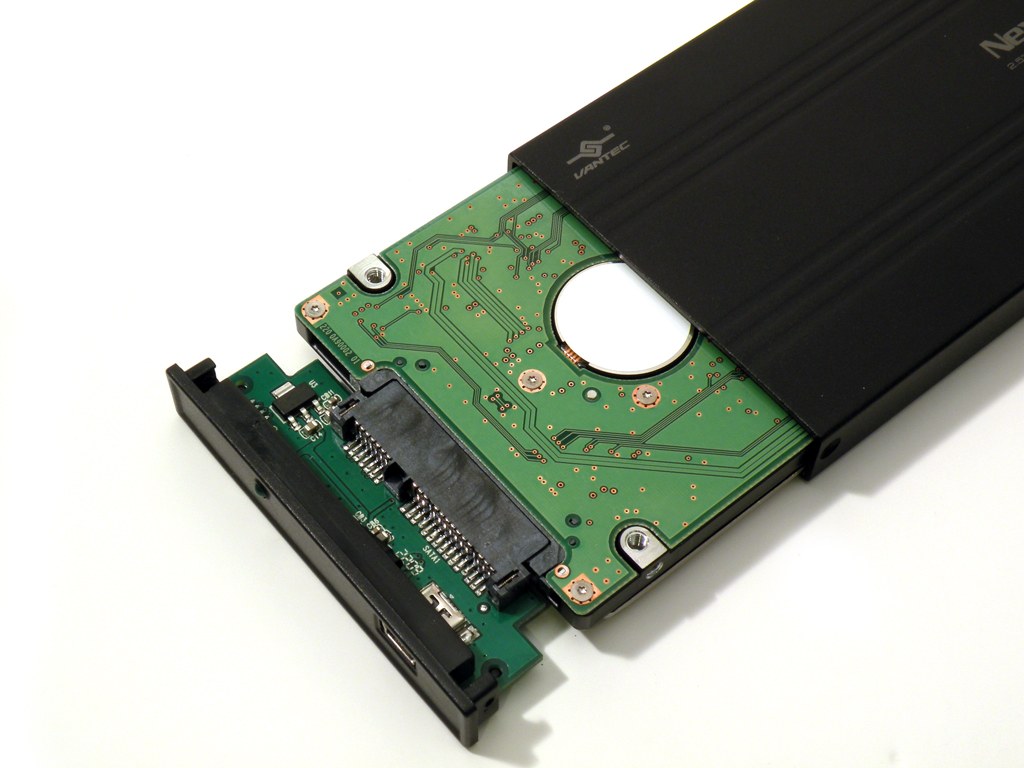

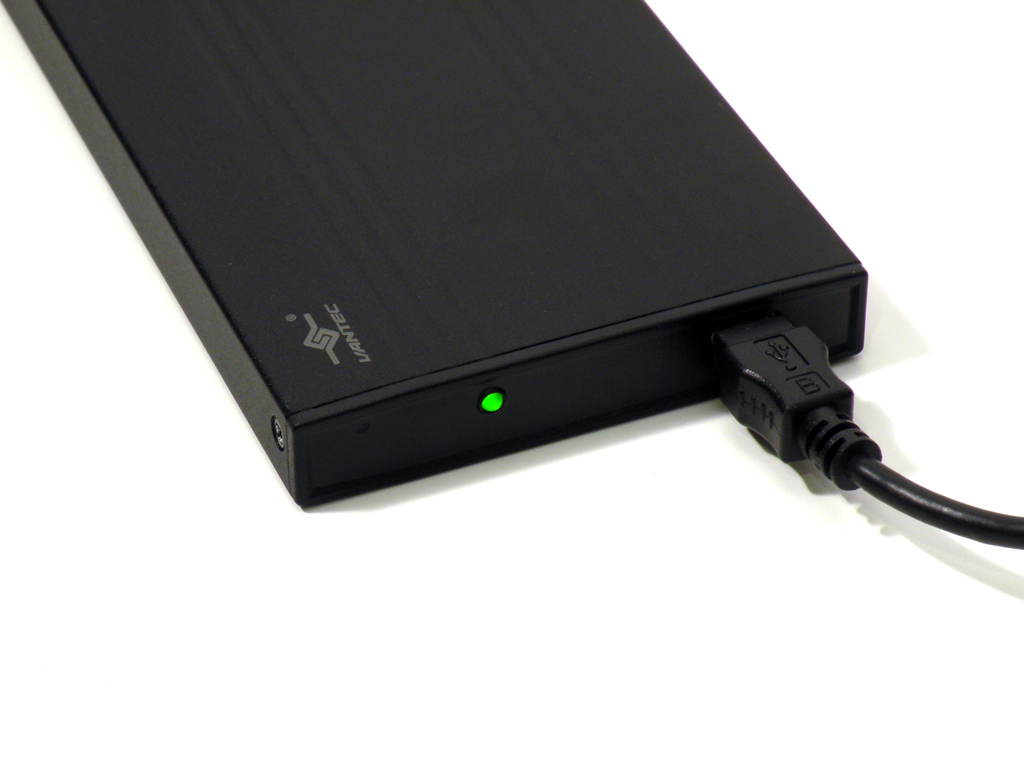
With the NexStar TX already disassembled, installing the hard drive is a snap. Simply plug the HDD into the SATA ports on the end cap. Once connected it easily slides into the aluminum enclosure and the two screws are fastened back into the holes. Once installed the hard disk is firmly in place and there is no noticable movement from within when it's lightly shaken. At this point the NexStar TX is ready for use. To connect to a computer, the USB adapter cable is connected to the enclosure and then one needs to connect the two standard USB connections to a computer. One USB connection is for supplying power and the other is for DATA transfer. The USB cable is only about 14 inches long which may be too short for some, however it does save on space for storage. As you can see with everything connected and powered up, a green LED light illuminates to indicate power and hard disk activity.
Performance
To test the performance of the Vantec Nexstar TX, we used a single 2.5" Hitatchi 7200 80GB hard disk drive. Performance was measured using HDTach 3.0.4.0 and ATTO Disk Benchmark.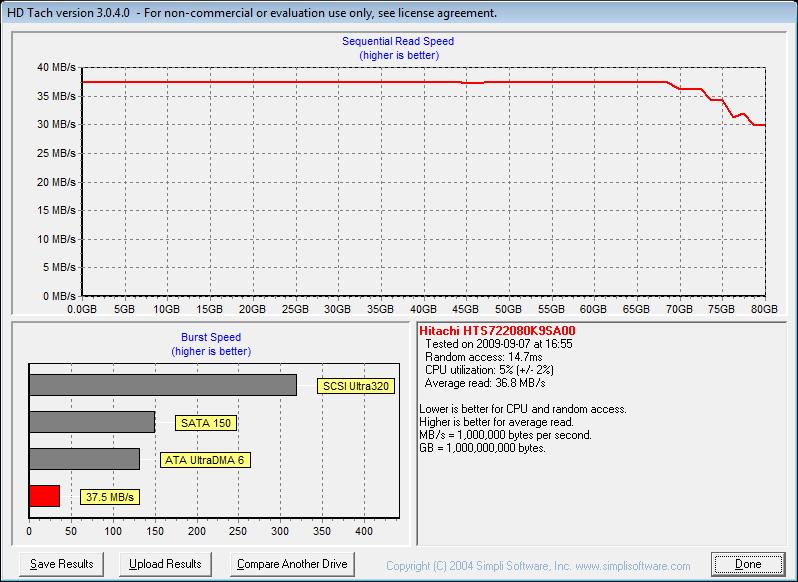
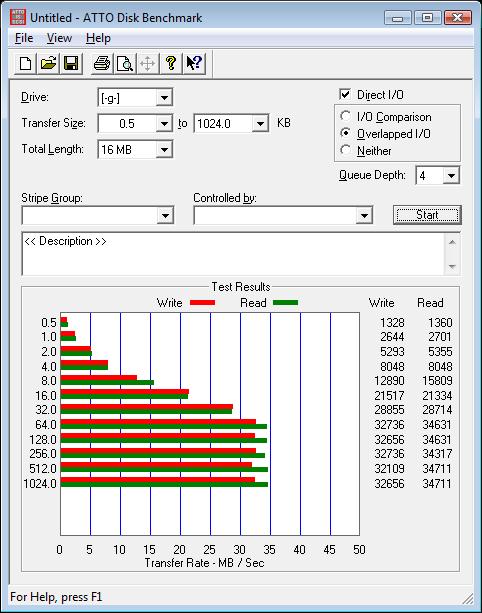


Read bandwith, write bandwith and CPU utilization are all very good with the NexStar TX. Write bandwith in ATTO is above 30 MB/s which is outstanding for a USB 2.0 device. CPU utilization is a good 5% and this value can change from system to system. With 36.8 MB/s average read performance in HDTach it is the fastest external hard disk enclosure we have tested so far. Of course operation is silent with the exception of the hard disk mounted inside. The TX does do a very good job of isolating hard drive noise with its quality construction.
Feb 10th, 2025 13:19 EST
change timezone
Latest GPU Drivers
New Forum Posts
- It's happening again, melting 12v high pwr connectors (82)
- Microsoft/Outlook.com foreign failed login attempts? (8)
- Asteroid 2024 YR4 reaches level 3 on the Torino Scale (32)
- Acer laptop RTX 4080 stuck at 210mhz core clock, pulling 593watts (19)
- Folding Pie and Milestones!! (9369)
- Have you got pie today? (16584)
- Milestones (13980)
- HP ProDesk 400 G3 Microtower MT Desktop PC Bios Mod (1)
- WCG Daily Numbers (12759)
- TPU's Rosetta Milestones and Daily Pie Thread (2185)
Popular Reviews
- Kingdom Come Deliverance II Performance Benchmark Review - 35 GPUs Tested
- Civilization VII Performance Benchmark Review - 35 GPUs Tested
- ASRock Phantom Gaming B850I Lightning Wi-Fi Review
- Spider-Man 2 Performance Benchmark Review - 35 GPUs Tested
- NVIDIA GeForce RTX 5080 Founders Edition Review
- AMD Ryzen 7 9800X3D Review - The Best Gaming Processor
- Kingdom Come: Deliverance 2 Handheld Performance Review
- Formovie Cinema Edge 4K UST Laser Projector Review
- ASUS ROG Harpe Ace Extreme Review
- Corsair Frame 4000D Review
Controversial News Posts
- AMD Radeon 9070 XT Rumored to Outpace RTX 5070 Ti by Almost 15% (286)
- AMD is Taking Time with Radeon RX 9000 to Optimize Software and FSR 4 (256)
- AMD Denies Radeon RX 9070 XT $899 USD Starting Price Point Rumors (239)
- Edward Snowden Lashes Out at NVIDIA Over GeForce RTX 50 Pricing And Value (239)
- AMD Radeon RX 9070 XT & RX 9070 Custom Models In Stock at European Stores (226)
- New Leak Reveals NVIDIA RTX 5080 Is Slower Than RTX 4090 (215)
- AMD's Radeon RX 9070 Launch Faces Pricing Hurdles (175)
- AMD Radeon RX 9070 XT Tested in Cyberpunk 2077 and Black Myth: Wukong (169)