Regeneration
NGOHQ.COM
- Joined
- Oct 26, 2005
- Messages
- 3,161 (0.44/day)
Almost every day there are new threads regarding bricked graphics cards due to wrong BIOS flashing, and since eidairaman1 is no longer around to help, here is a guide how to deal with a bad VGA BIOS flash.
Find the correct BIOS
First off, you'll have to find a copy of the original BIOS. In case you don't have a backup, remove the graphics card, take off the cooler, check which memory chip is used (Samsung/Hynix/Micron/Elpida) including exact model (e.g. H5GQ8H24MJR). Inspect the card from both sides, look for model number (on the stickers and card itself), serial numbers, board revision, clock frequency (e.g. 1386M) and write it all down. In the same opportunity, remove dust from the fans with a toothbrush, clean the card with alcohol & cotton swabs and then reapply thermal paste.
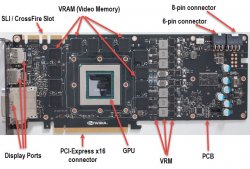
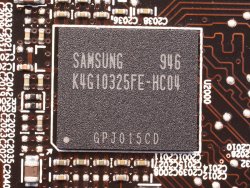
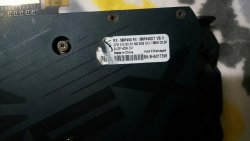
Navigate to the TPU VGA Database and begin looking for your card in both official and unverified uploads. Use the information you just gathered: Google the model number, SKU, look for its official GPU and memory clocks. Most BIOSes on the TPU database list board model, GPU and memory clocks, supported memory brand and model, number of DP/DVI/HDMI outputs, and sometimes the uploader provides additional information at the bottom of the page. Compare the data you gathered against the database and download all potential matches.
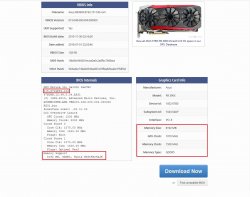
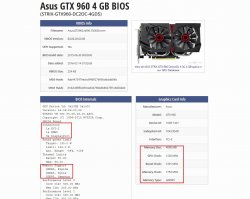
You can also contact the vendor and ask for a copy of the BIOS. In fact, some vendors publish BIOS updates on the product's website.
Is there a BIOS switch?
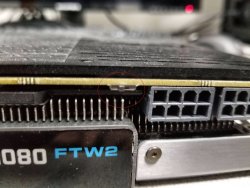
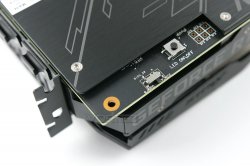
Many of the modern graphic cards come with dual BIOS chips (silent and performance) and a small switch designed to toggle between them. Usually, it's above the monitor outputs or near the PCIe power connector. If your card is equipped with one, all you have to do is just press the switch. If you wish to re-flash the chip with the wrong ROM, just press the switch again before flashing (while the system is still on).
Cannot POST/BOOT
There are several methods to deal with a graphics card that is unable to POST and giving a black screen when system is powered on.
1. If your card has dual BIOS, just press the BIOS switch.
2. Use the integrated graphics (onboard graphics) if available. Just plug to the monitor to the motherboard's I/O.
***If you get an add-in graphics card error message, just enable "Intel Multi-Display / iGPU Multi-Monitor" from the motherboard's BIOS***
3. USB 3.x to HDMI or DisplayPort adapter that compatible with Windows PCs.
4. Get an old PCI graphics card.
5. Another PCIe graphics card and motherboard with TWO x16 PCI express slots.
6. SPI flash programmer like FlashcatUSB or CH341A.
Still cannot POST!!!
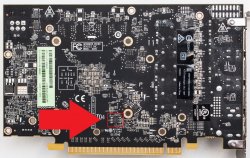
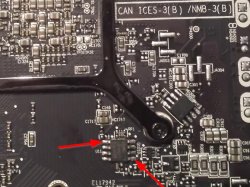
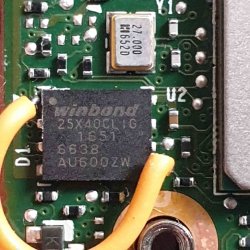
Even after you used one of the methods above and still cannot POST, your bricked card is probably preventing the system from working. In this case, you'll have to locate the video BIOS chip and short 1-5 pins with a paperclip, or small wire, or by soldering until flashing is complete. The BIOS chip is usually 8-pin and located on the rear, bottom side, tagged as U1-12 on the PCB, but be sure to verify first by searching online the text written on the chip (e.g. A25L0100). Search engine results should be related to "flash memory chip", not a regulator or anything else.
What about laptops?
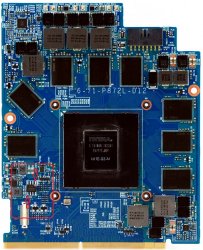
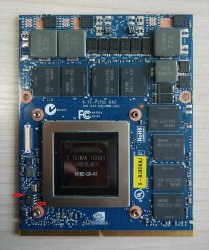
Dealing with a bad flash on a laptop is more complicated and can be very tricky. Mostly because some laptops have the video BIOS integrated with the motherboard BIOS on a single chip. Before you crack it open, try using external monitor and external graphics card. These might work for you, but if you're less fortunate, the video BIOS is usually located near the GPU, but can be anywhere, even integrated with the motherboard. If you can spot it, try the same methods listed above. If it's integrated, use SPI flash programmer and be sure to take a dump before making any changes.
Flashing AMD cards
Download AMD's flashing utility and extract it to the some folder. Copy the BIOS file(s) to the same folder.
First try the GUI version (AMDVBFlashWin), if it doesn't work, use the command prompt version (search for cmd.exe and run it with administrator privileges).
Navigate to the folder where you put the files:
CD C:\Fullpath\
***If the folder is C:\Users\David\Downloads\New folder use "CD C:\Users\David\Downloads\New folder\"***
Type: "amdvbflash -i" to see which adapter id is the bricked card.
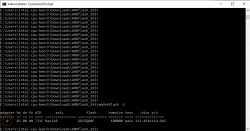
And then type:
amdvbflash -unlockrom 0
amdvbflash -f -p 0 filename.rom
***Change 0 to the correct adapter id, and filename.rom to the video BIOS file***
ERROR: 0FL01
Unfortunately, this is a general error with no specific information. This can be anything! From bad drivers, wrong ROM, not enough privileges, broken transistor, and even damaged BIOS chip. In this case, you can try flashing from DOS mode, UEFI Shell, Linux, or with SPI flash programmer.
Adapter not found
Try to short the video BIOS 1-5 pins as seen above, or use SPI flash programmer.
Flashing Nvidia cards
Download modded NVIDIA NVFlash and extract it to the some folder. Copy the BIOS file(s) to the same folder.
Run cmd.exe with administrator privileges and navigate to the folder where you put the files:
CD C:\Fullpath\
***If the folder is C:\Users\David\Downloads\New folder use "CD C:\Users\David\Downloads\New folder\"***
Type: "nvflash64_patched_5.590.0 -a" to see which adapter id is the bricked card.
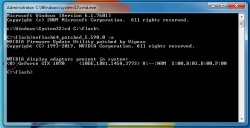
And then type:
nvflash64_patched_5.590.0 --index=0 --protectoff
nvflash64_patched_5.590.0 --index=0 -6 filename.rom
***Change 0 to the correct adapter id, and filename.rom to the video BIOS file***
Errors with NvFlash
Older versions of NvFlash work better with older hardware. For instance: v5.287 and Maxwell GPUs, or v5.105 and Fermi GPUs.
Sometimes NvFlash just like to "act up" for no good reason, if this happens, just reboot and try flashing again.
ERROR: No NVIDIA display adapters found
Try to short the video BIOS 1-5 pins as seen above, or use SPI flash programmer.
This guide brought to you by the old house of ngohq.com. If you like it, please press on the like button to the right.
Find the correct BIOS
First off, you'll have to find a copy of the original BIOS. In case you don't have a backup, remove the graphics card, take off the cooler, check which memory chip is used (Samsung/Hynix/Micron/Elpida) including exact model (e.g. H5GQ8H24MJR). Inspect the card from both sides, look for model number (on the stickers and card itself), serial numbers, board revision, clock frequency (e.g. 1386M) and write it all down. In the same opportunity, remove dust from the fans with a toothbrush, clean the card with alcohol & cotton swabs and then reapply thermal paste.


Navigate to the TPU VGA Database and begin looking for your card in both official and unverified uploads. Use the information you just gathered: Google the model number, SKU, look for its official GPU and memory clocks. Most BIOSes on the TPU database list board model, GPU and memory clocks, supported memory brand and model, number of DP/DVI/HDMI outputs, and sometimes the uploader provides additional information at the bottom of the page. Compare the data you gathered against the database and download all potential matches.


You can also contact the vendor and ask for a copy of the BIOS. In fact, some vendors publish BIOS updates on the product's website.
Is there a BIOS switch?
Many of the modern graphic cards come with dual BIOS chips (silent and performance) and a small switch designed to toggle between them. Usually, it's above the monitor outputs or near the PCIe power connector. If your card is equipped with one, all you have to do is just press the switch. If you wish to re-flash the chip with the wrong ROM, just press the switch again before flashing (while the system is still on).


Cannot POST/BOOT
There are several methods to deal with a graphics card that is unable to POST and giving a black screen when system is powered on.
1. If your card has dual BIOS, just press the BIOS switch.
2. Use the integrated graphics (onboard graphics) if available. Just plug to the monitor to the motherboard's I/O.
***If you get an add-in graphics card error message, just enable "Intel Multi-Display / iGPU Multi-Monitor" from the motherboard's BIOS***
3. USB 3.x to HDMI or DisplayPort adapter that compatible with Windows PCs.
4. Get an old PCI graphics card.
5. Another PCIe graphics card and motherboard with TWO x16 PCI express slots.
6. SPI flash programmer like FlashcatUSB or CH341A.
Still cannot POST!!!
Even after you used one of the methods above and still cannot POST, your bricked card is probably preventing the system from working. In this case, you'll have to locate the video BIOS chip and short 1-5 pins with a paperclip, or small wire, or by soldering until flashing is complete. The BIOS chip is usually 8-pin and located on the rear, bottom side, tagged as U1-12 on the PCB, but be sure to verify first by searching online the text written on the chip (e.g. A25L0100). Search engine results should be related to "flash memory chip", not a regulator or anything else.


What about laptops?
Dealing with a bad flash on a laptop is more complicated and can be very tricky. Mostly because some laptops have the video BIOS integrated with the motherboard BIOS on a single chip. Before you crack it open, try using external monitor and external graphics card. These might work for you, but if you're less fortunate, the video BIOS is usually located near the GPU, but can be anywhere, even integrated with the motherboard. If you can spot it, try the same methods listed above. If it's integrated, use SPI flash programmer and be sure to take a dump before making any changes.


Flashing AMD cards
Download AMD's flashing utility and extract it to the some folder. Copy the BIOS file(s) to the same folder.
First try the GUI version (AMDVBFlashWin), if it doesn't work, use the command prompt version (search for cmd.exe and run it with administrator privileges).
Navigate to the folder where you put the files:
CD C:\Fullpath\
***If the folder is C:\Users\David\Downloads\New folder use "CD C:\Users\David\Downloads\New folder\"***
Type: "amdvbflash -i" to see which adapter id is the bricked card.

And then type:
amdvbflash -unlockrom 0
amdvbflash -f -p 0 filename.rom
***Change 0 to the correct adapter id, and filename.rom to the video BIOS file***
ERROR: 0FL01
Unfortunately, this is a general error with no specific information. This can be anything! From bad drivers, wrong ROM, not enough privileges, broken transistor, and even damaged BIOS chip. In this case, you can try flashing from DOS mode, UEFI Shell, Linux, or with SPI flash programmer.
Adapter not found
Try to short the video BIOS 1-5 pins as seen above, or use SPI flash programmer.
Flashing Nvidia cards
Download modded NVIDIA NVFlash and extract it to the some folder. Copy the BIOS file(s) to the same folder.
Run cmd.exe with administrator privileges and navigate to the folder where you put the files:
CD C:\Fullpath\
***If the folder is C:\Users\David\Downloads\New folder use "CD C:\Users\David\Downloads\New folder\"***
Type: "nvflash64_patched_5.590.0 -a" to see which adapter id is the bricked card.

And then type:
nvflash64_patched_5.590.0 --index=0 --protectoff
nvflash64_patched_5.590.0 --index=0 -6 filename.rom
***Change 0 to the correct adapter id, and filename.rom to the video BIOS file***
Errors with NvFlash
Older versions of NvFlash work better with older hardware. For instance: v5.287 and Maxwell GPUs, or v5.105 and Fermi GPUs.
Sometimes NvFlash just like to "act up" for no good reason, if this happens, just reboot and try flashing again.
ERROR: No NVIDIA display adapters found
Try to short the video BIOS 1-5 pins as seen above, or use SPI flash programmer.
This guide brought to you by the old house of ngohq.com. If you like it, please press on the like button to the right.
Last edited:


