 553
553
AMD Radeon VII 16 GB Review
Clock Speeds & Power Limit »AMD Wattman

For Vega 20, AMD has once again changed how overclocking works. Instead of two curves with several points that control frequency and voltage separately, you now only get three points that can be moved to form a smooth curve, combining voltage and frequency in a single UI element.
When dragging these points, you can only move them vertically, which just controls the voltage. Moving the points horizontally to adjust clocks isn't possible—you have to drag the white vertical lines with the little flags at the top, which is somewhat counter-intuitive.

Note the dashed horizontal line marked as "Max". That's the maximum voltage your card can run at, dragging the points above that will have no effect. This is nicely indicated by the orange curve not going beyond the maximum voltage.
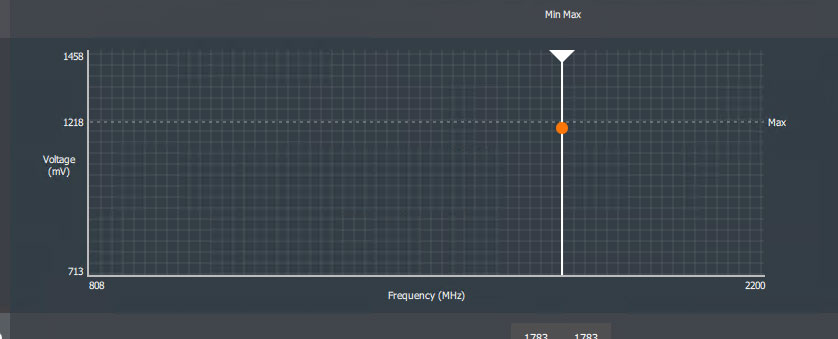
If you prefer your card stay at a single voltage and frequency as much as possible, you can drag both points right next to each other to reduce the GPU's effective operating frequency band. In reality, it looks as though this just narrows the range—the card will still run at various clocks speeds near your desired target clocks.
Junction Temperature / Hotspot


When GPU-Z first exposed the "Hotspot" thermal sensor on Radeon Vega cards, AMD requested removal, and we compromised on a "off-by-default" setting. That's why I was surprised to see that very same sensor introduced in Wattman, labeled "Junction Temperature".
In their reviewers guide, AMD sheds some additional light on this new sensor. They have placed 64 thermal sensors in strategic locations all over the GPU die, which is twice the number of sensors found on first-generation Vega. The highest reading of all these sensors is called "Junction Temperature" and reported in Wattman. Radeon VII uses Junction Temperature for thermal throttling and fan control.
Just like on Vega, the reported temperature values are quite high, which might scare some less experienced users. Once Junction Temperature reaches 115°C, the card will start throttling a little bit to keep the temperature below 115°C. At stock, with our card, this doesn't happen during gaming—we saw up to 110°C Junction Temperature.
Overall, exposing this sensor in Wattman is a good choice because, just like on Vega, it provides a means for enthusiasts to detect if their cooler mounting is uneven or some other mounting issue exists.
I do have doubts though on tying fan control into Junction Temperature. Its value will rise super quickly as soon as some load is running on the card, at a point in time when the thermal solution still has capacity to soak up heat. Intel considers this additional headroom in their CPU Turbo design, and it works great for handling quick bursts of activity at maximum performance without overloading the cooling solution.

After completing all testing and photos, I reassembled my card and wondered if I could push Junction Temperature below the 110°C I've been seeing on the stock card. Changing the thermal paste didn't make much of a difference (barely 1-2 °C better). My trick for such situations is increasing mounting pressure by adding little metal washers. Pictured above, you see two of the washers: one to get a better look and another below one of the mounting screws to indicate the location I placed it in. Of course, you want to use a total of four washers—one for each screw. I used 6 mm outer diameter, 3 mm inner diameter and 0.5 mm thickness, but you can use everything that falls into that size range. Also, I'd recommend plastic washers, so you don't accidentally short something if you lose it in our case.
With the washers installed, my Radeon VII Junction Temperature dropped by around 10°C to 100°C, which is a significant improvement.
Overclocking

With manual overclocking, maximum overclock of our sample is 1165 MHz on the memory (12% overclock) and 1950 MHz for the GPU clock (8% overclock).
As mentioned before, voltage control is possible for both overvolting and undervolting. However, when overvolting, the card will run into the 115°C Junction Thermal limit VERY quickly, which causes all sorts of throttling. Increasing the board power limit doesn't help either since the problem is the temperature, not the amount of deliverable power.
Overclocked Performance
Using these clock frequencies, we ran a quick test of Unigine Heaven to evaluate the gains from overclocking.
Actual 3D performance gained from overclocking is 8.2%.
Jan 30th, 2025 09:14 EST
change timezone
Latest GPU Drivers
New Forum Posts
- Will you buy a RTX 5090? (240)
- question storage optical media (6)
- RTX 5080 - premature review - it sucks (92)
- So who’s paying $100 for GTA 6 then? (98)
- Is It The 1080 TI The Best GPU Ever? (244)
- ASUS RX570 Expedition shutting itself down (10)
- Is my Gigabyte 3060 supposed to make this noise when playing games? (2)
- Please let me know if the UPS that I want to buy is good or not for my PC. (97)
- The coffee and tea drinkers club. (226)
- HP Rx 460 Freezing, not booting all of a sudden after normal use. (10)
Popular Reviews
- NVIDIA GeForce RTX 5080 Founders Edition Review
- NVIDIA DLSS 4 Transformer Review - Better Image Quality for Everyone
- ASUS GeForce RTX 5090 Astral OC Review - Astronomical Premium
- NVIDIA GeForce RTX 5090 Founders Edition Review - The New Flagship
- Galax GeForce RTX 5080 1-Click OC Review
- MSI GeForce RTX 5090 Suprim SOC Review
- MSI GeForce RTX 5090 Suprim Liquid SOC Review
- KLEVV URBANE V DDR5-7600 32 GB CL36 Review
- Palit GeForce RTX 5090 GameRock Review
- NVIDIA GeForce RTX 5090 PCI-Express Scaling
Controversial News Posts
- NVIDIA 2025 International CES Keynote: Liveblog (470)
- AMD Debuts Radeon RX 9070 XT and RX 9070 Powered by RDNA 4, and FSR 4 (349)
- AMD is Taking Time with Radeon RX 9000 to Optimize Software and FSR 4 (251)
- AMD Radeon RX 9070 XT & RX 9070 Custom Models In Stock at European Stores (226)
- AMD Denies Radeon RX 9070 XT $899 USD Starting Price Point Rumors (224)
- NVIDIA GeForce RTX 5090 Features 575 W TDP, RTX 5080 Carries 360 W TDP (217)
- New Leak Reveals NVIDIA RTX 5080 Is Slower Than RTX 4090 (209)
- AMD's Radeon RX 9070 Launch Faces Pricing Hurdles (175)