 21
21
AOC AGON AG271QG 144-165 Hz Review
Picture Quality, Uniformity & Calibration »Controls & OSD
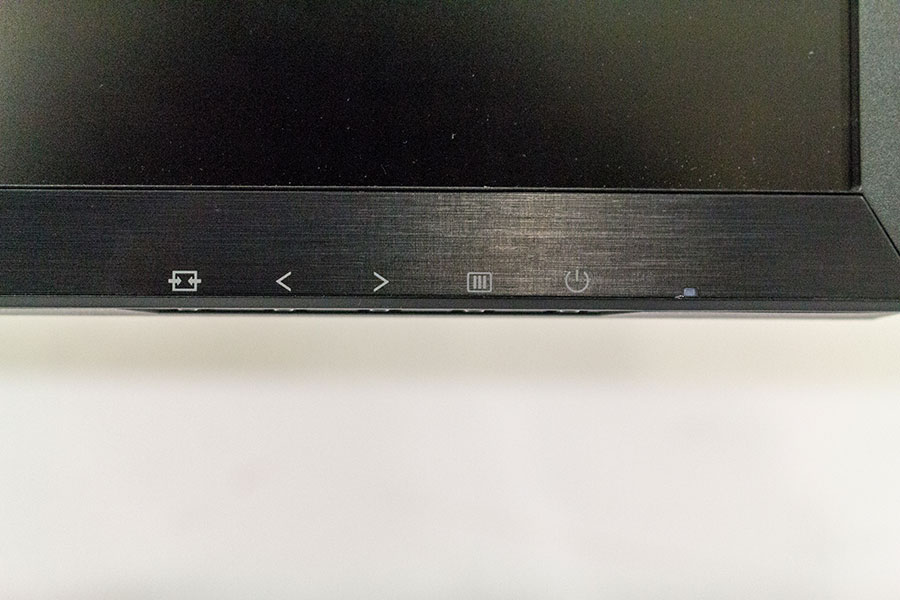
The OSD can be accessed by using four cascading buttons placed below the bezel at the bottom, on the right side. The buttons general functions are marked on the bezel itself. There's also a fifth button here, one that's used to power the monitor on and off. As you can imagine, you'll end up pressing it by accident, which drove me crazy. Before you open the OSD, the first button will switch between video inputs, the second will control the volume of the built-in speakers, and the third will activate ULMB (Ultra Low-Motion Blur), assuming you lowered the refresh rate to 120 Hz and turned off G-Sync in the video driver. More on that in the gaming-performance section of this review.
Because of the way the buttons are implemented, the overall user experience isn't the greatest, which is putting it mildly. The OSD itself looks a bit archaic and doesn't offer some of the options one might expect, like factory-made picture profiles and the ability to display the current refresh rate/framerate. It also doesn't display the exact values of various gamma settings, opting instead for "Gamma1", "Gamma2", and "Gamma3", which leaves you to figure out on your own which one you like best, or you can take a look at the manual and find out that the exact gamma values are 2.2, 2.0, and 2.4 respectively.

The Luminance menu is where most of the action happens. Here, we can control the contrast, brightness, gamma (Gamma1 is 2.2, Gamma2 is 2.0, and Gamma3 is 2.4), Overdrive (Off, Weak, Light, Medium, and Strong), and two settings AOC calls Game Color and Shadow Control. Game Color actually adjusts the monitor's color saturation and is best left at the default value of 100. Shadow Control has a scale of 0-3. The higher you go, the brighter the dark tones become. In theory, this could make it easier for you to spot your enemies in dark areas. In practice, it destroys any subtlety and refinement in darker scenes and makes everything look washed out. I'd stick with 0. To see how various Overdrive settings impact pixel response, jump ahead to the gaming performance portion of the review.
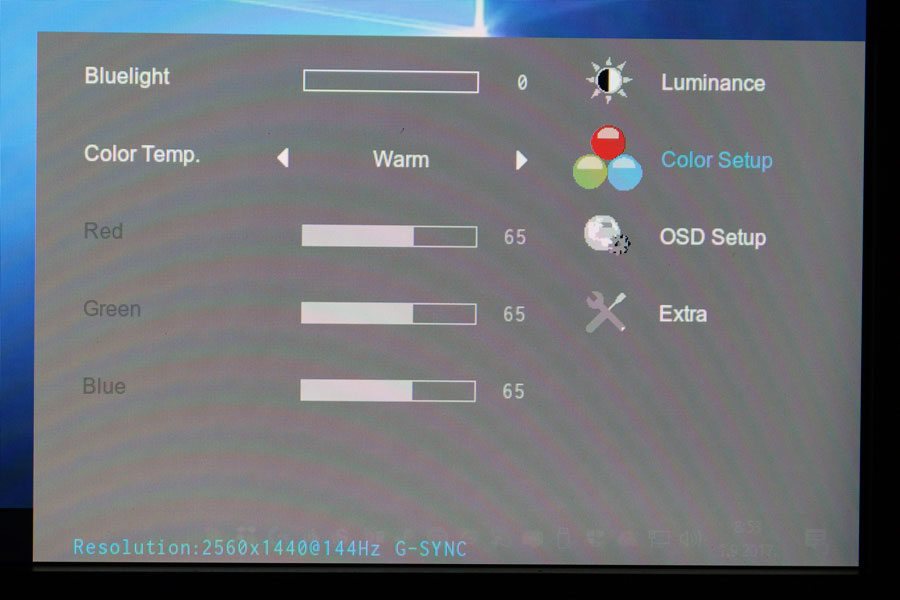
The Color Setup menu lets us adjust the color temperature (User, sRGB, Cool, Warm, and Normal). If you want to adjust the RGB channels manually, you'll need to switch this setting to User. That will allow you to adjust the RGB channels in a 0-100 range. At factory settings, the selected color temperature is Warm. I'm pretty sure most users will keep it that way as it offers the punchiest (although not the most accurate) colors. The Bluelight option essentially acts as a blue light filter. It can be adjusted from 0-20. Blue light has the shortest wavelength and highest energy, and your eyes aren't very good at blocking it. It can lead to eye strain, especially during prolonged sessions in front of a monitor, so if that's something you struggle with, you can reduce its amount by increasing this value. Of course, the more blue light you filter, the yellower (warmer) the picture becomes.

The OSD Setup menu is pretty self-explanatory. The Break Reminder option, if turned on, displays an on-screen warning for each hour of continuous monitor use. Or, to quote the user manual: "Break Reminder if the user continuely work for mare than 1 hurs". Come again?


The Extra menu lets us reset the monitor to its factory defaults, overclock the panel from 144 Hz to 165 Hz - a process that's done in seconds and goes through without a single hitch - as well as activate or deactivate Deep Sleep (keep it on) and ULMB (keep it off). The ULMB option will be grayed out until you lower the refresh rate to 120 Hz and turn off G-Sync.
Feb 23rd, 2025 23:20 EST
change timezone
Latest GPU Drivers
New Forum Posts
- is a 650w gold power supply enough for a amd 7 7700x OR 7 5700x and a msi geforce rtx 4070 super 12go gaming x slim ? (3)
- New fans (3)
- CUDIMM OC Progress (2)
- It's happening again, melting 12v high pwr connectors (896)
- Nvidia's GPU market share hits 90% in Q4 2024 (gets closer to full monopoly) (530)
- Monitor Battle! Help me choose between two contenders (41)
- Dell Workstation Owners Club (3282)
- SLI is really not Dead if you Have a SLI rig (83)
- EFI partition too small, can't update Windows 11 on laptop (12)
- 9800 x3d overheating what is the stock voltage (5)
Popular Reviews
- ASUS GeForce RTX 5070 Ti TUF OC Review
- MSI GeForce RTX 5070 Ti Ventus 3X OC Review
- darkFlash DY470 Review
- MSI GeForce RTX 5070 Ti Vanguard SOC Review
- MSI GeForce RTX 5070 Ti Gaming Trio OC+ Review
- Galax GeForce RTX 5070 Ti 1-Click OC White Review
- Palit GeForce RTX 5070 Ti GameRock OC Review
- Fantech Aria II Pro Review
- Gigabyte GeForce RTX 5090 Gaming OC Review
- AMD Ryzen 7 9800X3D Review - The Best Gaming Processor
Controversial News Posts
- NVIDIA GeForce RTX 5090 Spotted with Missing ROPs, NVIDIA Confirms the Issue, Multiple Vendors Affected, RTX 5070 Ti, Too (449)
- AMD Radeon 9070 XT Rumored to Outpace RTX 5070 Ti by Almost 15% (304)
- AMD Plans Aggressive Price Competition with Radeon RX 9000 Series (271)
- AMD Radeon RX 9070 and 9070 XT Listed On Amazon - One Buyer Snags a Unit (247)
- Edward Snowden Lashes Out at NVIDIA Over GeForce RTX 50 Pricing And Value (241)
- AMD Denies Radeon RX 9070 XT $899 USD Starting Price Point Rumors (239)
- NVIDIA Investigates GeForce RTX 50 Series "Blackwell" Black Screen and BSOD Issues (226)
- New Leak Reveals NVIDIA RTX 5080 Is Slower Than RTX 4090 (215)