 1
1
Deepcool Macube 110 Review
Thermal Stress Test »Review System
| System Parts for Case Reviews | |
|---|---|
| Processor: | Intel Core i5-9600K |
| Motherboards: | ATX: MSI Z390 GAMING EDGE AC MATX: Z370M GAMING EDGE AC Mini-ITX: MSI Z370I GAMING EDGE AC Provided by: MSI |
| Graphics Card: | ATX/mATX: Palit GeForce RTX 2080 Gaming Pro OC ITX: EVGA GTX 1650 SC Ultra Black 4 GB |
| Memory: | 16 GB XPG GAMMIX D30 DDR4 2666 MHz CL16-18-18 1.20 V 16 GB XPG SPECTRIX D60G DDR4 3000 MHz CL16-18-18 1.35 V Provided by: ADATA |
| HDD: | Western Digital 320 GB 7200 RPM |
| SSD: | ITX: ADATA SX6000 Pro M.2 256 GB mATX: ADATA GAMMIX S11 Pro M.2 256 GB ATX: ADATA SPECTRIX S40G M.2 256 GB ADATA XPG SX850 256 GB ADATA Ultimate SU630 240 GB ADATA Ultimate SU750 256 GB Provided by: ADATA |
| Power Supply: | Fractal Design ION+ 750W 80 Plus Platinum Provided by: Fractal Design |
| Cooling: | be quiet! Dark Rock 4 be quiet! Dark Rock Slim be quiet! Shadow Rock LP Provided by: be quiet! |
Assembly

Adding the motherboard is done by traditional means, with the use of spacers and screws. The openings for cable management line up nicely, so your final assembly should be clean as a result. The GPU support bracket is easily adjusted and actually works really well.


To install an SSD, simply screw in the provided metal pins and push the drive into one of two rubber-ringed placement possibilities. This works well enough, and the drive doesn't budge even though a tool-less method.


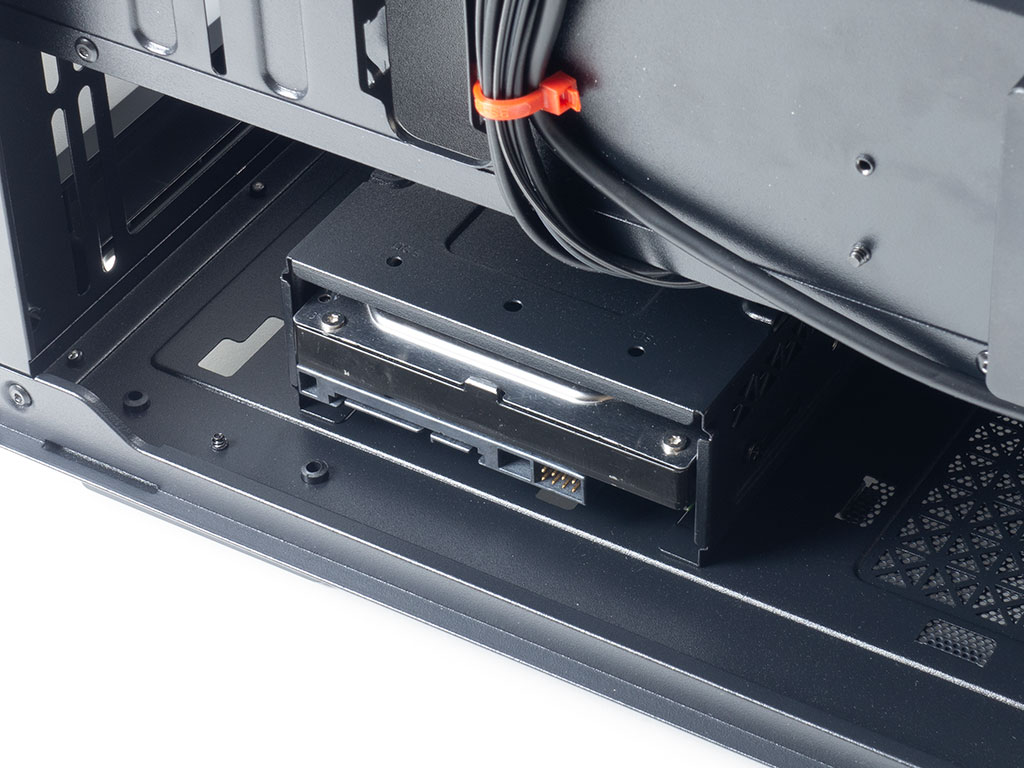
To install 3.5" drives, you have to tip the system over and remove two screws before pulling out the cage. It allows for two 3.5" drives or a mix of one such unit within while the top holds a 2.5" variant. Once filled, simply place it into one of two available spots to either give you room for liquid cooling at the front or an extra-long PSU.

Adding the power supply is a bit of a squeeze, just to get it underneath the shroud, but there is plenty of room for a high-capacity unit, so you may power all your gaming hardware with ease.


The lack of grommets does make the interior look slightly busier than necessary, but everything is routed cleanly. We were able to utilize most of the hooks for clean cable management behind the scenes, but it could be even tidier with a little more love and patience.
Finished Looks

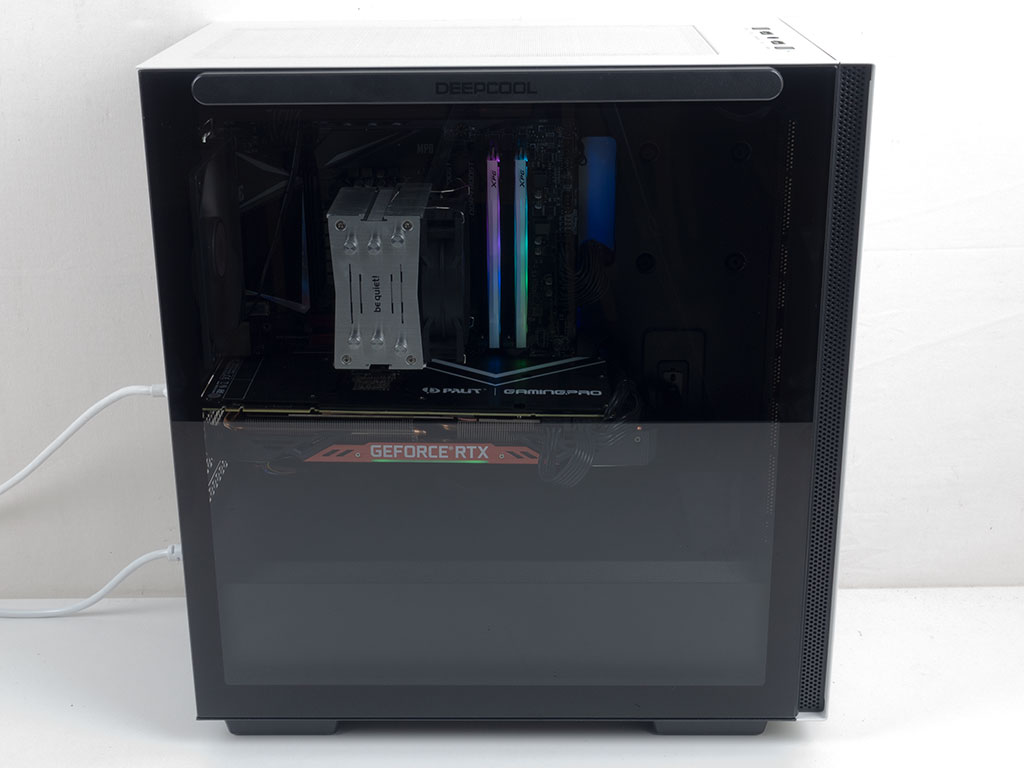

Once turned on, the LED in the top lights up white when a drive is accessed, and you can clearly see the hardware within the Deepcool Macube 110 because of the lightly tinted glass panel. In the rear, everything is where you would expect it to be for a classic mATX chassis.
Mar 21st, 2025 16:58 EDT
change timezone
Latest GPU Drivers
New Forum Posts
- GPU Review Test System 2025.2 Games & Planning (14)
- Old Gamer Memory Upgrade Worth It? (62)
- 2006 Macbook Pro Modern Sleeper Project (10)
- Cooling problems persist on LGA1700 (92)
- Post your Cinebench 2024 score (620)
- Does Linux take advantage of all the bells and whistles offered by the Intel Core Ultra Series-2 (Arrow Lake) processors? (5)
- Post your Cinebench R23 Score (3055)
- Question about Intel Optane SSDs (33)
- Suggestion for lightweight Image Viewer / GTK2 has to go (4)
- 17 13620H + phase change pad = murder fuel for my cpu. (0)
Popular Reviews
- ASRock Radeon RX 9070 XT Taichi OC Review - Excellent Cooling
- Assassin's Creed Shadows Performance Benchmark Review - 30 GPUs Compared
- Sapphire Radeon RX 9070 XT Nitro+ Review - Beating NVIDIA
- be quiet! Pure Base 501 LX Review
- AMD Ryzen 9 9950X3D Review - Great for Gaming and Productivity
- MSI MAG B860 Tomahawk Wi-Fi Review
- Corsair SF750 750 W Review
- ASUS GeForce RTX 5070 TUF OC Review
- XFX Radeon RX 9070 XT Mercury OC Magnetic Air Review
- ASUS Radeon RX 9070 TUF OC Review
Controversial News Posts
- NVIDIA GeForce RTX 50 Cards Spotted with Missing ROPs, NVIDIA Confirms the Issue, Multiple Vendors Affected (519)
- AMD RDNA 4 and Radeon RX 9070 Series Unveiled: $549 & $599 (260)
- AMD Mentions Sub-$700 Pricing for Radeon RX 9070 GPU Series, Looks Like NV Minus $50 Again (250)
- NVIDIA Investigates GeForce RTX 50 Series "Blackwell" Black Screen and BSOD Issues (244)
- AMD Radeon RX 9070 and 9070 XT Official Performance Metrics Leaked, +42% 4K Performance Over Radeon RX 7900 GRE (195)
- AMD Radeon RX 9070-series Pricing Leaks Courtesy of MicroCenter (158)
- MSI Doesn't Plan Radeon RX 9000 Series GPUs, Skips AMD RDNA 4 Generation Entirely (142)
- Microsoft Introduces Copilot for Gaming (123)