 5
5
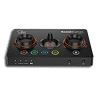
Creative Sound Blaster GC7 Review - A Feature-Packed USB Sound Card
Software »Closer Examination
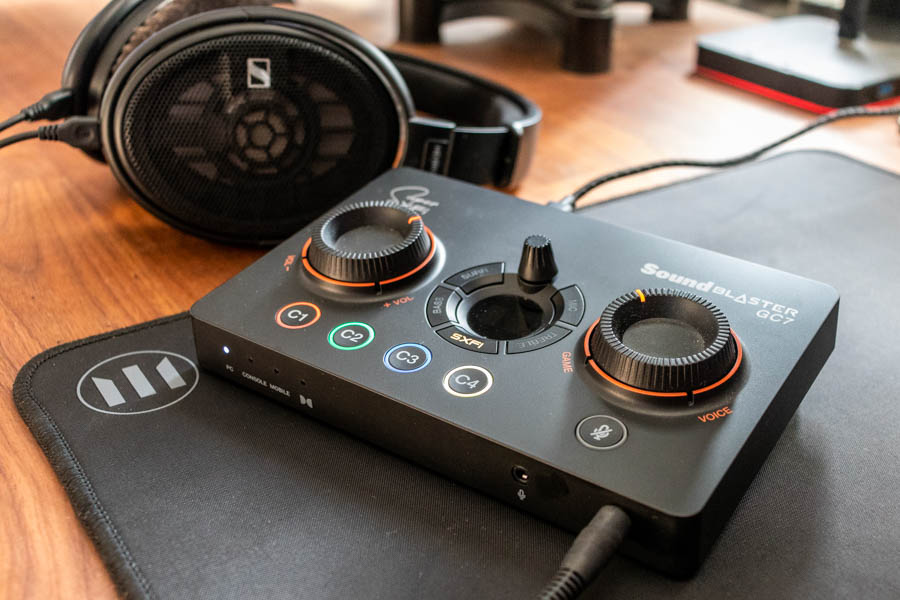


The Creative Sound Blaster GC7 adopts a design similar to that of the Sound Blaster X3 (reviewed here), but it's rectangular rather than square in shape. The entire exterior is still made out of plastic, which, while sturdy, doesn't exactly scream luxury. When dishing out a $170/€150 for an external sound card, you have every right to expect nicer build materials. For comparison, a hi-fi DAC/headphone amp in this price bracket would definitely come with an all-metal case. Sporting a matte black color scheme, the exterior of the Sound Blaster GC7 is quite prone to collecting fingerprints and dust. You'll want to keep a wiping cloth at hand as that's the only way to keep the sound card clean. The sound card is slightly tilted towards the user, which is a smart decision from an ergonomics perspective. This becomes more obvious when looking at it from the side.

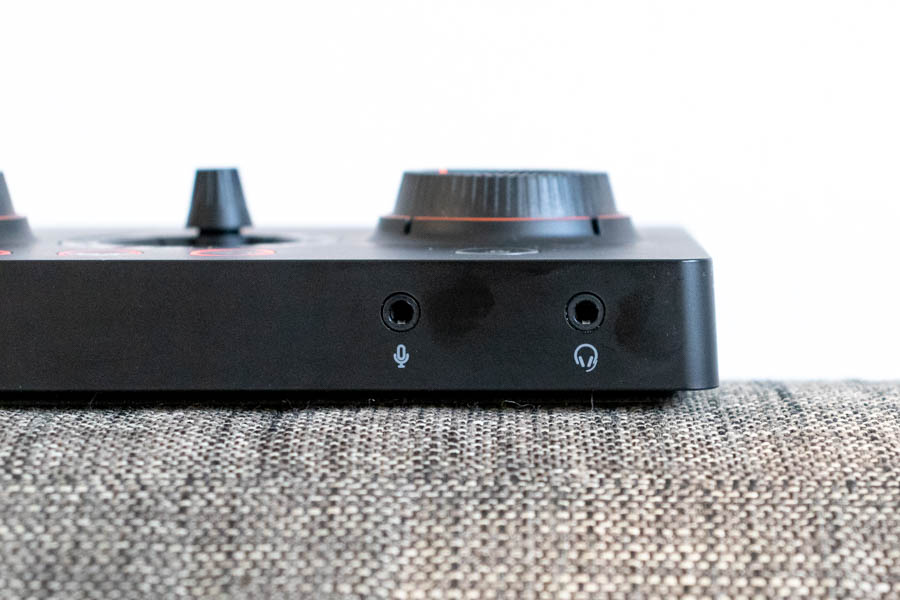
On the left edge of the front of the Sound Blaster GC7 Creative placed four white LEDs which light up depending on the position of the platform selection switch on the rear. The fourth LED turns on when the sound card is decoding the Dolby Digital signal, which is only possible through its optical input. Two 3.5-mm ports, a microphone input, and headphone output are on the right edge. The headphone output is actually a hybrid audio port. If your headset uses a 4-pole TRRS plug, you can connect it to this single port and get the headphones and microphone to work properly.
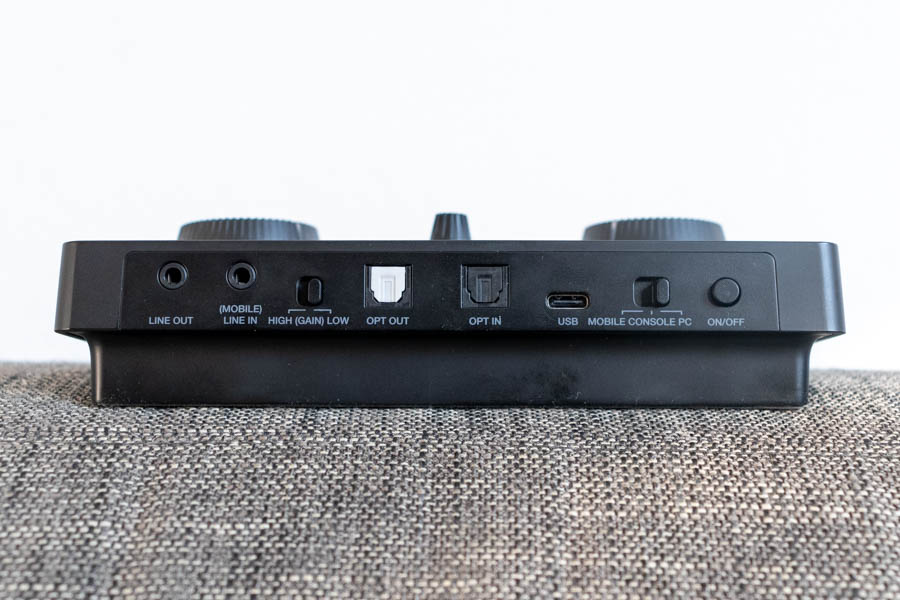

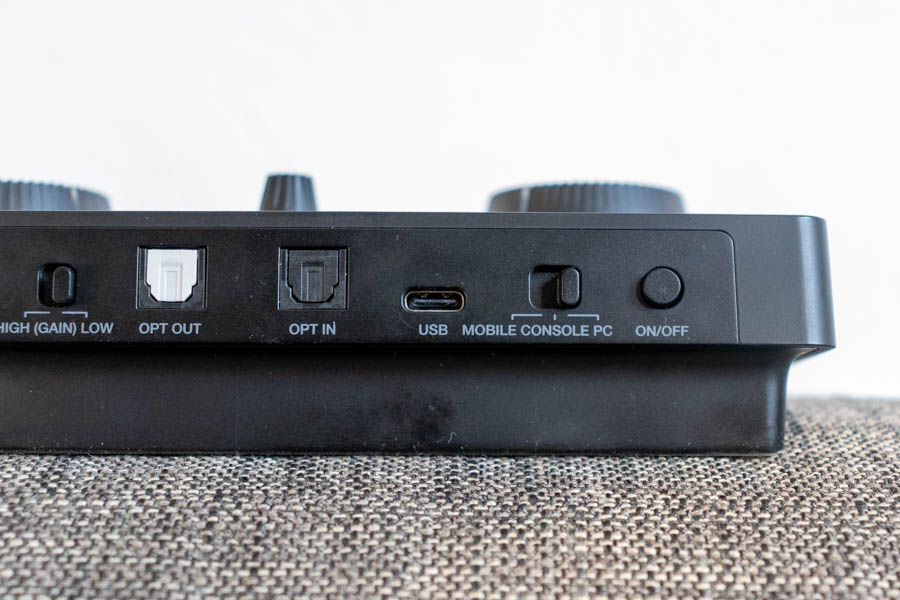
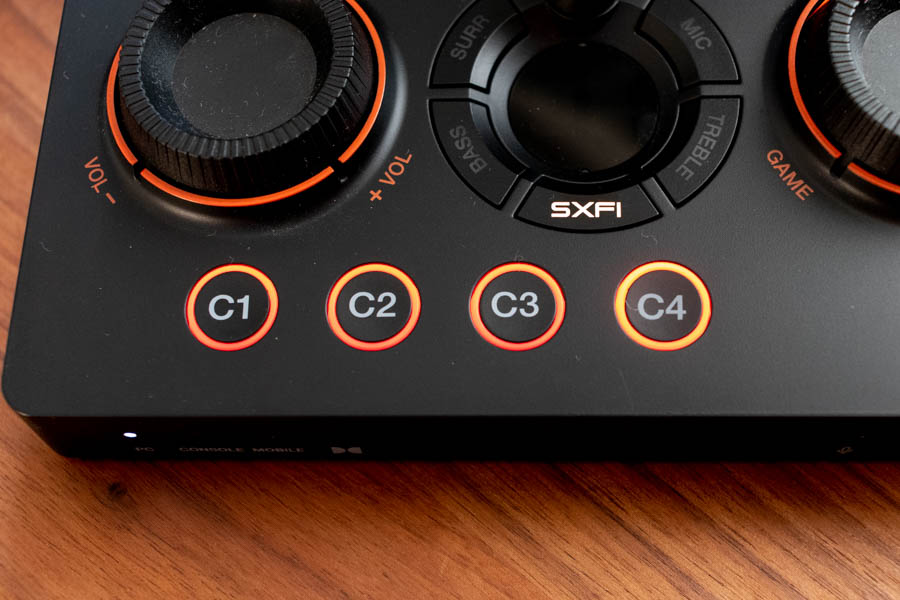
Other inputs and outputs are lined up on the back of the Sound Blaster GC7. Here, you have a 3.5-mm line output and input, optical (TOSLINK) output and input, USB-C input (also used to power the sound card), power button, and two switches. The first switch adjusts the headphone amplifier gain (Low or High), while the second one is used for platform selection (PC, console, or mobile). As for the aforementioned inputs and outputs, the 3.5-mm line output is where you'll connect your active speakers. Through this port, they'll receive an analog signal from the sound card, which then needs to be amplified and finally reproduced through the speaker drivers. The 3.5-mm line input can be used in Mobile and Console mode (when using the Nintendo Switch in handheld mode). It has internal 4-pole (TRRS) wiring, so it pairs nicely with a 3.5-mm port of a smartphone with the supplied 3.5-mm 4-pole AUX cable. The optical (TOSLINK) input is what you can use to connect the Sound Blaster GC7 to your TV, PlayStation, and other sound sources with an optical output. The optical (TOSLINK) output is there for when you want to use the Sound Blaster GC7 as a transport to deliver the digital audio signal to a different device, such as an AV receiver, integrated amplifier, pair of powered speakers, and so on. The USB-C connection is mandatory regardless of what you're using the Sound Blaster GC7 for as it doubles as a power delivery source. This is a stereo sound card, so it lacks ports for 5.1 and/or 7.1 speaker setups.


The Sound Blaster GC7 has two large dials. The left one is a simple volume dial, while the right one is dubbed the GameVoice Mix dial. This dial lets you volume mix between two "software sources"; the game you're playing and Discord, for example. Creative made this work by having the Sound Blaster GC7 show up as two separate playback interfaces in Windows/macOS: Speakers and Headset. To get it to work, set "Speakers" as the Default Playback Device and "Headset" as the Default Communications Device. After doing so, the system sounds (games, music, etc.) will be routed through a "virtual" channel, while the VoIP apps, such as Discord, will go through a separate, secondary "virtual" channel. You'll end up hearing them both, but the GameVoice Mix dial will determine the volume balance between these two channels. Rotate it clockwise to make your teammates louder and your game quieter or counterclockwise to do the opposite. Beneath the GameVoice Mix dial is a microphone mute button. It is surrounded by a backlit ring which glows red when the microphone is muted. It should be noted that the GameVoice Mix dial also works on PlayStation 4 and PlayStation 5 with the addition of the HDMI to S/PDIF converter, which isn't included in the box.
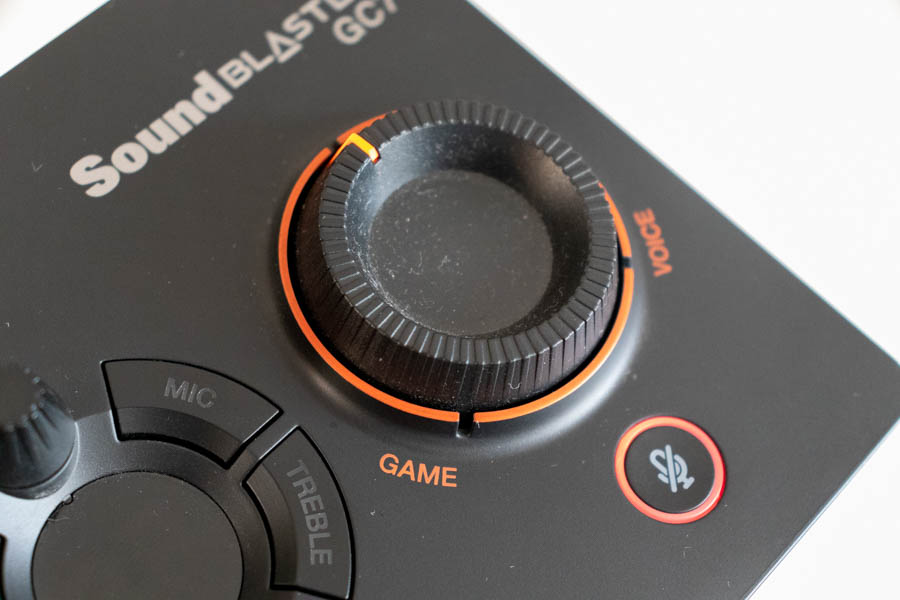
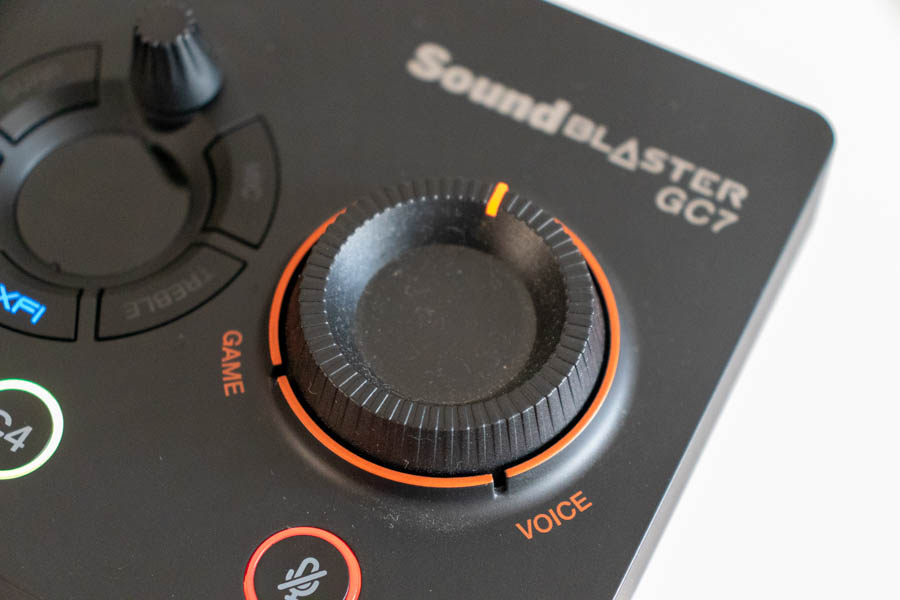
Both knobs have an integrated orange LED indicating their current position. Their starting point is the 8 o'clock position, and they can be turned until the 4 o'clock position. Unfortunately, the GameVoice Mix dial doesn't "click" into place when it reaches the 12 o'clock point, which is its neutral position, where the aforementioned virtual channels are in perfect balance. Instead, you'll have to balance them by ear or leaning forward and aligning the notch on the ring surrounding the dial with the orange LED on the dial itself.

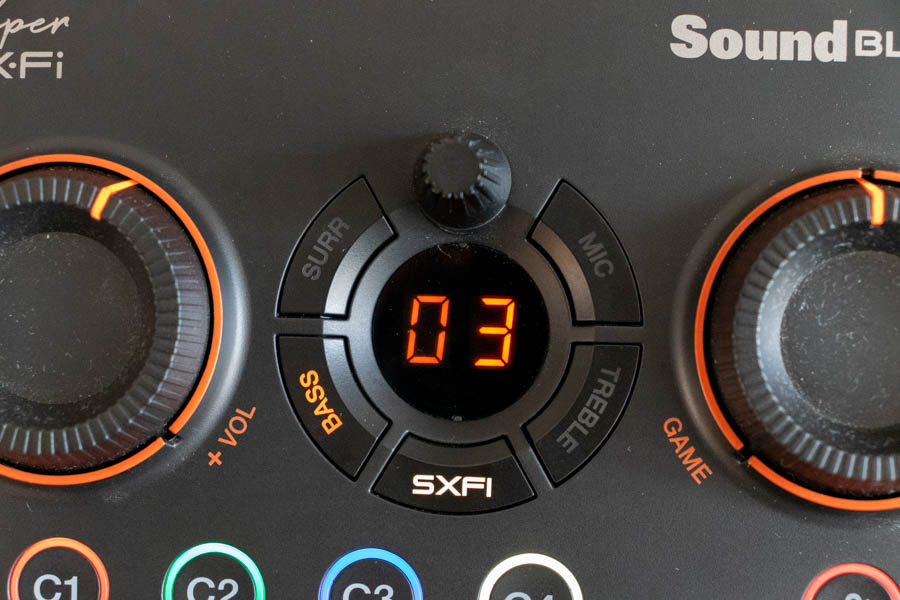


Located between the two dials is the so-called EFX Control Panel. This segment consists of a tall knob, round two-digit display, and grand total of five buttons. The buttons are Surround, Microphone, Bass, Treble, and SXFI. As you're probably guessed, they're used to switch between the accompanying sound options, which you can then increase or decrease by using the aforementioned knob. The Surround and Microphone options can be adjusted on a scale from 0 to 99, while the Bass and Treble have a ±9 adjustment range. The SXFI button turns on Super X-Fi and Super X-Fi Battle Mode. These modes can be recognized by the color of the SXFI lettering. Orange means off, green equals on, and blue is Battle Mode.
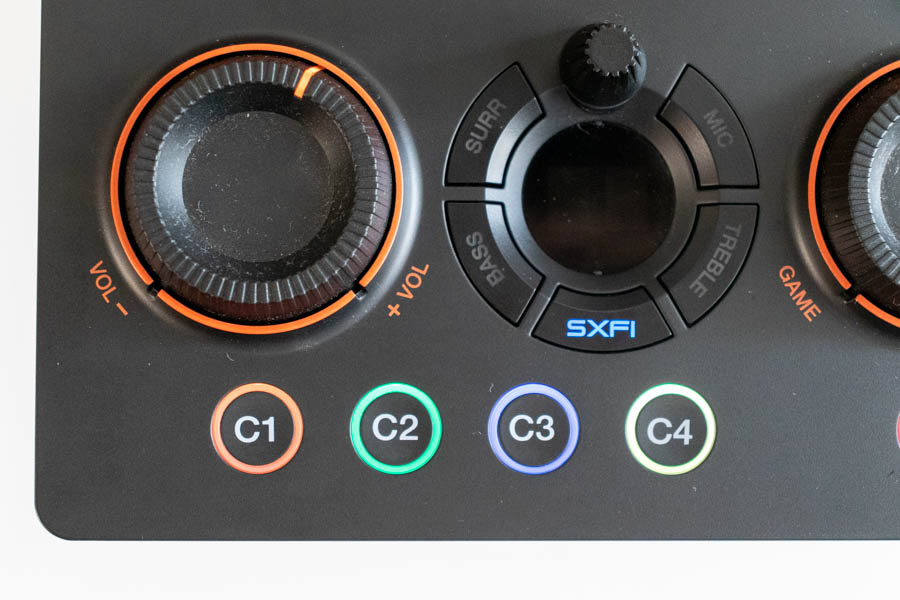
The bottom row of the Sound Blaster GC7 is occupied by four fully configurable buttons, marked as C1, C2, C3, and C4. A number of functions can be assigned to those buttons through the official desktop or mobile app. They can be used to cycle through equalizer presets, activate or deactivate microphone monitoring and Scout Mode, switch outputs (headphones, speakers, or both), play/pause music, skip between songs, write custom text or emojis, launch an application, or activate keyboard shortcuts. Much like the microphone mute button, the C1–C4 buttons are surrounded by LED-backlit rings. You're welcome to set their color to anything you like.
On my sample of the Sound Blaster GC7, the ring surrounding the C4 button was noticeably brighter than C1–C3, which I found quite annoying after setting them all to the same color. I can't claim that this is a product-wide issue, however, and it definitely won't bother you if you use different colors for these custom buttons.
Jul 1st, 2025 22:53 CDT
change timezone
Latest GPU Drivers
New Forum Posts
- PCMA2305 Phase Change Metal Alloy (PCMA) (7)
- Best motherboards for XP gaming (18)
- What would you buy? (32)
- Is my m2 possibly fake ? and possible laptop hardware damage ? (28)
- HP Zbook 15 G2 GPU Upgrade (4)
- Help me overclocking my GSkill Ripjaws 3200MHz CL 16 DDR4 RAMs. (20)
- MACPRO 3,1 booting windows (0)
- My PCIe5 SSD is slow. Samsung 9100 PRO (29)
- Steering wheels, I think I had a mea culpa! (0)
- My PSU died.. (1)
Popular Reviews
- ASUS ROG Crosshair X870E Extreme Review
- Crucial T710 2 TB Review - Record-Breaking Gen 5
- Sapphire Radeon RX 9060 XT Pulse OC 16 GB Review - An Excellent Choice
- AVerMedia CamStream 4K Review
- Upcoming Hardware Launches 2025 (Updated May 2025)
- AMD Ryzen 7 9800X3D Review - The Best Gaming Processor
- Lexar NQ780 4 TB Review
- Sapphire Radeon RX 9070 XT Nitro+ Review - Beating NVIDIA
- AMD Ryzen 9 9950X3D Review - Great for Gaming and Productivity
- NVIDIA GeForce RTX 5060 8 GB Review
TPU on YouTube
Controversial News Posts
- Intel's Core Ultra 7 265K and 265KF CPUs Dip Below $250 (288)
- NVIDIA Grabs Market Share, AMD Loses Ground, and Intel Disappears in Latest dGPU Update (208)
- Some Intel Nova Lake CPUs Rumored to Challenge AMD's 3D V-Cache in Desktop Gaming (140)
- NVIDIA GeForce RTX 5080 SUPER Could Feature 24 GB Memory, Increased Power Limits (112)
- Microsoft Partners with AMD for Next-gen Xbox Hardware (105)
- NVIDIA Launches GeForce RTX 5050 for Desktops and Laptops, Starts at $249 (105)
- Intel "Nova Lake‑S" Series: Seven SKUs, Up to 52 Cores and 150 W TDP (100)
- NVIDIA DLSS Transformer Cuts VRAM Usage by 20% (91)