-
Welcome to TechPowerUp Forums, Guest! Please check out our forum guidelines for info related to our community.
You are using an out of date browser. It may not display this or other websites correctly.
You should upgrade or use an alternative browser.
You should upgrade or use an alternative browser.
How to quickly & easily fix coil-whine(coil choke noise)
- Thread starter lexluthermiester
- Start date

- Joined
- May 8, 2023
- Messages
- 30 (0.07/day)
that's blooming your air has too much moisture it have uneven reaction. the surface kind of "dry out" faster then core.
mine is the same, don't worry about it, does not effect much other then look
mine is the same, don't worry about it, does not effect much other then look

- Joined
- Jul 5, 2013
- Messages
- 26,134 (6.46/day)
You might have used a bit too much, but that shouldn't affect performance.
- Joined
- May 8, 2023
- Messages
- 30 (0.07/day)
Try capacitor cable mod. It can reduce noise but not eliminate noise
added 5 1000uf caps to the second 8pin (it's an extension from the main 8pin), no differenceTry capacitor cable mod. It can reduce noise but not eliminate noise
Last edited:
- Joined
- May 8, 2023
- Messages
- 30 (0.07/day)
that's not good, I don't know what to do next.added 5 1000uf caps to the second 8pin (it's an extension from the main 8pin), no difference
maybe physical isolation your pc cage?
- Joined
- Oct 6, 2004
- Messages
- 58,413 (8.07/day)
- Location
- Oystralia
| System Name | Rainbow Sparkles (Power efficient, <350W gaming load) |
|---|---|
| Processor | Ryzen R7 5800x3D (Undervolted, 4.45GHz all core) |
| Motherboard | Asus x570-F (BIOS Modded) |
| Cooling | Alphacool Apex UV - Alphacool Eisblock XPX Aurora + EK Quantum ARGB 3090 w/ active backplate |
| Memory | 2x32GB DDR4 3600 Corsair Vengeance RGB @3866 C18-22-22-22-42 TRFC704 (1.4V Hynix MJR - SoC 1.15V) |
| Video Card(s) | Galax RTX 3090 SG 24GB: Underclocked to 1700Mhz 0.750v (375W down to 250W)) |
| Storage | 2TB WD SN850 NVME + 1TB Sasmsung 970 Pro NVME + 1TB Intel 6000P NVME USB 3.2 |
| Display(s) | Phillips 32 32M1N5800A (4k144), LG 32" (4K60) | Gigabyte G32QC (2k165) | Phillips 328m6fjrmb (2K144) |
| Case | Fractal Design R6 |
| Audio Device(s) | Logitech G560 | Corsair Void pro RGB |Blue Yeti mic |
| Power Supply | Fractal Ion+ 2 860W (Platinum) (This thing is God-tier. Silent and TINY) |
| Mouse | Logitech G Pro wireless + Steelseries Prisma XL |
| Keyboard | Razer Huntsman TE ( Sexy white keycaps) |
| VR HMD | Oculus Rift S + Quest 2 |
| Software | Windows 11 pro x64 (Yes, it's genuinely a good OS) OpenRGB - ditch the branded bloatware! |
| Benchmark Scores | Nyooom. |
That is a LOT more glue than you need, and if its not dry in a few seconds it's not the right type for sureUsed akfix 702 glue on RX 580, doesn't seem right
after 14 hours coil whine is still there, no change, but the glue is not completely dry yet
cotton swab and acetone time for the excess that leaked out, it can't harm but will reduce cooling if its on topo f something a heatsink/heatpad is meant to touch
That's one way to cool it...I can't find the sound source, it seems the main chip is whining. I touched every element on the board while its running and the sound doesn't change
make sure you have airflow over the VRM's while you do this so they dont burn up
you need a smaller cooler so you can get closer and listen easier, i guess.
- Joined
- Jun 14, 2021
- Messages
- 33 (0.03/day)
HiA forum user recently asked about Coil Whine, which is the noise a choke coil sometimes makes as it operates. This is almost always a video card problem, but can happen on any other computer or electronics components employing a choke in it's circuitry, including motherboards & power supplies.
I have for decades been using a very easy, quick and, most importantly, permanent fix. This fix works 95% of the time to quiet the noise to the point that it is not audible more than 8inches/20cm away. The rest of the time, the noise is barely audible.
A word of caution! If your part is under warranty, you may wish to consider doing an RMA. Many(not all) manufacturers actually want the noisy part back so they can test and analyze it for re-engineering to improve future designs. If your part is NOT under warranty, read on...
What you need:
Any tools required to disassemble the part to access the choke coils in question.
One or more containers of thin liquid cyanoacrylate based glue, commonly known as "Super Glue".
The brand of super glue you choose is not important. The type is. The type must be of low viscosity so it can quickly wick into the empty spaces between the choke coil and the board it's soldered to. The applicator having a narrow tip nozzle is important as it will make applying the glue more precise. See below.
The glue of choice is the proper SuperGlue brand, but I also use the brand that can be found at Harbor Freight.
View attachment 291994
For this newest example, I'm using a Sparkle GeForce GTX560 2GB which has been noisy.
View attachment 291987View attachment 291988
This card only has 5 main choke coils so sealing them will be easy.
View attachment 291989
In this photo you can see how I'm applying the glue directly into the gap. Please note, the glue needs to be applied at multiple place around each choke housing shell, not just in one spot.
View attachment 291990
This photo shows how the glue has wicked itself into the gaps.
View attachment 291991
And here are two angle of the choke near the top of the card.
View attachment 291992
View attachment 291993
Notice how I've used a generous amount of glue to allow the wicking action to reach maximum effect.
It's important to use enough glue to completely wick the entire edge of the choke. Then you let it cure for at least an hour(while super glue sets in seconds it still needs an hour or two to fully cure).
Once cured the fix is complete and you're good to go! Put everything back together and enjoy.
Important EDIT:
After two reports and some research it has been discovered that the Loctite brand superglue found in many retail stores is a hybrid glue that has a consistency which falls inbetween gel types and the fluid types. As a superglue it seems like a good choice.
However in this use-case-scenario, it is NOT recommended as it is not as fluidic as normal liquid superglue types and will not wick into the spaces between the choke coil housing and PCB!
EDIT: I have redone portions of this guide to give more details, info and better photo's. Thank's to the Mods for granting a perma-edit button so I can do running updates to this thread!
Could you also use engineering silicon? I have a 4090 with coil whine; as far as I know, the blame is either the caps or the 70a inductors. Looking at this photo https://www.techpowerup.com/review/msi-geforce-rtx-4090-suprim-x/images/front_full.jpg take it the caps are on the far right, round silver/blue, but unsure about inductors?
Does the sealant go around the base only?
Thanks
- Joined
- Oct 6, 2004
- Messages
- 58,413 (8.07/day)
- Location
- Oystralia
| System Name | Rainbow Sparkles (Power efficient, <350W gaming load) |
|---|---|
| Processor | Ryzen R7 5800x3D (Undervolted, 4.45GHz all core) |
| Motherboard | Asus x570-F (BIOS Modded) |
| Cooling | Alphacool Apex UV - Alphacool Eisblock XPX Aurora + EK Quantum ARGB 3090 w/ active backplate |
| Memory | 2x32GB DDR4 3600 Corsair Vengeance RGB @3866 C18-22-22-22-42 TRFC704 (1.4V Hynix MJR - SoC 1.15V) |
| Video Card(s) | Galax RTX 3090 SG 24GB: Underclocked to 1700Mhz 0.750v (375W down to 250W)) |
| Storage | 2TB WD SN850 NVME + 1TB Sasmsung 970 Pro NVME + 1TB Intel 6000P NVME USB 3.2 |
| Display(s) | Phillips 32 32M1N5800A (4k144), LG 32" (4K60) | Gigabyte G32QC (2k165) | Phillips 328m6fjrmb (2K144) |
| Case | Fractal Design R6 |
| Audio Device(s) | Logitech G560 | Corsair Void pro RGB |Blue Yeti mic |
| Power Supply | Fractal Ion+ 2 860W (Platinum) (This thing is God-tier. Silent and TINY) |
| Mouse | Logitech G Pro wireless + Steelseries Prisma XL |
| Keyboard | Razer Huntsman TE ( Sexy white keycaps) |
| VR HMD | Oculus Rift S + Quest 2 |
| Software | Windows 11 pro x64 (Yes, it's genuinely a good OS) OpenRGB - ditch the branded bloatware! |
| Benchmark Scores | Nyooom. |
around the base only, hoping to be absorbed inside a littleHi
Could you also use engineering silicon? I have a 4090 with coil whine; as far as I know, the blame is either the caps or the 70a inductors. Looking at this photo https://www.techpowerup.com/review/msi-geforce-rtx-4090-suprim-x/images/front_full.jpg take it the caps are on the far right, round silver/blue, but unsure about inductors?
Does the sealant go around the base only?
Thanks
that base is a shield for both EMI and vibration - and they come loose.
Heres one smashed apart from google, to help visualise it
You're hoping to
1. Seal the air gap the noise leaks out of
2. stop vibration
3. both
- Joined
- Jul 5, 2013
- Messages
- 26,134 (6.46/day)
You mean engineering silicone? Maybe? I've never used it. Have a link to the stuff you're talking about?Could you also use engineering silicon?
- Joined
- Jun 14, 2021
- Messages
- 33 (0.03/day)
https://cpc.farnell.com/chip-quik/egs10c-20g/silicone-adhesive-sealant-20g/dp/SA03781 The problem is https://www.igorslab.de/en/msi-gefo...quid-x-in-test-with-water-stays-no-eye-dry/3/ I think the caps are the NVVDD and there is a lot of them. I also think that they are within an outer shell, so at best, you might seal the shell base but that's is? TBH,You mean engineering silicone? Maybe? I've never used it. Have a link to the stuff you're talking about?
https://www.igorslab.de/en/msi-gefo...quid-x-in-test-with-water-stays-no-eye-dry/3/ Looking at this, is it the NVVDD that are the caps? The problem is there are two small ones inside each.around the base only, hoping to be absorbed inside a little
that base is a shield for both EMI and vibration - and they come loose.
Heres one smashed apart from google, to help visualise it
View attachment 300594
You're hoping to
1. Seal the air gap the noise leaks out of
2. stop vibration
3. both
- Joined
- Jul 5, 2013
- Messages
- 26,134 (6.46/day)
That stuff will not harm anything on a video card. Not sure how well it will seal any gaps as there will be no wicking action involved.https://cpc.farnell.com/chip-quik/egs10c-20g/silicone-adhesive-sealant-20g/dp/SA03781 The problem is https://www.igorslab.de/en/msi-gefo...quid-x-in-test-with-water-stays-no-eye-dry/3/ I think the caps are the NVVDD and there is a lot of them.
SourTurtle
New Member
- Joined
- Jun 14, 2023
- Messages
- 2 (0.00/day)
Hello, appreciate the effort you've put into this post. I have a 4090 FE with bad coil whine. Already RMAd once and got a brand new one still with coil whine. Tried the card in a completely different system and with multiple different PSUs, but coil whine persists.
Would you mind showing me what parts I need to apply glue to? I'm thinking it's all of the things that say "LR22" but want to be sure. If those are the right things, how do you get glue on the top and bottom with such narrow space between them?
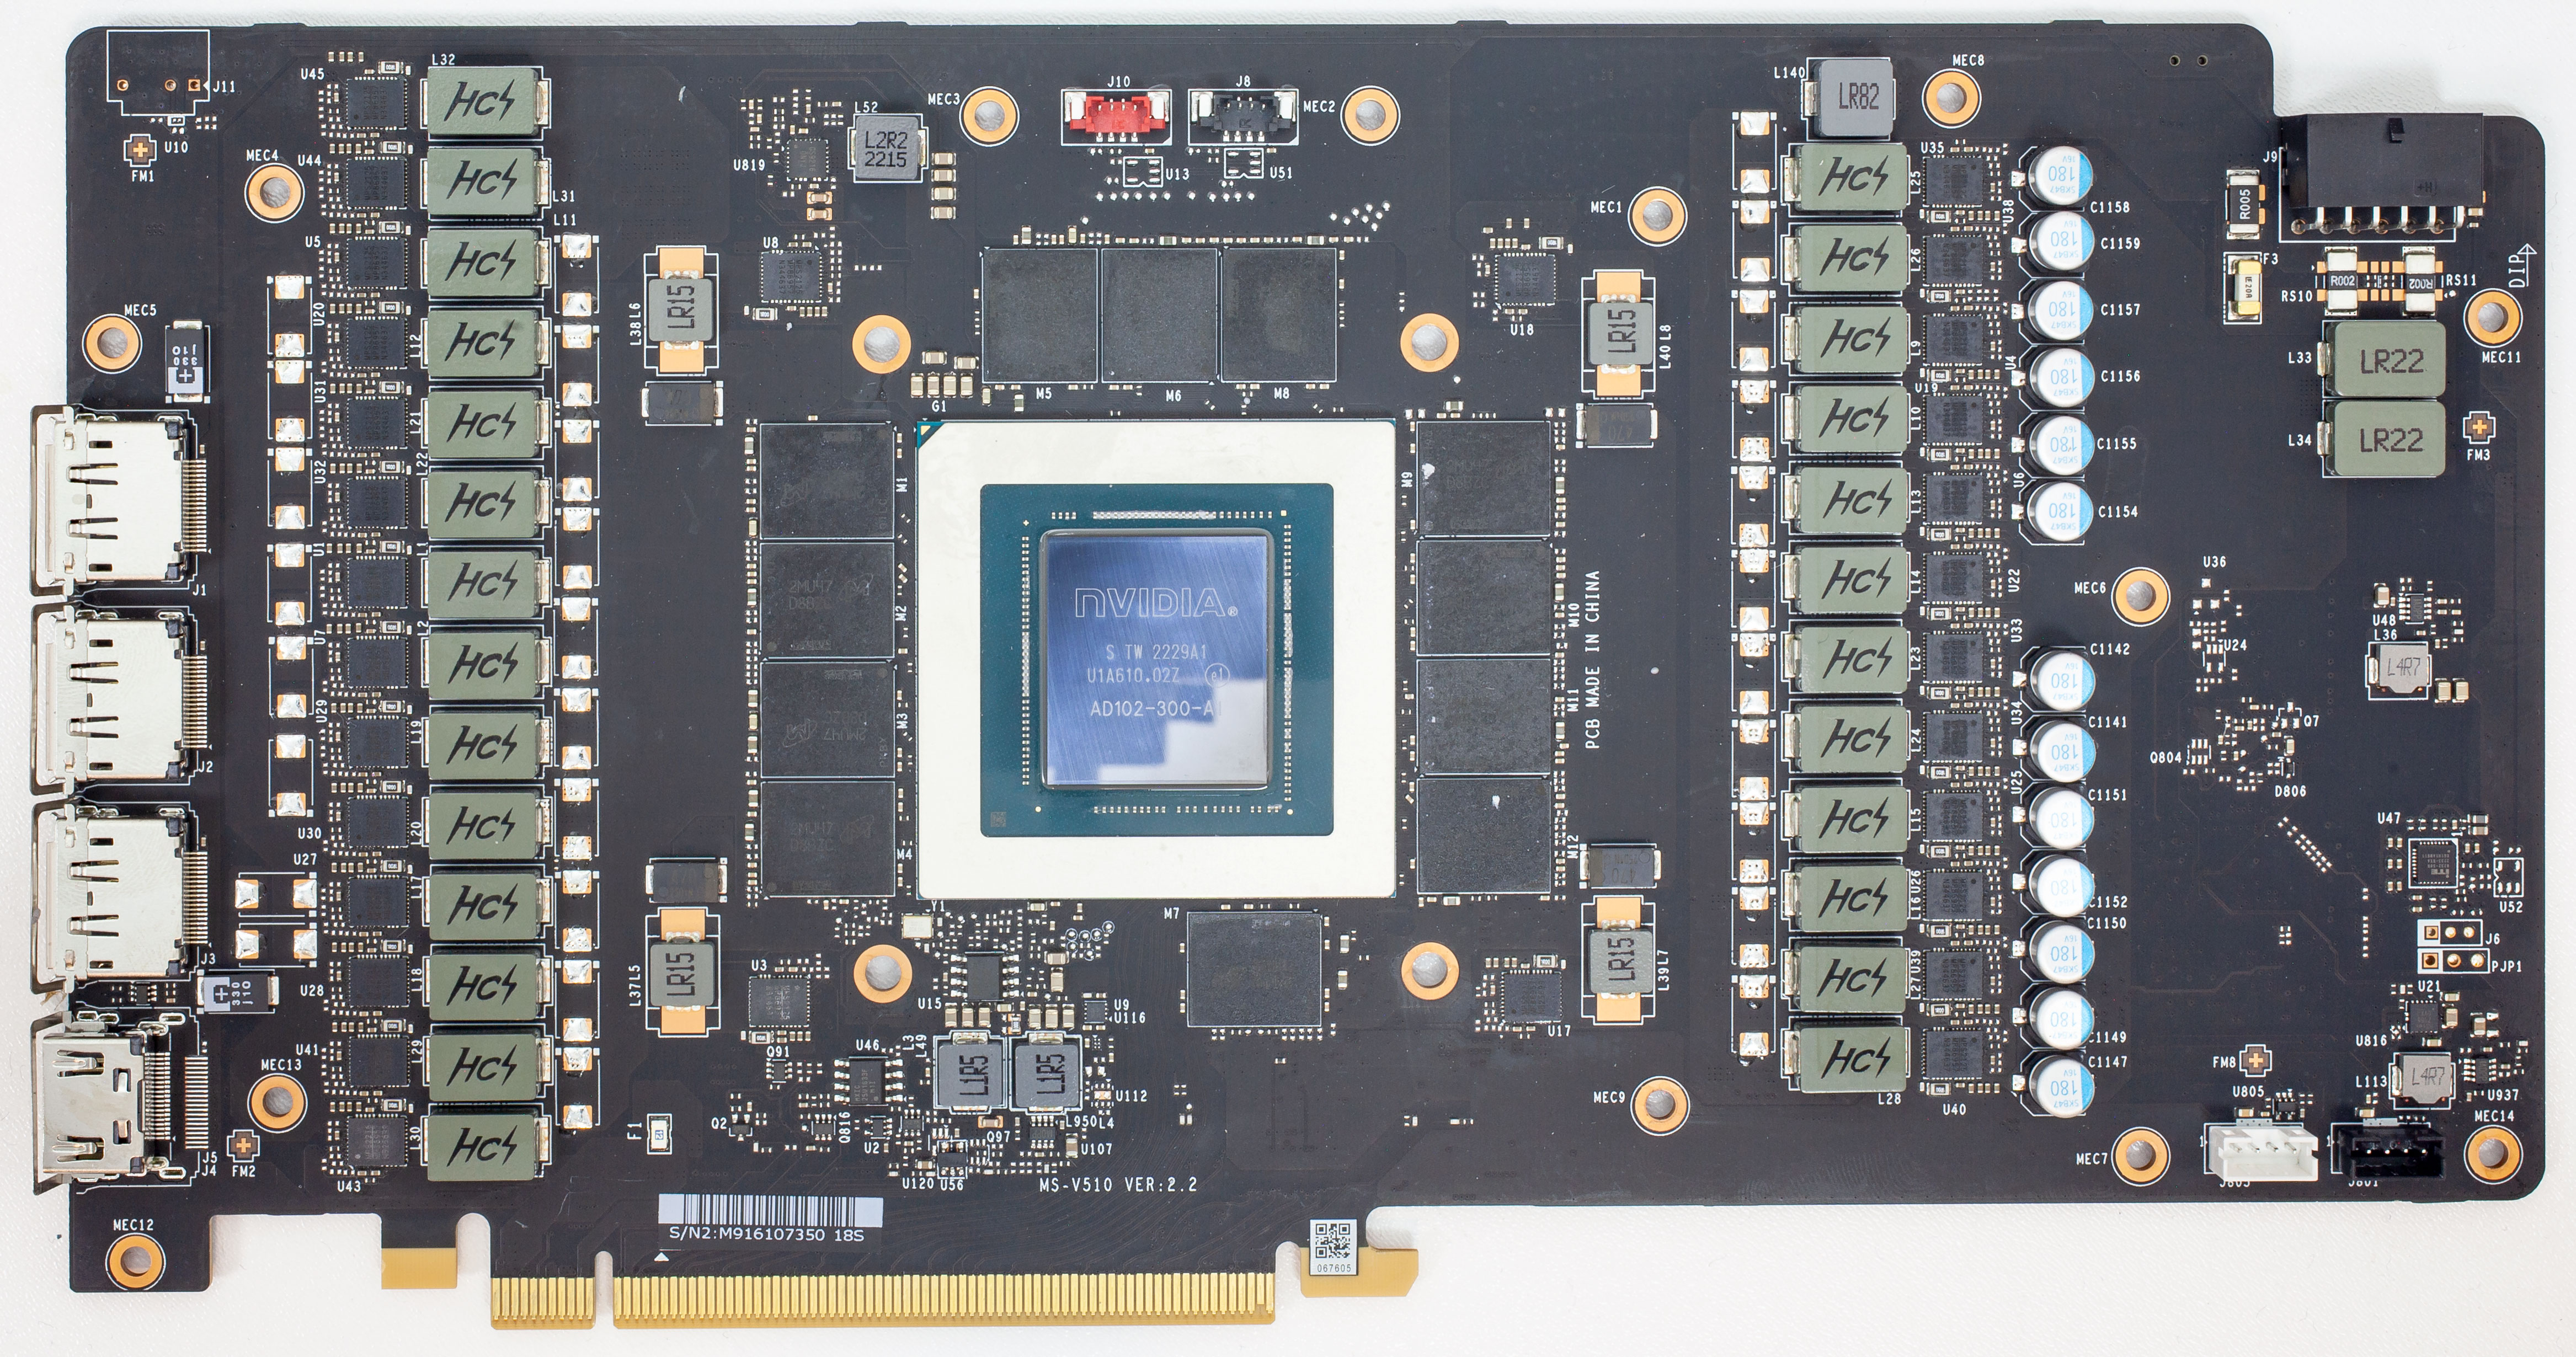
PCB images located here: https://www.techpowerup.com/review/nvidia-geforce-rtx-4090-founders-edition/4.html
Would you mind showing me what parts I need to apply glue to? I'm thinking it's all of the things that say "LR22" but want to be sure. If those are the right things, how do you get glue on the top and bottom with such narrow space between them?
PCB images located here: https://www.techpowerup.com/review/nvidia-geforce-rtx-4090-founders-edition/4.html
Last edited:
- Joined
- Jun 14, 2021
- Messages
- 33 (0.03/day)
Once the warranty is up, I am going to give this a go. What glue did you settle for as your number 1 go-to? ThanksThat stuff will not harm anything on a video card. Not sure how well it will seal any gaps as there will be no wicking action involved.
- Joined
- Jul 5, 2013
- Messages
- 26,134 (6.46/day)
The super glue posted in the OP.What glue did you settle for as your number 1 go-to?
The chokes that need sealing are highlighted in red.Hello, appreciate the effort you've put into this post. I have a 4090 FE with bad coil whine. Already RMAd once and got a brand new one still with coil whine. Tried the card in a completely different system and with multiple different PSUs, but coil whine persists.
Would you mind showing me what parts I need to apply glue to? I'm thinking it's all of the things that say "LR22" but want to be sure. If those are the right things, how do you get glue on the top and bottom with such narrow space between them?
PCB images located here: https://www.techpowerup.com/review/nvidia-geforce-rtx-4090-founders-edition/4.html
Last edited:
- Joined
- Jun 14, 2021
- Messages
- 33 (0.03/day)
Thanks, I just wanted to make sure you did not find anything better since then. Cheers for the help.The super glue posted in the OP.
The chokes that need sealing are highlighted in red.
SourTurtle
New Member
- Joined
- Jun 14, 2023
- Messages
- 2 (0.00/day)
Awesome, thank you so much. Is glue needed on all 4 sides? Some of them are so close together I'm not sure how I'd reliably get in there.The super glue posted in the OP.
The chokes that need sealing are highlighted in red.View attachment 300879
- Joined
- Jul 5, 2013
- Messages
- 26,134 (6.46/day)
Yes, completely surround the parts on all sides so that the glue can completely seal the gaps between the choke and the PCB.Is glue needed on all 4 sides?

- Joined
- Jul 30, 2007
- Messages
- 33 (0.01/day)
- Location
- izmir/Turkey
| System Name | Antec |
|---|---|
| Processor | intel core2 duo e8500 @4.260 |
| Motherboard | asus p5q deluxe |
| Cooling | stock |
| Memory | 4gb kinston pc2 6400 |
| Video Card(s) | 1xpoint of view 9800 gtx +1x zotac 9800gtx+amp sli |
| Storage | 2x 500 samsung |
| Display(s) | 19" samsung lcd |
| Power Supply | corsair hx 850 |
| Software | windows7 ultimate x64 |
Hi, and thanks to @lexluthermiester following this topic for quite sometime .I have a Strix 4090 oc with very bad coil whine but as I see the success rate is very low so do you think does it worth the effort and voiding warranty?
- Joined
- Oct 15, 2006
- Messages
- 14,701 (2.26/day)
- Location
- Missoula, MT, USA
| System Name | Kursah's Gaming Rig 2018 (2022 Upgrade) - Ryzen+ Edition | Gaming Laptop (Lenovo Legion 5i Pro 2022) |
|---|---|
| Processor | R7 5800X @ Stock | i7 12700H @ Stock |
| Motherboard | Asus ROG Strix X370-F Gaming BIOS 6203| Legion 5i Pro NM-E231 |
| Cooling | Noctua NH-U14S Push-Pull + NT-H1 | Stock Cooling |
| Memory | TEAMGROUP T-Force Vulcan Z 32GB (2x16) DDR4 4000 @ 3600 18-20-20-42 1.35v | 32GB DDR5 4800 (2x16) |
| Video Card(s) | Palit GeForce RTX 4070 JetStream 12GB | CPU-based Intel Iris XE + RTX 3070 8GB 150W |
| Storage | 4TB SP UD90 NVME, 960GB SATA SSD, 2TB HDD | 1TB Samsung OEM NVME SSD + 4TB Crucial P3 Plus NVME SSD |
| Display(s) | Acer 28" 4K VG280K x2 | 16" 2560x1600 built-in |
| Case | Corsair 600C - Stock Fans on Low | Stock Metal/Plastic |
| Audio Device(s) | Aune T1 mk1 > AKG K553 Pro + JVC HA-RX 700 (Equalizer APO + PeaceUI) | Bluetooth Earbuds (BX29) |
| Power Supply | EVGA 750G2 Modular + APC Back-UPS Pro 1500 | 300W OEM (heavy use) or Lenovo Legion C135W GAN (light) |
| Mouse | Logitech G502 | Logitech M330 |
| Keyboard | HyperX Alloy Core RGB | Built in Keyboard (Lenovo laptop KB FTW) |
| Software | Windows 11 Pro x64 | Windows 11 Home x64 |
Topic stickied. Past due for it, and apologies it took so long.
Thanks for @lexluthermiester's and the community's efforts. Please keep it going folks!
Thanks for @lexluthermiester's and the community's efforts. Please keep it going folks!
- Joined
- Jul 5, 2013
- Messages
- 26,134 (6.46/day)
Please keep in mind that many people try this and don't chime in with a success story, which is ok. Kind of expected that. Usually people chime in when they have issues or need help. Most of the time, this fix works well. It's not always perfect and sometimes it doesn't do much, which can indicate a motherboard or PSU problem. Be happy to help you with tips or pointers. Just chime in.Hi, and thanks to @lexluthermiester following this topic for quite sometime .I have a Strix 4090 oc with very bad coil whine but as I see the success rate is very low so do you think does it worth the effort and voiding warranty?
Forgot to respond here, sorry. As mentioned above, you might be having a motherboard or PSU issue. Motherboards and PSUs both have choke coils in/on them and they can resonate as well. Motherboards are easy to work on, but PSU's require careful work. If anyone would like me to add some PSU examples to the the original post, let me know and I'll dedicate some time to it.I can't find the sound source, it seems the main chip is whining. I touched every element on the board while its running and the sound doesn't change
Last edited:
- Joined
- Jun 14, 2021
- Messages
- 33 (0.03/day)
HiA forum user recently asked about Coil Whine, which is the noise a choke coil sometimes makes as it operates. This is almost always a video card problem, but can happen on any other computer or electronics components employing a choke in it's circuitry, including motherboards & power supplies.
I have for decades been using a very easy, quick and, most importantly, permanent fix. This fix works 95% of the time to quiet the noise to the point that it is not audible more than 8inches/20cm away. The rest of the time, the noise is barely audible.
A word of caution! If your part is under warranty, you may wish to consider doing an RMA. Many(not all) manufacturers actually want the noisy part back so they can test and analyze it for re-engineering to improve future designs. If your part is NOT under warranty, read on...
What you need:
Any tools required to disassemble the part to access the choke coils in question.
One or more containers of thin liquid cyanoacrylate based glue, commonly known as "Super Glue".
The brand of super glue you choose is not important. The type is. The type must be of low viscosity so it can quickly wick into the empty spaces between the choke coil and the board it's soldered to. The applicator having a narrow tip nozzle is important as it will make applying the glue more precise. See below.
The glue of choice is the proper SuperGlue brand, but I also use the brand that can be found at Harbor Freight.
View attachment 291994
For this newest example, I'm using a Sparkle GeForce GTX560 2GB which has been noisy.
View attachment 291987View attachment 291988
This card only has 5 main choke coils so sealing them will be easy.
View attachment 291989
In this photo you can see how I'm applying the glue directly into the gap. Please note, the glue needs to be applied at multiple place around each choke housing shell, not just in one spot.
View attachment 291990
This photo shows how the glue has wicked itself into the gaps.
View attachment 291991
And here are two angle of the choke near the top of the card.
View attachment 291992
View attachment 291993
Notice how I've used a generous amount of glue to allow the wicking action to reach maximum effect.
It's important to use enough glue to completely wick the entire edge of the choke. Then you let it cure for at least an hour(while super glue sets in seconds it still needs an hour or two to fully cure).
Once cured the fix is complete and you're good to go! Put everything back together and enjoy.
Important EDIT:
After two reports and some research it has been discovered that the Loctite brand superglue found in many retail stores is a hybrid glue that has a consistency which falls inbetween gel types and the fluid types. As a superglue it seems like a good choice.
However in this use-case-scenario, it is NOT recommended as it is not as fluidic as normal liquid superglue types and will not wick into the spaces between the choke coil housing and PCB!
EDIT: I have redone portions of this guide to give more details, info and better photo's. Thank's to the Mods for granting a perma-edit button so I can do running updates to this thread!
Sorry, I forgot to post this. Is it the bits that I have highlighted in blue that need done?
Thanks
Attachments
-
 front_full.jpg2.5 MB · Views: 122
- Joined
- Jul 5, 2013
- Messages
- 26,134 (6.46/day)
All of them, including the ones with the question marks.Hi
Sorry, I forgot to post this. Is it the bits that I have highlighted in blue that need done?
Thanks
- Joined
- Oct 6, 2004
- Messages
- 58,413 (8.07/day)
- Location
- Oystralia
| System Name | Rainbow Sparkles (Power efficient, <350W gaming load) |
|---|---|
| Processor | Ryzen R7 5800x3D (Undervolted, 4.45GHz all core) |
| Motherboard | Asus x570-F (BIOS Modded) |
| Cooling | Alphacool Apex UV - Alphacool Eisblock XPX Aurora + EK Quantum ARGB 3090 w/ active backplate |
| Memory | 2x32GB DDR4 3600 Corsair Vengeance RGB @3866 C18-22-22-22-42 TRFC704 (1.4V Hynix MJR - SoC 1.15V) |
| Video Card(s) | Galax RTX 3090 SG 24GB: Underclocked to 1700Mhz 0.750v (375W down to 250W)) |
| Storage | 2TB WD SN850 NVME + 1TB Sasmsung 970 Pro NVME + 1TB Intel 6000P NVME USB 3.2 |
| Display(s) | Phillips 32 32M1N5800A (4k144), LG 32" (4K60) | Gigabyte G32QC (2k165) | Phillips 328m6fjrmb (2K144) |
| Case | Fractal Design R6 |
| Audio Device(s) | Logitech G560 | Corsair Void pro RGB |Blue Yeti mic |
| Power Supply | Fractal Ion+ 2 860W (Platinum) (This thing is God-tier. Silent and TINY) |
| Mouse | Logitech G Pro wireless + Steelseries Prisma XL |
| Keyboard | Razer Huntsman TE ( Sexy white keycaps) |
| VR HMD | Oculus Rift S + Quest 2 |
| Software | Windows 11 pro x64 (Yes, it's genuinely a good OS) OpenRGB - ditch the branded bloatware! |
| Benchmark Scores | Nyooom. |
You dont get glue on 'top and bottom' of themHello, appreciate the effort you've put into this post. I have a 4090 FE with bad coil whine. Already RMAd once and got a brand new one still with coil whine. Tried the card in a completely different system and with multiple different PSUs, but coil whine persists.
Would you mind showing me what parts I need to apply glue to? I'm thinking it's all of the things that say "LR22" but want to be sure. If those are the right things, how do you get glue on the top and bottom with such narrow space between them?
PCB images located here: https://www.techpowerup.com/review/nvidia-geforce-rtx-4090-founders-edition/4.html
Generic example image
you want it to make a seal around the bottom only, some of it will soak up onto the coil (the wick effect) and help a little more. That doesnt always work, not does it always need to be done - thats something you can't predict.
Only two sides are visible in this image, but the red line is where you'd glue - for close together parts, you'd have to simply get the glue in between them, but you do not want to drip it down from above all over the sides, the glue is only to help seal them up - it's not a paint job.
Edit: Better explanation, you only want the superglue at the PCB height, where PCB meets the box over the choke. That little box IS the noise abosrber they ship with.
They look like this inside,to help imagine that better - you're just reducing some high frequency vibration with this, by holding it in place against the PCB better, hopefully with an airtight seal to trap the noise in. If you cant reach that side to get glue there? Then noise probably cant get out either.