 10
10
Ploopy Open-Back Planar Magnetic Headphones Review - DIY Fun!
Fit, Comfort & Audio Performance »Closer Examination


You get a cable with the Ploopy headphones that works as expected but ends up disappointing in terms of the user experience. It's overly stiff, microphonic, and even retains memory to where I suspect this is a handmade cable done on a budget. It goes from a 3.5 mm TRS single-ended connector that plugs into the provided DAC/amp accessory or a standalone source. The cable is likely using copper conductor in two strands—one per channel—that continues throughout the length of the wires before it meets a Y-splitter that leads to the source connector as seen above. There is a cable guide you can move back and forth for some cable management and on the headphone side are two 3.5 mm TRS connectors again. Note the lack of L/R markings anywhere; I quickly switched to my own aftermarket cable (dual 3.5 mm to single 3.5 mm) for ease of use. You may want to consider a balanced cable if you plan to not use the provided DAC/amp, as the headphones are power-hungry.


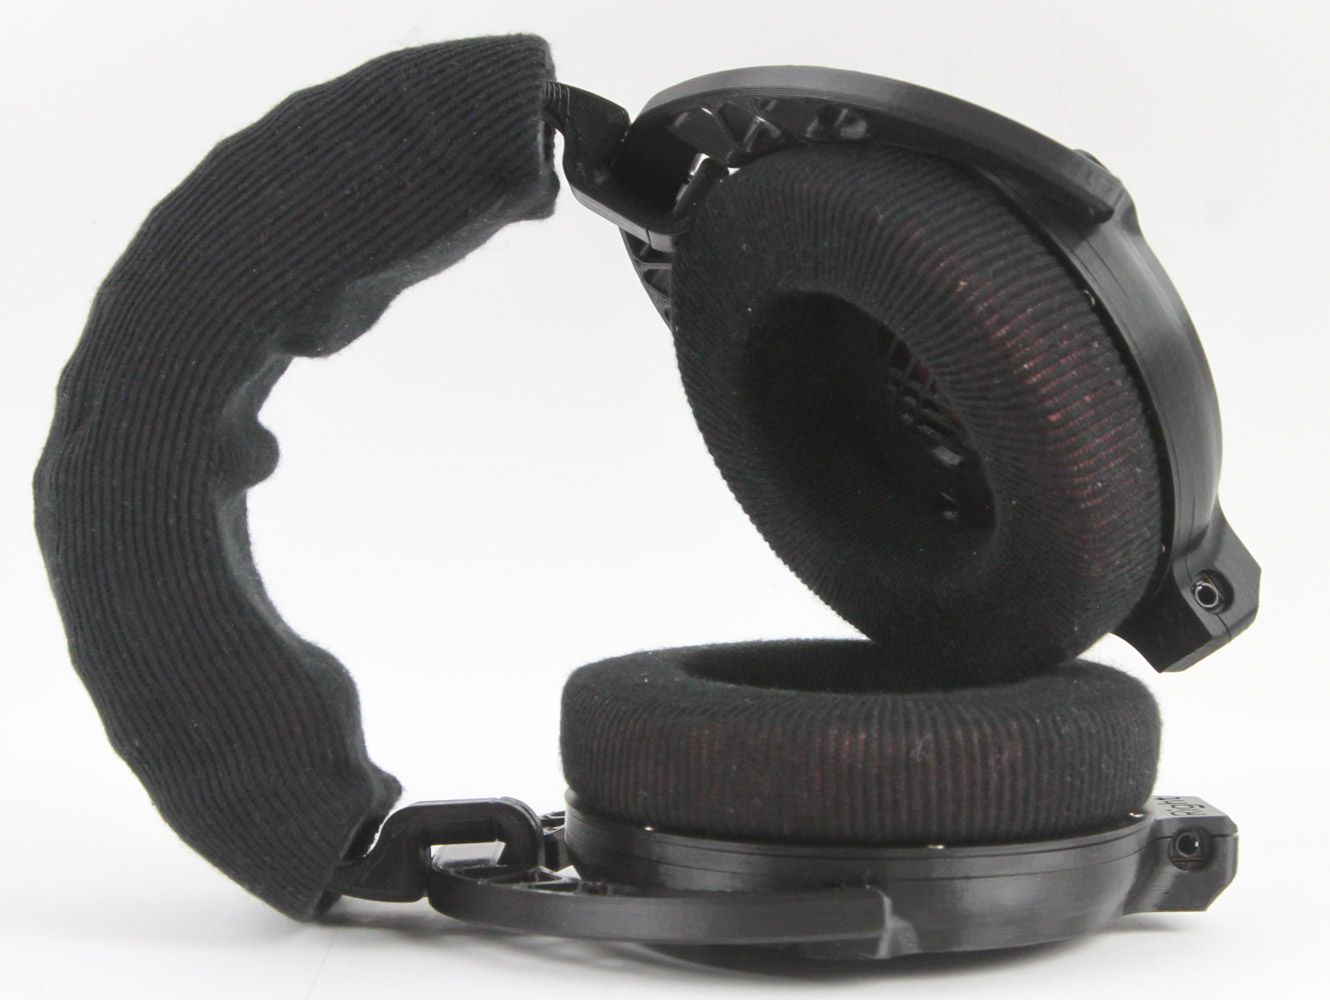
The Ploopy headphones were designed with the primary intention of allowing the end user to have parts readily available at all times. You can source them yourself wherein you will also need to 3D print several pieces or buy them as a kit from Ploopy and assemble yourself—this includes soldering, FYI. You can go through the full assembly instructions here on Github to get an idea of whether this is something you want to do yourself or go with the pre-assembled version as is the case here. Either way, if you opt for purchasing a kit or headphones from Ploopy, you have a choice of five colors for the 3D printed plastic 3D sections—red, black, blue, purple, and gold. I have the black version here which is a safe option and works well with the fabric covers used on the headband and ear pads. It's still clearly a DIY product that is quite large in size but not as heavy as you might think. The various contact points are looser than I'd like to where the headphones don't feel overly solid in the hands even though I know they will hold up well enough. The headband is basically the plastic piece going over a piece of thick soft foam and held in place with the stretchy fabric going around. It's quite plush and comfortable over the head. There's not much else to see on the sides outside of knowing it is theoretically possible to remove the ear cups from the headband by pushing down on the holding clip while simultaneously pulling it back, but that's easier said than done!


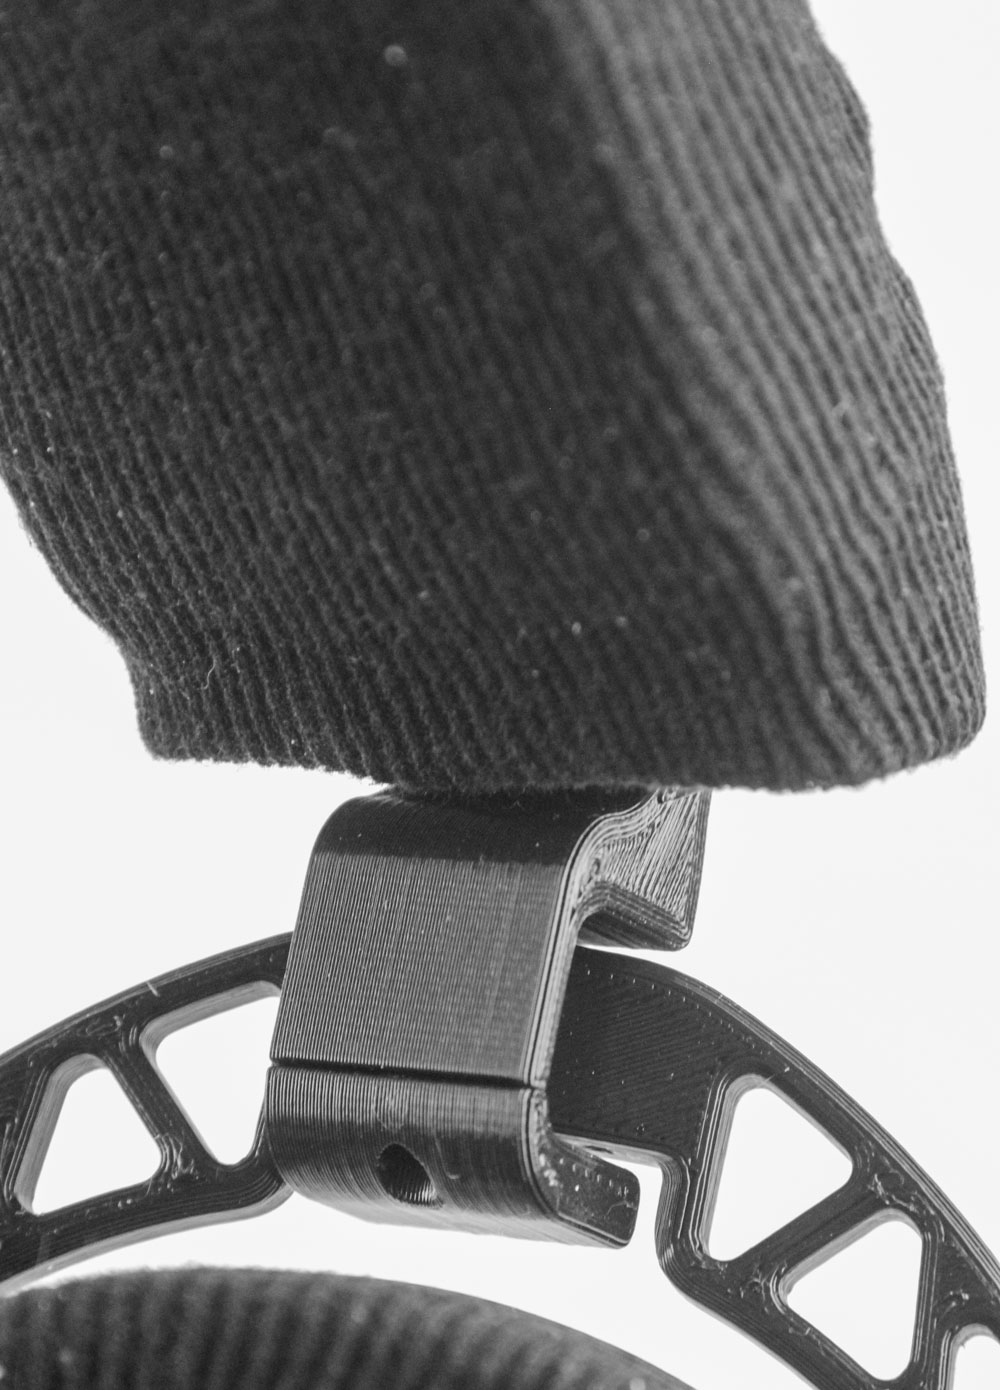
There are several sizing options built into the headband system wherein you simply pull down the yoke on either side. These are discrete steps allowing you to easily match up both sides and the notches are deep enough to where the softer plastic—compared to injection molded parts or even metal—should still be fine for you to tinker around and get them perfectly sized for you. There is plenty of space here for larger heads although those not as blessed in the head size metric may find even the smallest size to be just barely holding the headphones in place. Ploopy makes a smaller sized headband now which might help in this case so it is recommended you do a test fit by not fully pushing in the ear cups into the headband and seeing how the fit is first.


The yokes and the ear cup securement are all done via push pins so there is decent cup swivel and rotation available. In fact, you could have theoretically had 360° movement but Ploopy decided to keep things more manageable by using the frame to act as deliberate stop points after certain travel in either direction. Regardless, this does the job well in helping you achieve a good fit over the ears.

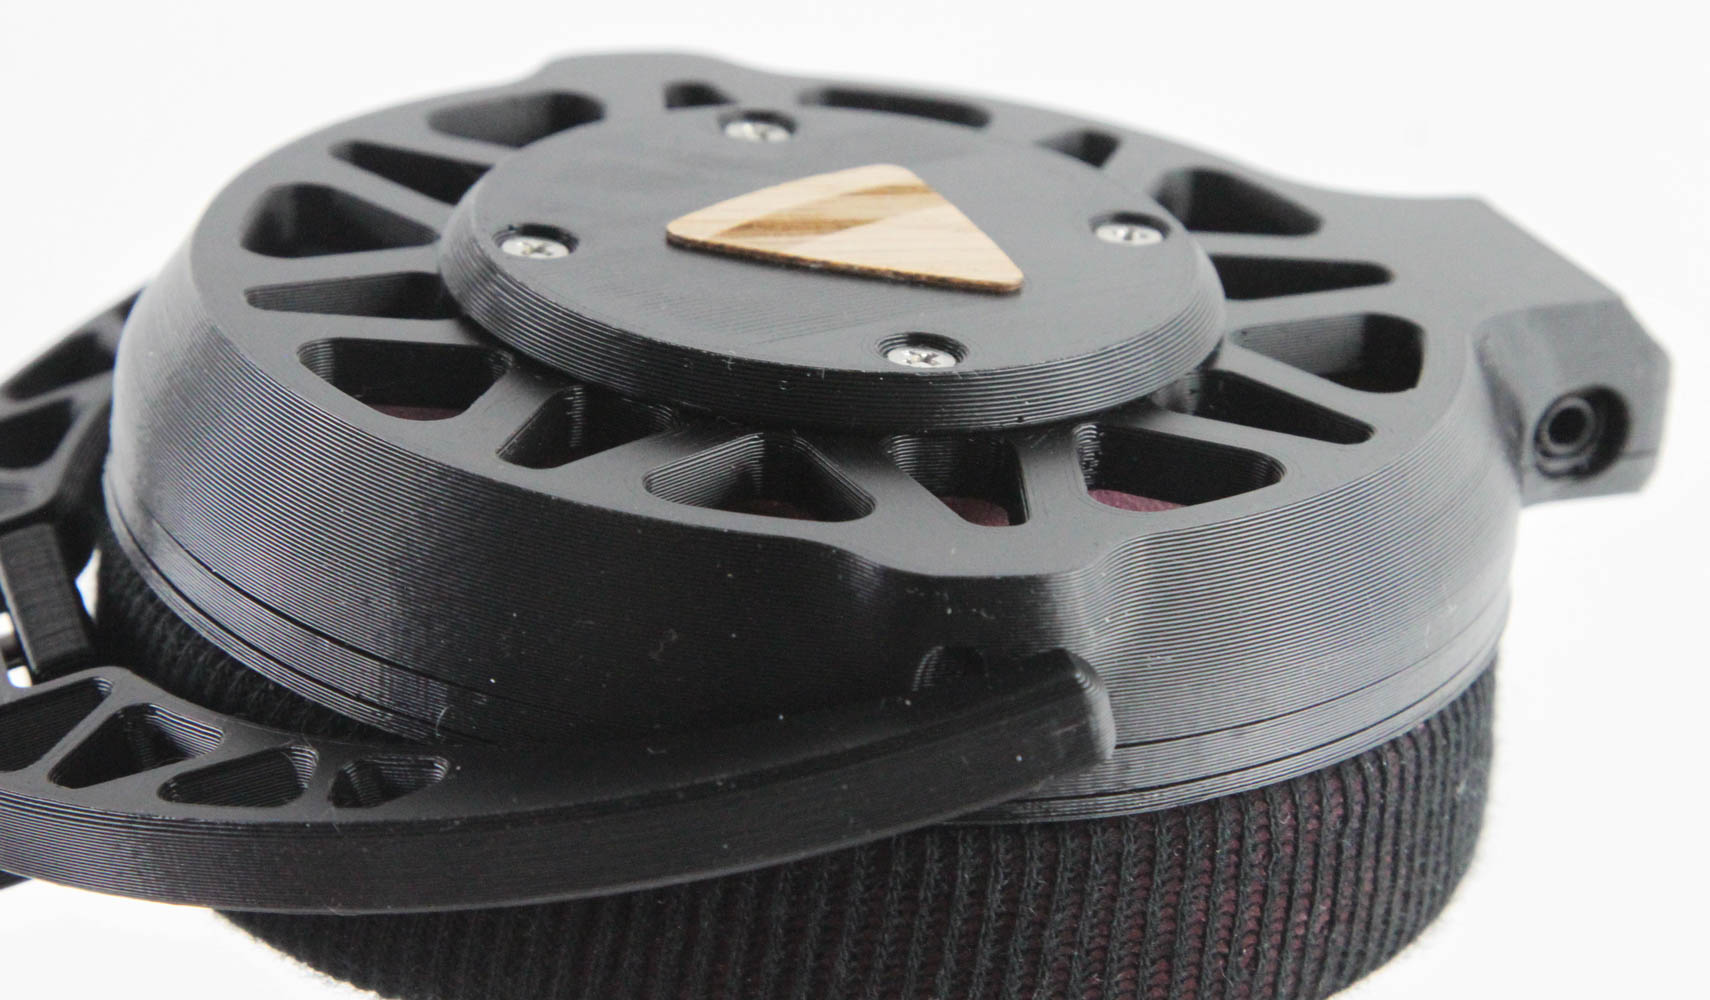


More 3D printed parts make up the ear cups of this open-back, over-ear set of headphones. The circular section you see on the outside houses the magnets below which drive the planar magnetic diaphragm back and forth. The cup design, especially on the inside, is done with tonality in mind as we see a resonator integrated on the locking ring the ear pads go on. Removing and installing the ear pads is quite simple since the locking ring twists in either direction until there is an opening in the pairing ring fit in the ear cups. This also means there is no specific orientation for the ear pads themselves and you will end up feeling it might work itself loose even if that's unlikely to happen. Removing the ear pads provides a closer look at that pink foam sheet which protects the driver behind it.


The ear pads share a lot with the headband in that you have a fabric cover going around a circular foam piece—looks like the same pink foam throughout. The pads are swappable and completely symmetrical so don't go expecting higher end versions which are sculpted to be thicker on the back than the front. You can also see the resonator in the middle aimed at, well, amplifying certain audio frequencies.


On the bottom of the ear cups is an extension where you will see left/right markings on the inside to help identify the two channels. There is also a 3.5 mm cable connector here but placed such that it juts out nearly perpendicular to the ear cups. The cable fits in fine but note the awkward angle it comes out of from the headphones. I would have much rather seen a far less aggressive angle of entry, say 30°. Either way, all you have to do now is connect the cable and then use the provided DAC/amp board or your own amplifier thereafter.
Jul 5th, 2025 14:09 CDT
change timezone
Latest GPU Drivers
New Forum Posts
- What are you playing? (23892)
- How do you view TPU & the internet in general? (With poll) (72)
- AMD RX 9070 XT & RX 9070 non-XT thread (OC, undervolt, benchmarks, ...) (155)
- Are there others on TPU with a dual system (two pc´s in one case)? (12)
- FINAL FANTASY XIV: Dawntrail Official Benchmark (196)
- Help Watercooling my PC (1)
- TPU's Nostalgic Hardware Club (20484)
- GravityMark v1.89 GPU Benchmark (310)
- Optane performance on AMD vs Intel (57)
- EVGA XC GTX 1660 Ti 8GB ROM (8)
Popular Reviews
- NVIDIA GeForce RTX 5050 8 GB Review
- Fractal Design Scape Review - Debut Done Right
- Crucial T710 2 TB Review - Record-Breaking Gen 5
- ASUS ROG Crosshair X870E Extreme Review
- PowerColor ALPHYN AM10 Review
- Sapphire Radeon RX 9060 XT Pulse OC 16 GB Review - An Excellent Choice
- Upcoming Hardware Launches 2025 (Updated May 2025)
- AMD Ryzen 7 9800X3D Review - The Best Gaming Processor
- Sapphire Radeon RX 9070 XT Nitro+ Review - Beating NVIDIA
- NVIDIA GeForce RTX 5060 8 GB Review
TPU on YouTube
Controversial News Posts
- Intel's Core Ultra 7 265K and 265KF CPUs Dip Below $250 (288)
- NVIDIA Grabs Market Share, AMD Loses Ground, and Intel Disappears in Latest dGPU Update (212)
- Some Intel Nova Lake CPUs Rumored to Challenge AMD's 3D V-Cache in Desktop Gaming (140)
- NVIDIA GeForce RTX 5080 SUPER Could Feature 24 GB Memory, Increased Power Limits (115)
- NVIDIA Launches GeForce RTX 5050 for Desktops and Laptops, Starts at $249 (105)
- Microsoft Partners with AMD for Next-gen Xbox Hardware (105)
- AMD Radeon RX 9070 XT Gains 9% Performance at 1440p with Latest Driver, Beats RTX 5070 Ti (102)
- Intel "Nova Lake‑S" Series: Seven SKUs, Up to 52 Cores and 150 W TDP (100)