 10
10
Razer Naga V2 Pro Review
Sensor & Performance »Build Quality
Overall build quality is solid. When shaking the mouse, a rattle comes from the scroll wheel. When applying lateral pressure, no creaking or flexing of the shell can be observed. Activating the side buttons by squeezing the sides is impossible. Lastly, accidental clicks when slamming down the mouse do not occur.Buttons

Main buttons on the Naga V2 Pro are very good. Pre and post-travel are low on the left button, whereas the right one has slightly higher pre and moderate post-travel. Button response is sharp and fairly snappy, and the buttons are very easy to spam. Button stiffness is low. A pair of Razer-branded 3rd-generation optical switches (90 M) is used.


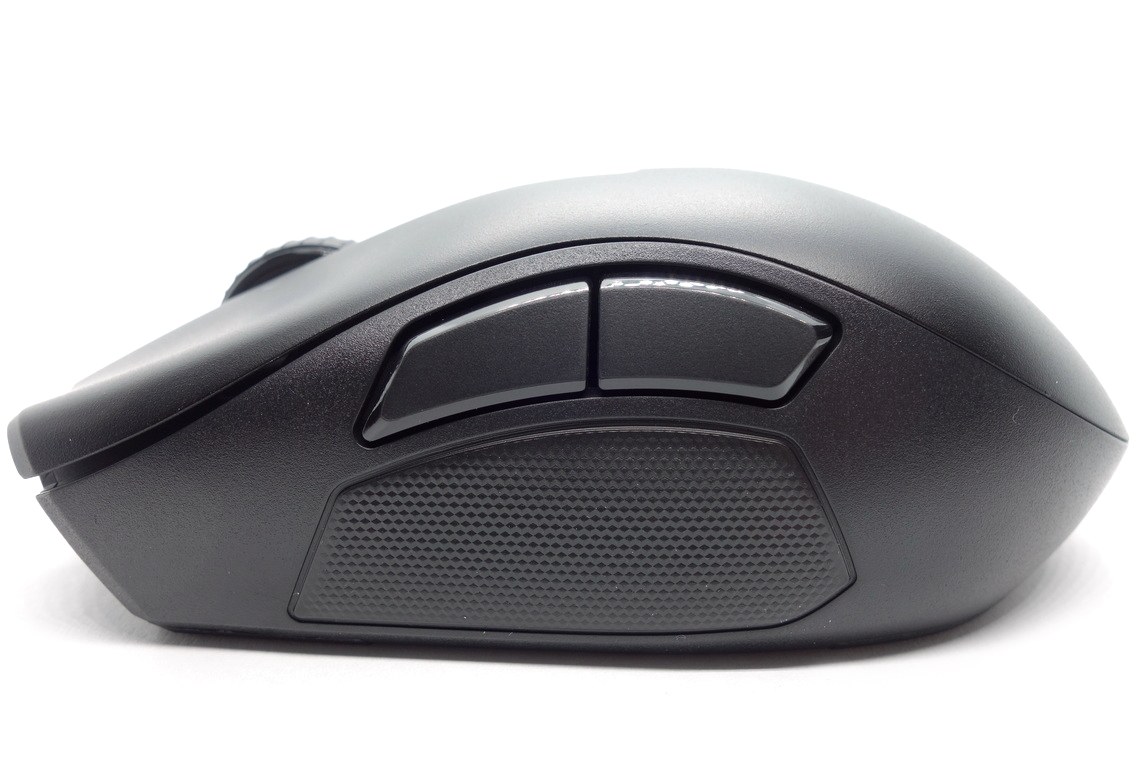
The Naga V2 Pro comes with three different side-button configurations that attach magnetically and may be swapped at any time. The 12-button side panel has the buttons arranged in the usual manner, and while the buttons don't feel entirely stable, their pre and post-travel is minimal. On the 6-button side panel, the buttons are arranged in two rows and bulge outwards to make it easier to tell them apart by feel. These buttons feel perfectly stable, and pre and post-travel are virtually nonexistent. The 2-button side panel resembles the usual side button configuration of non-MMO mice, and while placed higher than average, the buttons are reasonably easy to reach. Once again, pre and post-travel are kept to a minimum, and the actuation point is even across the entirety of these. All in all, side buttons are excellent.
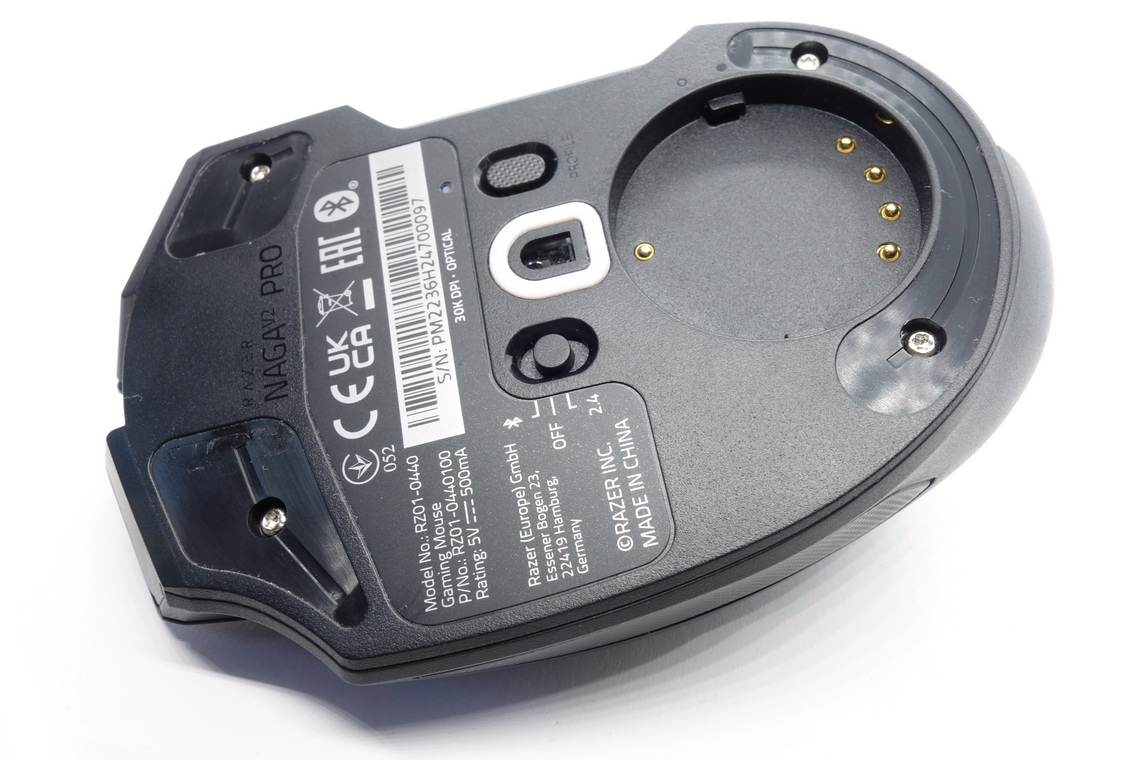
At the top of the mouse are two additional buttons. By default, the forward button switches between scroll wheel modes, which requires the mouse to be powered on, whereas the rear button cycles through the set CPI levels. A set of surface-mounted switches from Kailh (cyan plunger) are used here. The slider at the bottom switches between 2.4 GHz mode, Bluetooth, and off-state, and works just fine. An additional button on the bottom can be used to cycle through the five on-board memory profiles. A seemingly unbranded tactile switch is used here.
Scroll Wheel
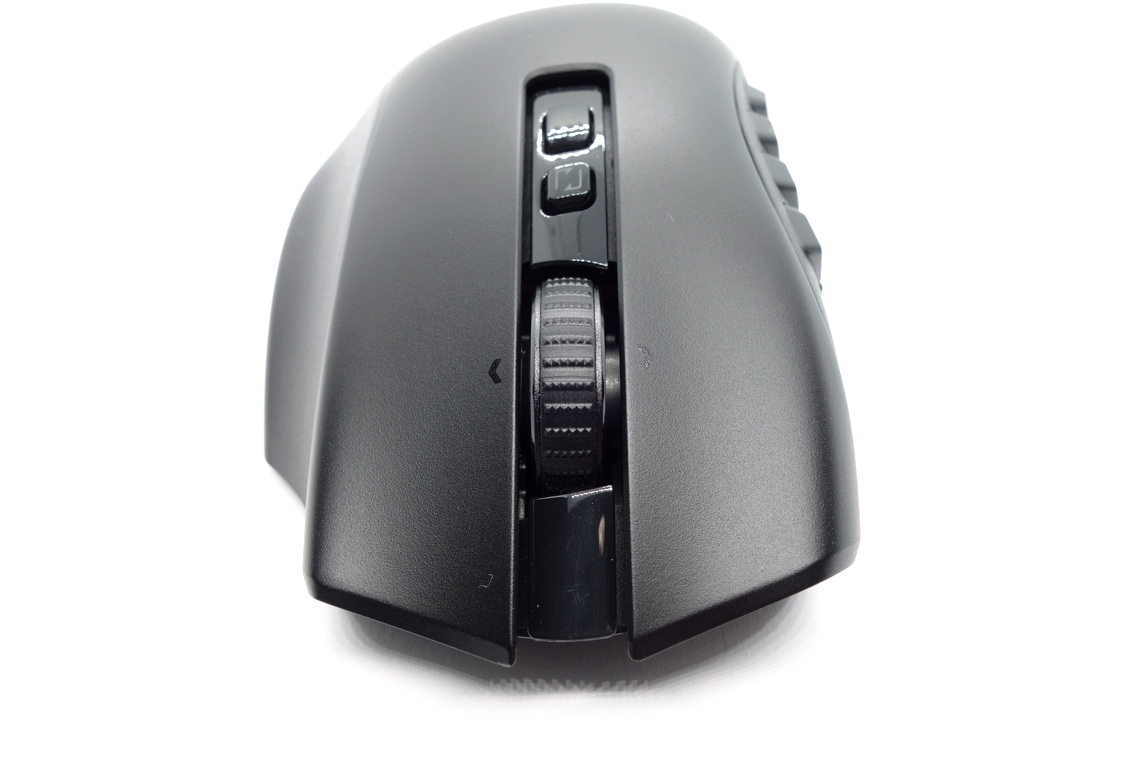

On the Naga V2 Pro, the scroll wheel uses neither a mechanical nor an optical encoder, or an encoder of any kind. Instead, a magnetorheological material is used, which is able to imitate several physical features typically exhibited by traditional encoders, such as scroll tension or the number of steps. Hence, given that its physical traits aren't fixed, the wheel cannot be rated as such. That said, no matter which configuration is used, the scroll wheel will be quieter than traditional encoders, and the subtle "push" when slowly scrolling past the apex of each teeth is absent as well. Functionally, the wheel is no different from one using a traditional encoder, and emulating familiar configurations (such as Zowie's infamously stiff 16-step optical encoder) is perfectly possible. In the video below, I'm cycling between the default scroll wheel configurations, which are Standard, Distinct, Ultra-fine, Adaptive, and Smooth Scroll:
Actuating the middle (scroll wheel) click requires medium to low force. The switch comes from TTC (black plunger). Furthermore, the scroll wheel can be tilted to the left and right, giving access to two additional button functions. I didn't encounter any issue with accidentally actuating the middle click when tilting the wheel. Two seemingly unbranded tactile switches (likely TTC) are used for these.
Surface
The Naga V2 Pro has a roughened matte surface at the top and hardened rubber with a dot pattern on the side when using the 6 or 2-button side panels. Grip is fine, and it doesn't attract fingerprints, dirt, or the likes too easily, is easy to clean, and there are no signs of wear left after doing so. All in all, very good materials.Button Sound Test
Disassembly
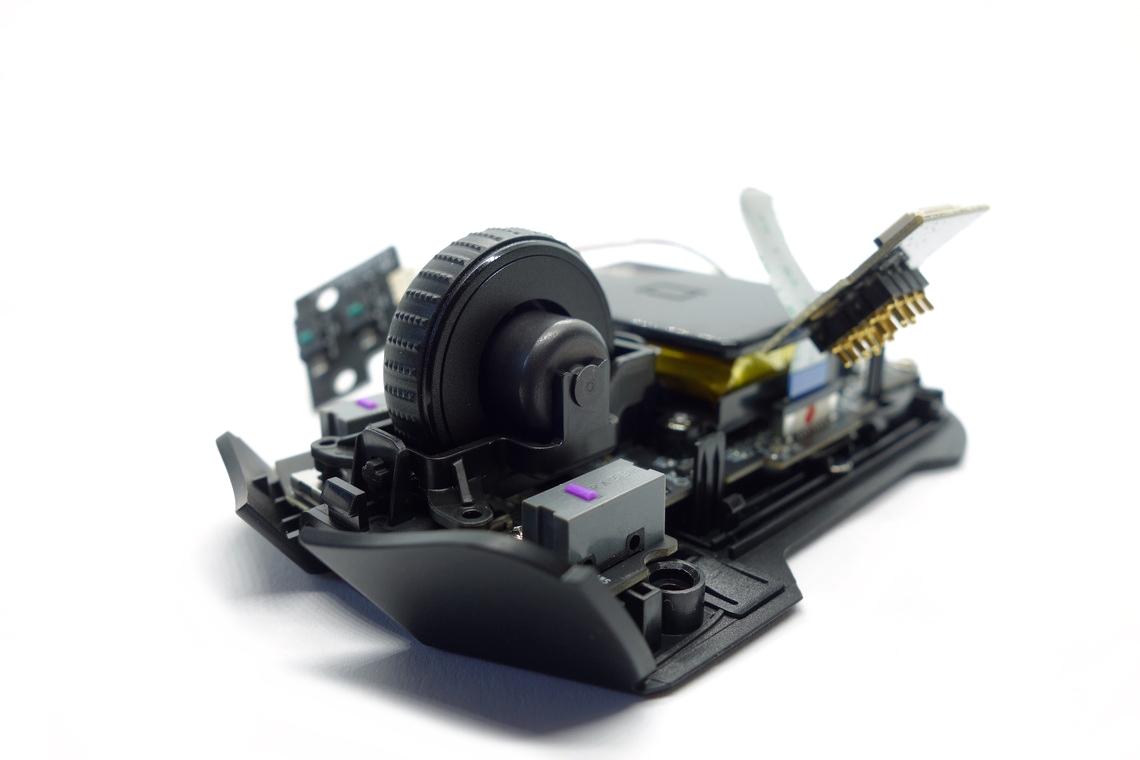
Disassembling the Naga V2 Pro is fairly easy. First, all skates except for the sensor ring need to be removed. Four Torx T6 screws are found beneath, which need to be unscrewed. Separating the top and bottom shell may require some extra effort, possibly by wedging a credit card or something similar in between.
The internal design is surprisingly straightforward. The top buttons sit on their own PCB screwed into the top shell and connected to the main PCB through a 3-pin connector. A PCB with the contacts for the side-button panels is screwed into the left side of the top shell. Everything else sits on the very large and absolutely packed main PCB, aside from the USB connector which is located on its own PCB below the main PCB. The plastic assembly holding the battery has been erected above the sensor and is secured with two screws. Four screws are used to affix the main PCB to the bottom shell, on top of the two screws used for the USB PCB. All PCBs are fairly thin. The MCU is a Nordic nRF52840, whose datasheet can be found here.
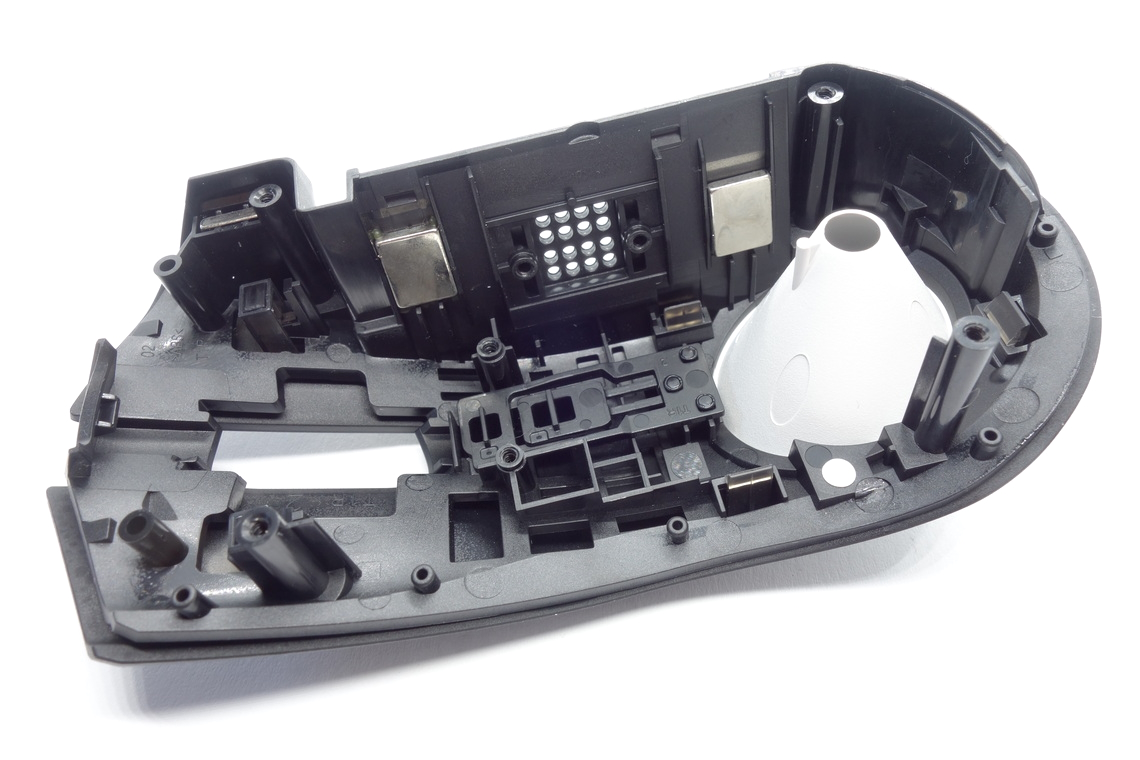
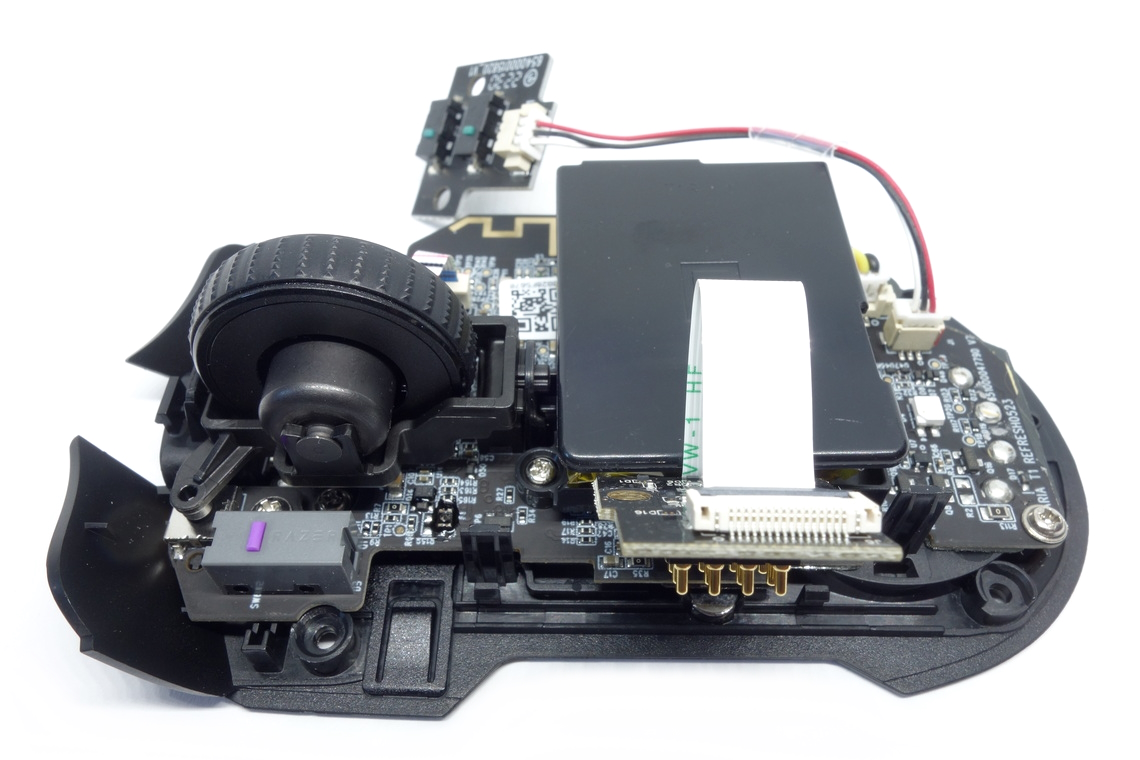
As for the soldering and general quality of the PCBs, I'm unable to find any noteworthy flaws.
Jul 5th, 2025 13:57 CDT
change timezone
Latest GPU Drivers
New Forum Posts
- AMD RX 9070 XT & RX 9070 non-XT thread (OC, undervolt, benchmarks, ...) (155)
- Are there others on TPU with a dual system (two pc´s in one case)? (12)
- FINAL FANTASY XIV: Dawntrail Official Benchmark (196)
- Help Watercooling my PC (1)
- TPU's Nostalgic Hardware Club (20484)
- How do you view TPU & the internet in general? (With poll) (71)
- GravityMark v1.89 GPU Benchmark (310)
- Optane performance on AMD vs Intel (57)
- EVGA XC GTX 1660 Ti 8GB ROM (8)
- TPU's Rosetta Milestones and Daily Pie Thread (2374)
Popular Reviews
- NVIDIA GeForce RTX 5050 8 GB Review
- Fractal Design Scape Review - Debut Done Right
- Crucial T710 2 TB Review - Record-Breaking Gen 5
- ASUS ROG Crosshair X870E Extreme Review
- PowerColor ALPHYN AM10 Review
- Sapphire Radeon RX 9060 XT Pulse OC 16 GB Review - An Excellent Choice
- Upcoming Hardware Launches 2025 (Updated May 2025)
- AMD Ryzen 7 9800X3D Review - The Best Gaming Processor
- Sapphire Radeon RX 9070 XT Nitro+ Review - Beating NVIDIA
- NVIDIA GeForce RTX 5060 8 GB Review
TPU on YouTube
Controversial News Posts
- Intel's Core Ultra 7 265K and 265KF CPUs Dip Below $250 (288)
- NVIDIA Grabs Market Share, AMD Loses Ground, and Intel Disappears in Latest dGPU Update (212)
- Some Intel Nova Lake CPUs Rumored to Challenge AMD's 3D V-Cache in Desktop Gaming (140)
- NVIDIA GeForce RTX 5080 SUPER Could Feature 24 GB Memory, Increased Power Limits (115)
- NVIDIA Launches GeForce RTX 5050 for Desktops and Laptops, Starts at $249 (105)
- Microsoft Partners with AMD for Next-gen Xbox Hardware (105)
- AMD Radeon RX 9070 XT Gains 9% Performance at 1440p with Latest Driver, Beats RTX 5070 Ti (102)
- Intel "Nova Lake‑S" Series: Seven SKUs, Up to 52 Cores and 150 W TDP (100)