 15
15
Razer Viper Mini Review - Lightweight, Precise and Affordable
Sensor & Performance »Build Quality
Overall build quality is very solid. There is a very slight rattle when shaking the mouse. I've been able to determine that it comes from the lens, which is loose—see below for more details. When applying lateral pressure, no creaking of the shell can be observed. Lastly, when slamming the mouse down, no accidental clicks occur.Buttons


Main buttons on the Viper Mini are very good. Pre-travel is very low and post-travel low, resulting in a firm and satisfying click feel. Yet, although not mushy, the buttons leave something to be desired in terms of tactility at the same time. Button stiffness is light. Razer-branded optical switches are used here. Compared to the regular Viper, the switches are the same, but the button mechanism has been revised in order to improve click feel.

Side buttons are good. Pre-travel is moderate, but post-travel is low. Click feel is nice and tactile nonetheless. Button size and placement is quite good as actuation is possible rather easily by rolling one's thumb over these. CF switches (white plunger) are used for these.
At the top of the mouse is a single button which cycles through the set CPI levels. Its click feel is decent. A tactile switch from CF is used for this one.
Scroll Wheel

The scroll wheel is good. Scrolling up is quite noisy. The individual steps are well-separated though, resulting in decent tactility. The encoder is a black Kailh. The middle (scroll wheel) click requires little force to actuate. A TTC tactile switch is used here. Notably, the scroll wheel isn't solid plastic to further cut down on weight.
Coating
The Viper Mini has a black matte coating all over, although it differs in texture: grainier for the main buttons, smoother for the top and sides. It's very grippy and doesn't attract dirt, finger prints, or the likes too much. It's easy to clean, and there are no signs of wear left after doing so. All in all, an excellent coating.Button Sound Test
Disassembly

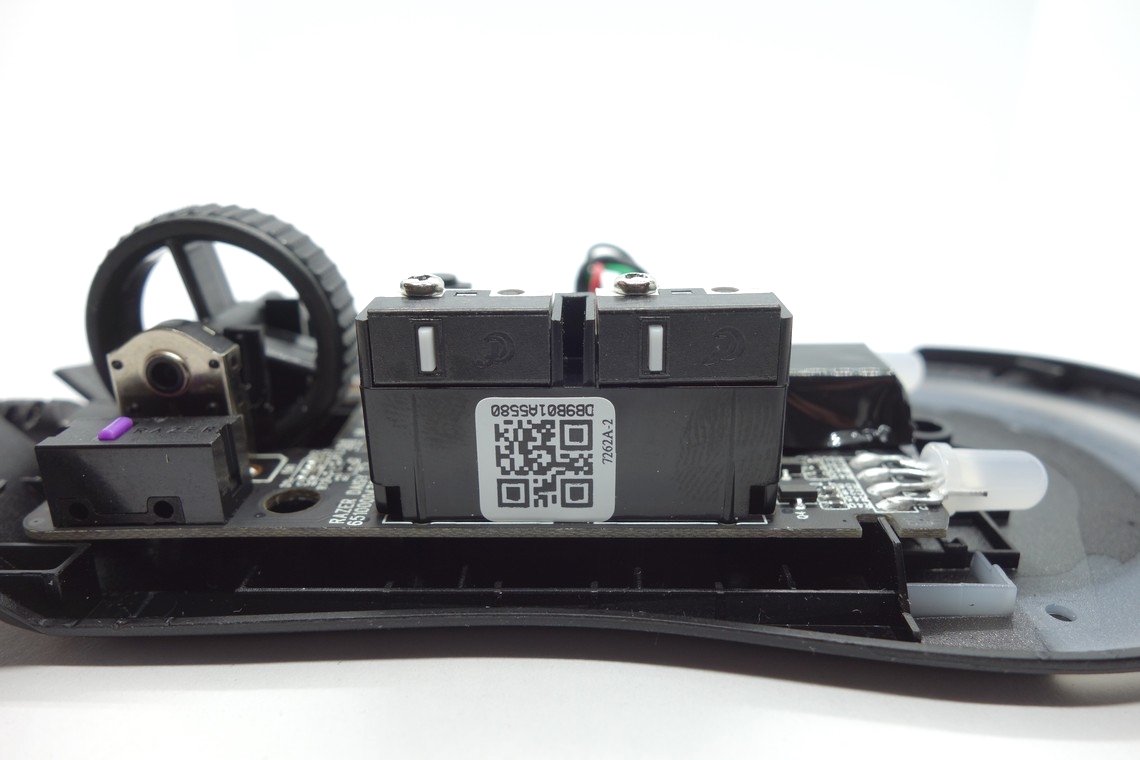
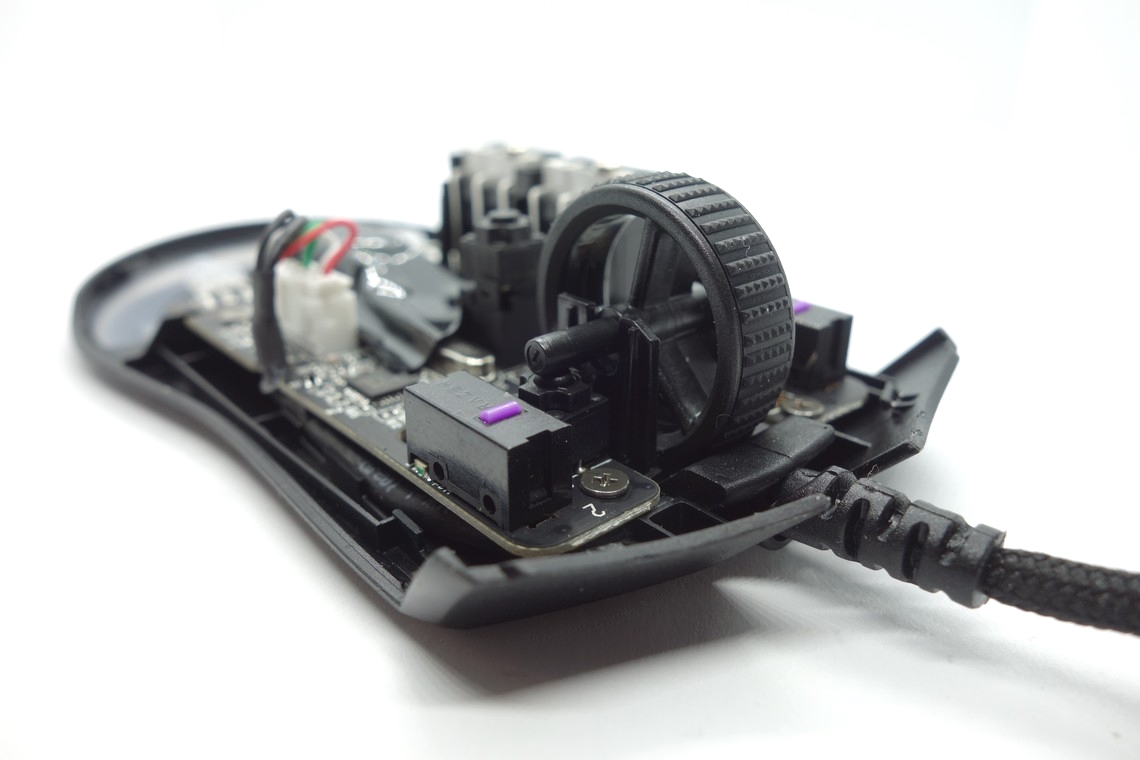
Opening the Viper Mini is both easy and difficult. Thankfully, the mouse feet need not be removed. Instead, just remove the three screws beneath the sticker. Now onto the tricky part. The top and bottom shell are held together by two retaining clips at each end. Getting those to disengage without breaking anything can be difficult. I suggest wedging a credit card into one side and proceeding from there. I had to effectively crowbar it open. When doing so, make sure to push the shells and not the PCB.


The interior design is pretty straightforward. The side and main-button construction is part of the top shell. Everything sits on a single PCB. The side buttons are mounted directly onto the PCB. Same goes for the CPI button switch, which is also elevated. The PCB itself is fairly thin in order to save weight, and affixed to the bottom shell with five screws in total. At the back end of the PCB are two LEDs. The sensor IC part and lens (external illumination) are covered with foil. The markings on the MCU read "11U35 6 D3 22A50," which suggests that we're looking at a NXP LPC11U35. Please refer to this for the datasheet. Finally, we can spot the internal codename Razer uses for the mouse: Daisy T3.
As for the soldering and general quality of the PCB, I'm unable to find any noteworthy flaws.
Jul 5th, 2025 18:15 CDT
change timezone
Latest GPU Drivers
New Forum Posts
- How do you view TPU & the internet in general? (With poll) (80)
- EVGA XC GTX 1660 Ti 8GB ROM (11)
- Rx580 subsystem id (0)
- What are you playing? (23893)
- Do you use Linux? (677)
- Optane performance on AMD vs Intel (58)
- Frametime spikes and stuttering after switching to AMD CPU? (521)
- Stalker 2 is looking great. (187)
- b550m aorus elite not posting with new ram (7)
- Gigabyte graphic cards - TIM gel SLIPPAGE problem (131)
Popular Reviews
- NVIDIA GeForce RTX 5050 8 GB Review
- Fractal Design Scape Review - Debut Done Right
- Crucial T710 2 TB Review - Record-Breaking Gen 5
- ASUS ROG Crosshair X870E Extreme Review
- PowerColor ALPHYN AM10 Review
- Sapphire Radeon RX 9060 XT Pulse OC 16 GB Review - An Excellent Choice
- Upcoming Hardware Launches 2025 (Updated May 2025)
- AMD Ryzen 7 9800X3D Review - The Best Gaming Processor
- Sapphire Radeon RX 9070 XT Nitro+ Review - Beating NVIDIA
- NVIDIA GeForce RTX 5060 8 GB Review
TPU on YouTube
Controversial News Posts
- Intel's Core Ultra 7 265K and 265KF CPUs Dip Below $250 (288)
- NVIDIA Grabs Market Share, AMD Loses Ground, and Intel Disappears in Latest dGPU Update (212)
- Some Intel Nova Lake CPUs Rumored to Challenge AMD's 3D V-Cache in Desktop Gaming (140)
- NVIDIA GeForce RTX 5080 SUPER Could Feature 24 GB Memory, Increased Power Limits (115)
- Microsoft Partners with AMD for Next-gen Xbox Hardware (105)
- NVIDIA Launches GeForce RTX 5050 for Desktops and Laptops, Starts at $249 (105)
- AMD Radeon RX 9070 XT Gains 9% Performance at 1440p with Latest Driver, Beats RTX 5070 Ti (102)
- Intel "Nova Lake‑S" Series: Seven SKUs, Up to 52 Cores and 150 W TDP (100)