 75
75
Aqua Computer LEAKSHIELD Review - No More Leaks
Performance Testing »Software Setup and Monitoring

This is probably the main reason I was wanting to check out an Aqua Computer product after so long. The company's aquasuite software package has become more than just the tool for the Aquaero controller, with a vast product lineup supporting it in terms of VISION-class OLED displays, temperature and flow sensors, pumps with integrated aquasuite support, new fan controllers, and even RGB LED controllers and strips. aquasuite (all small, just to make my typing harder) is the most detailed software suite for DIY watercooling in my opinion, but does have a steep learning curve, especially as you may not realize that some accessories for products are optional add-ons. You can download the latest version from this page, and the installer is ~4.5 MB in size. This is actually more of a software check to make sure you have a compatible product because Aqua Computer is operating things on a timed license for updates in a move that I don't agree with but do understand the reasons for. The executable recognized the LEAKSHIELD right away and gave me 12 months of free updates, following which I would either have to pay for an updated license, buy a new Aqua Computer product, or just stick with the current version for eternity. [Update from Aqua Computer: It will be 18 months with the LEAKSHIELD, not 12]

Once the DRM check is done, the actual installer for aquasuite is downloaded, and installation is fairly trivial. You need to devote around 66 MB to aquasuite, making it a relatively lightweight program on storage and system resources alike. Note that the installer suggests rebooting; however, I had no issues running it right away.
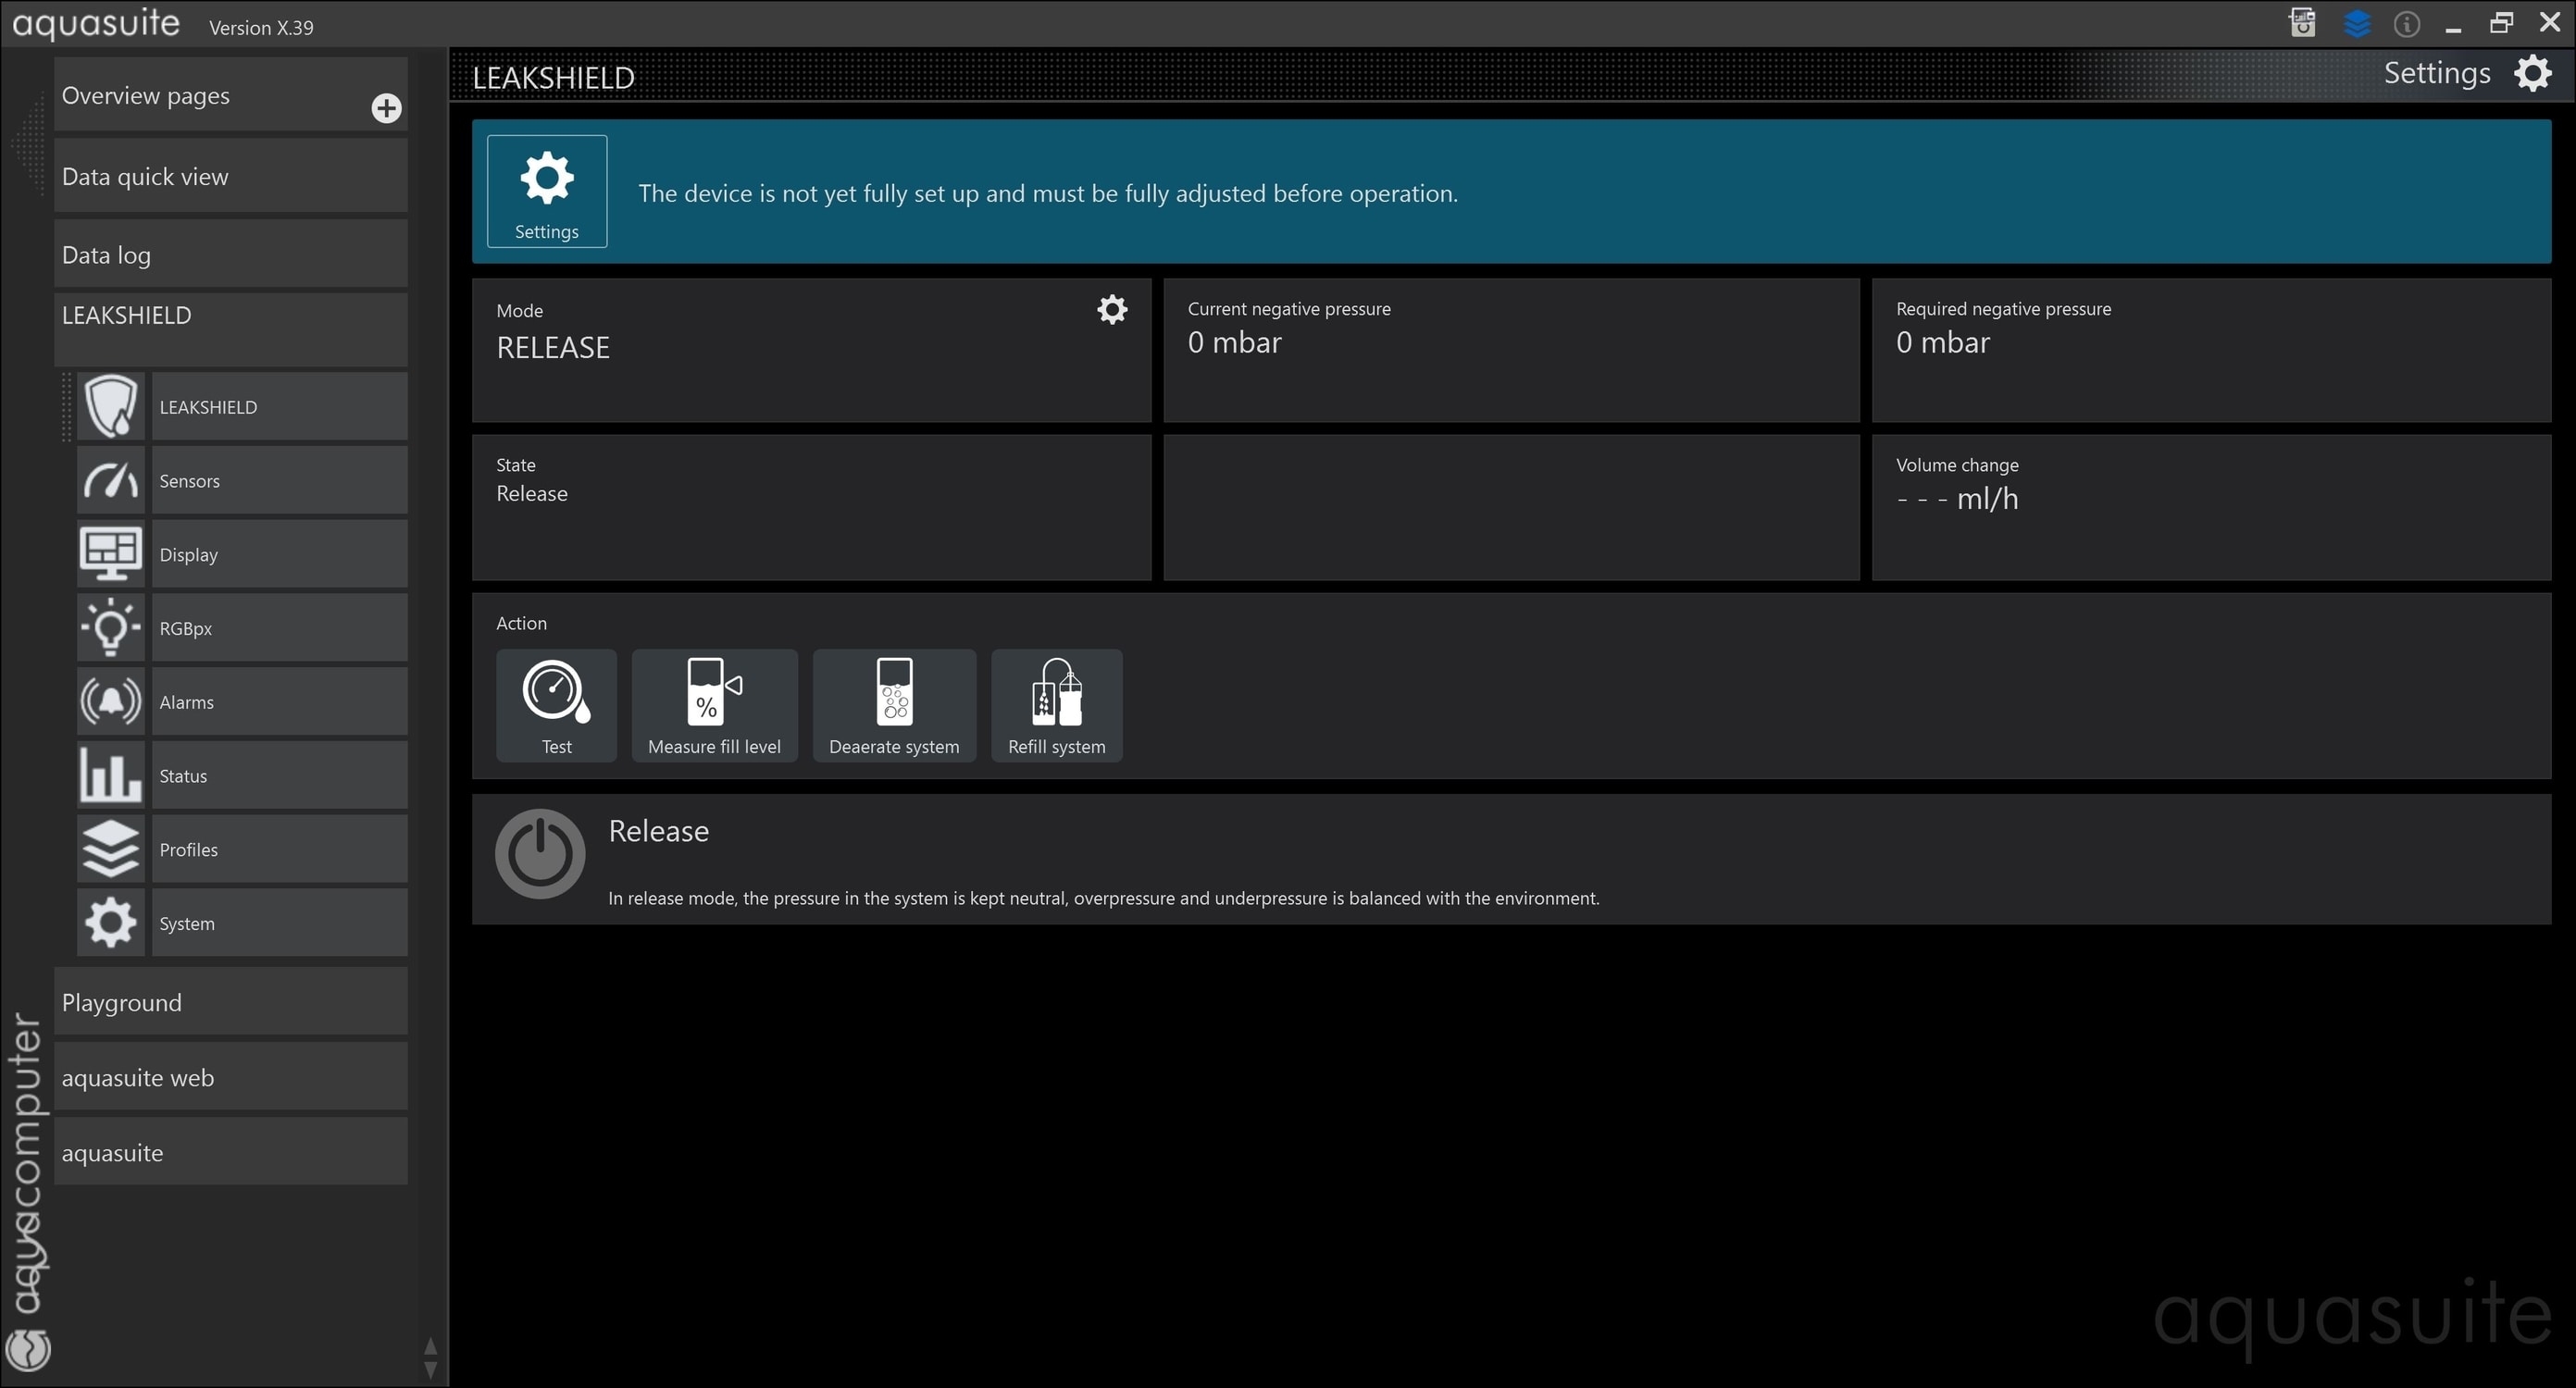
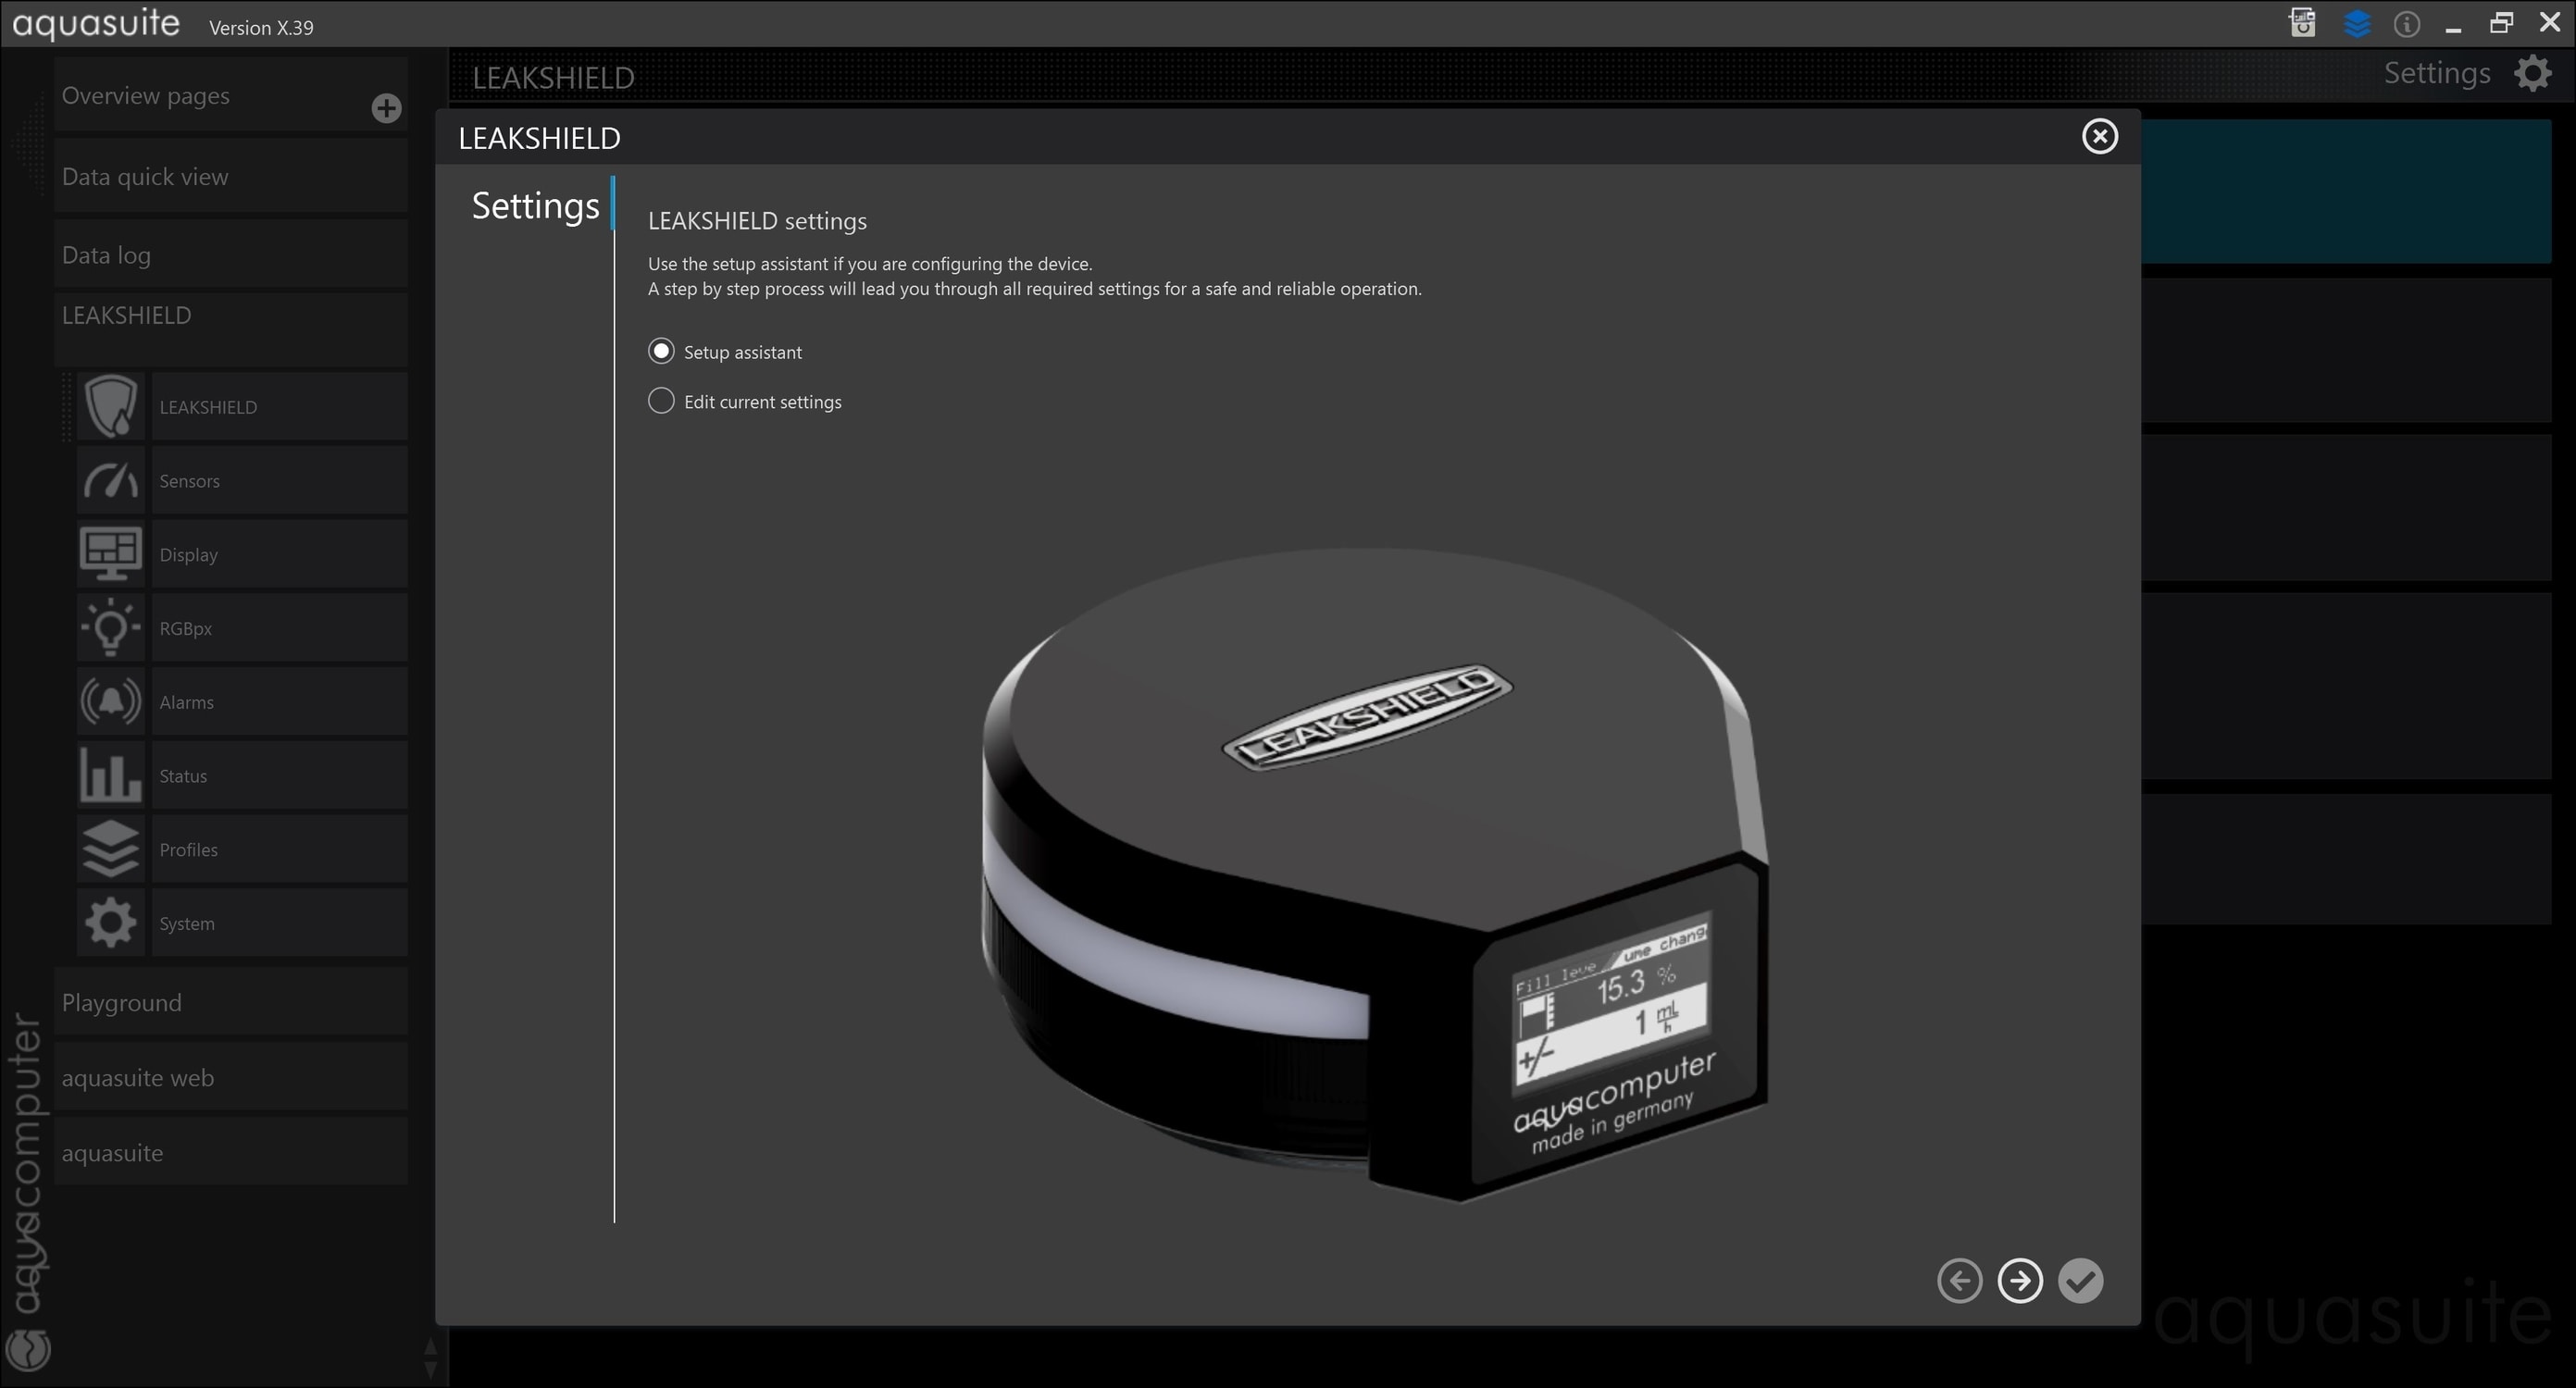
Aqua Computer sent me instructions on how to manually update aquasuite, and the LEAKSHIELD firmware to the latest version the company had given the then-public release obviously didn't cover this then-under-embargo product. In fact, there were multiple firmware updates within the weeks I had my hands on it, and I saw first hand the improvements, including fixes to some non-responsive element bugs, translation errors, and UI issues. This is also not a review of aquasuite. Although it certainly deserves a walkthrough at least, I will just focus on the LEAKSHIELD menu here. Clicking on the overview tab for it pulls up more menus, but you are right away greeted by a notification that the device is not set up fully, so we head to the settings cog as suggested, where we get the option of using a setup wizard, as well as editable pre-set options.
I did the setup demo above with the LEAKSHIELD connected to the Aqua Computer ULTITUBE D5 150 PRO, but without any coolant and just the two ports closed off with stop plugs. This was the quickest way to do this for the video, using my laptop alongside and the external USB to 5-pin adapter cable from before, but I of course set up a working loop for actual testing paired to one of my test systems. The setup wizard walks you through all the steps, emphasizing that the more data is provided, the better the accuracy and reliability of LEAKSHIELD. This is where the pre-configured measurements for first-party products come into place, especially for the reservoir you would otherwise have to measure three coolant levels for to provide data points for a calibration chart to be generated for further use. The same goes for the pump, though using a Xylem D5 makes life easier with the Aqua Computer D5 including values already. A flow sensor would be a nice addition to the mix, but is an optional extra.
The pressure settings page is actually more critical than you might think since the pre-configured values are based on data but allow you to change things. The vacuum pump in the LEAKSHIELD can handle up to 450 mbar of vacuum, and you thus want to have a pump with an operating pressure of no more than that (up to 470 mbar is alright). If you have two pumps in series thus, things won't work as well, and LEAKSHIELD can only be used as a leak monitor but not a shield. The higher the vacuum is set to, the higher the associated risk for tubing potentially crumbling under the pressure, too. Depending on whether you use harder, rigid tubing or thin-walled, soft tubing, you may want to tone down the vacuum setpoint to, say, 350 instead of 450 mbar. The adaptive setting enables the product to continually adjust the operating negative pressure within the set bounds, which also results in occasional pump noise. While really quiet, more of a low hum even if next to it, you can still set two separate times of low activity for the negative pressure to build up when, say, away from the keyboard.
There are then standby settings to configure, which are self-explanatory, before the biggest step of choosing the operating mode from among three options. "Shield" is recommended and what you are paying for, allowing LEAKSHIELD to generate adaptive negative pressure throughout and mitigate leaks. "Monitor" is the next best thing. While it does nothing to stop a leak going bad, it will alert you to one and can turn the system off with the previously discussed accessory. "Release" allows for an air purge to equilibrate the loop pressure to the ambient, allowing for the easy removal of components, including the LEAKSHIELD to top off the coolant in the reservoir, for example. The mode can be changed on the fly later, but the system will use the pressure differential and calibration-created chart of your choice to measure the fill level in the reservoir and then build up the negative pressure accordingly. This can take on the order of a few minutes or much longer depending on how well you have assembled your loop.
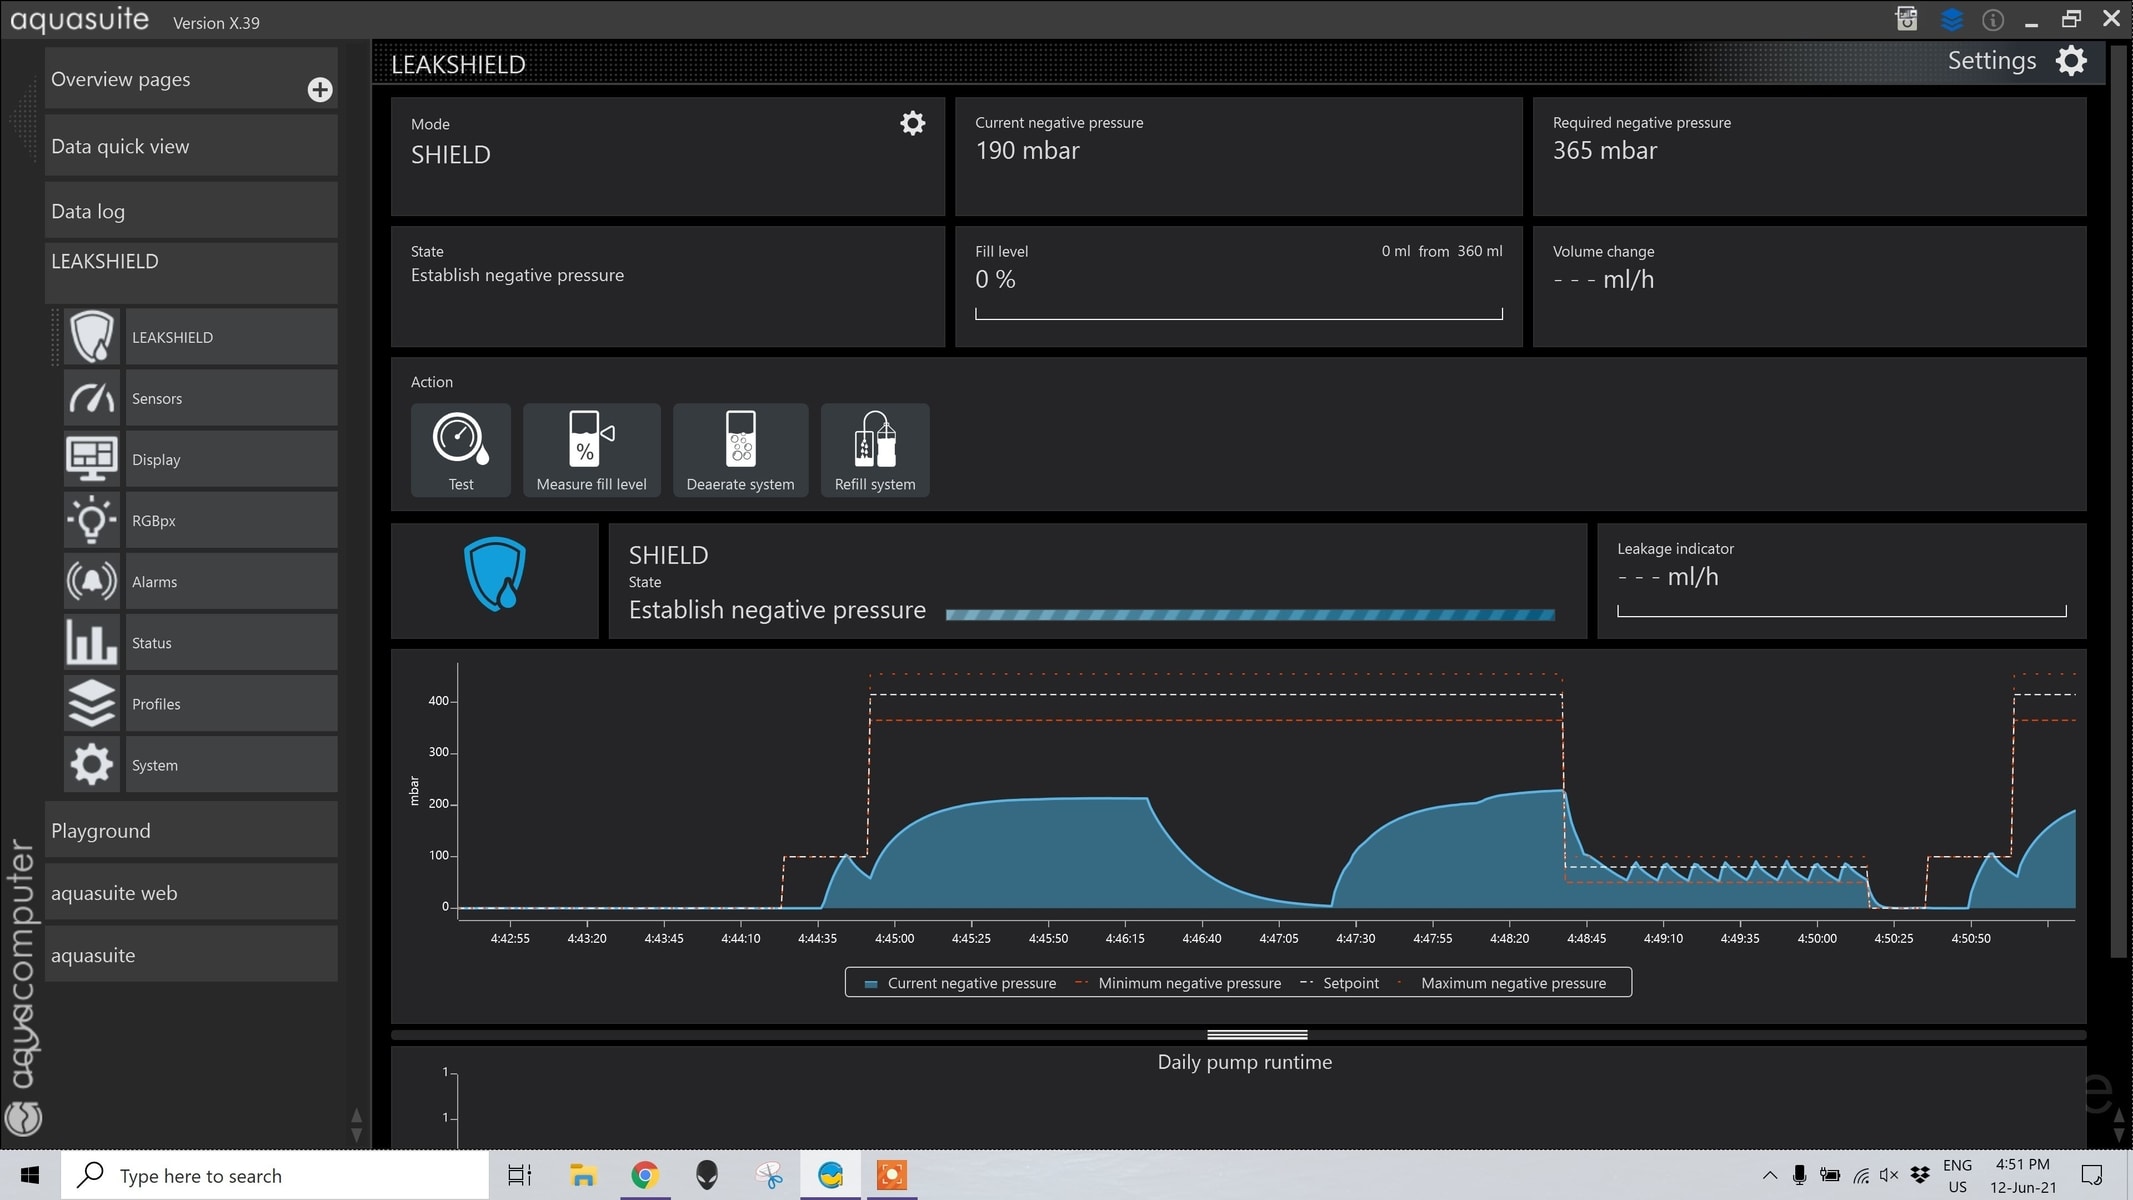
At this point, you are free to poke around aquasuite more to familiarize yourself with the software monitoring and LEAKSHIELD controls. The main menu is again named LEAKSHIELD and acts as an overview, with real-time status and pressure logging displayed, which here also correctly shows that I had no coolant and my pump was not running.
This video goes through available options, although not all of them. The sensors tab, for example, is best used with hardware sensors, but you can create software sensors aquasuite can use. Direct support for HWInfo and AIDA64 for this process covers the vast majority of users who also have an interest in aquasuite. The display menu is one I do recommend changing with caution since you have what is ultimately still an OLED display from a few years back that is prone to burn-in based on the use case. By default, the screen ships in the lowest brightness setting, but can be configured to two additional brightness steps which are then saved on the device. Using the physical button also temporarily results in maximum brightness before a standby mode that can be configured is entered. You can also invert the display if the LEAKSHIELD is upside down, automatically have the two colors invert to minimize burn-in, and turn off the display if you are not using it.
RGBpx is for the creation of an LED lighting profile with the six integrated dRGB LEDs, which otherwise have some pre-configured settings for function. We saw already how they light up white to begin with, and there is a transition effect when using the physical button, too. But with these options, you get to create a light show that can coordinate with other supported devices, including the first-party farbwerk LED controller for ambient lighting inside your case. That said, if this is not to your liking, using the alarm function of the LEDs might well be. There are pre-configured alarm states here, with an audible alarm option in addition to having the LEDs light up in a specific color of your choosing. This alarm is audible enough with the system relatively quiet, which should be the case for a typical watercooled PC anyway. If you are gaming or, well, mining on your system with the fans at full blast or speakers/headphones in use, it will be much harder to grab your attention.
The Status tab brings back some of the monitoring information from the overview, but in a more detailed manner, and lays out the innards of the LEAKSHIELD in what is essentially a piping and instrument diagram. This tells us more about its operation, including the use of the vacuum pump and valves, and what aquasuite thinks is in the rest of your loop based on the provided information. Underneath is a running event log, which is part of why aquasuite is such a dream for the data lovers among us. Four profiles can be created on the aptly named Profiles page, which in turn can easily be selected over the aquasuite icon in the system tray as long as background services are running. The final menu is all about the LEAKSHIELD settings, including firmware updates if available, changing the time zone from the Germany default, standby behavior, and saving the device settings as a backup. You can also reset to the factory default, which is how I was able to do this set up and monitoring demo with the latest firmware from just a couple of days ago while previously having tested the LEAKSHIELD once already.
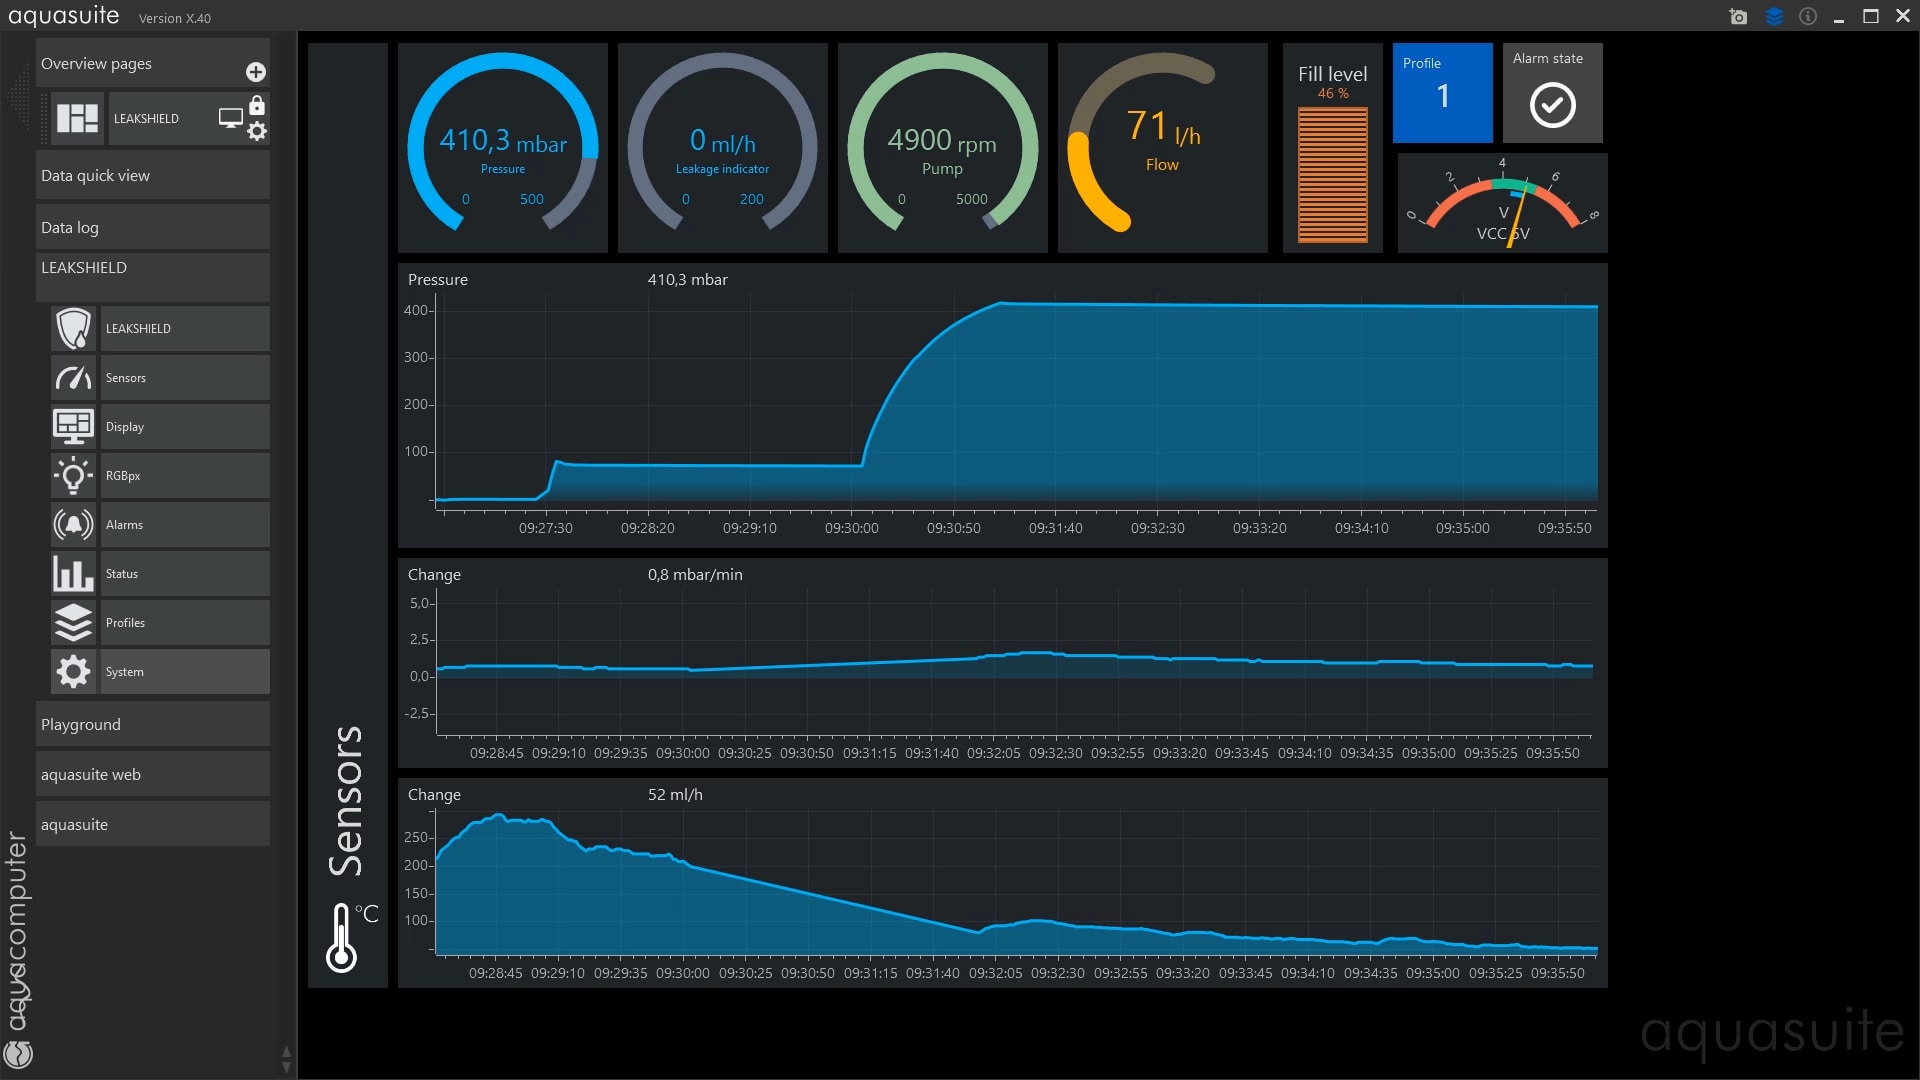
Here is a look at what aquasuite can show with sensors set up based on LEAKSHIELD. This one-stop shop shows the real-time negative pressure, how bad any leak is in terms of coolant loss rate, the coolant fill level in the reservoir, the running profile and associated alarm state, as well as graphs underneath for a more detailed look at the variables behaving as a function of time. I also did not mention a couple of other neat features just yet, but let's do that on the next page.
Jul 10th, 2025 02:16 CDT
change timezone
Latest GPU Drivers
New Forum Posts
- TPU's Nostalgic Hardware Club (20493)
- 3DMARK "LEGENDARY" (326)
- Post Your TIMESPY, PCMARK10 & FIRESTRIKE SCORES! (2019) (321)
- 5070ti overclock...what are your settings? (47)
- 'NVIDIA App' not usable offline? (1)
- G-Sync Not Working in Borderless / Window Mode - Windows 11 (5)
- Screen burn-in (19)
- [GPU-Z Test Build] New Kernel Driver, Everyone: Please Test (78)
- Friend's monitor randomly loses signal (3)
- What's your latest tech purchase? (24234)
Popular Reviews
- NZXT N9 X870E Review
- NVIDIA GeForce RTX 5050 8 GB Review
- Fractal Design Epoch RGB TG Review
- Corsair FRAME 5000D RS Review
- Fractal Design Scape Review - Debut Done Right
- AMD Ryzen 7 9800X3D Review - The Best Gaming Processor
- Sapphire Radeon RX 9060 XT Pulse OC 16 GB Review - An Excellent Choice
- Upcoming Hardware Launches 2025 (Updated May 2025)
- Sapphire Radeon RX 9070 XT Nitro+ Review - Beating NVIDIA
- PowerColor ALPHYN AM10 Review
TPU on YouTube
Controversial News Posts
- Intel's Core Ultra 7 265K and 265KF CPUs Dip Below $250 (288)
- Some Intel Nova Lake CPUs Rumored to Challenge AMD's 3D V-Cache in Desktop Gaming (140)
- NVIDIA Launches GeForce RTX 5050 for Desktops and Laptops, Starts at $249 (117)
- AMD Radeon RX 9070 XT Gains 9% Performance at 1440p with Latest Driver, Beats RTX 5070 Ti (116)
- NVIDIA GeForce RTX 5080 SUPER Could Feature 24 GB Memory, Increased Power Limits (115)
- Microsoft Partners with AMD for Next-gen Xbox Hardware (105)
- Intel "Nova Lake‑S" Series: Seven SKUs, Up to 52 Cores and 150 W TDP (100)
- NVIDIA DLSS Transformer Cuts VRAM Usage by 20% (97)