 17
17
EVGA XR1 lite Review - The Budget Capture Card We Waited For
Value & Conclusion »OBS Setup

The first order of business is to connect the EVGA XR1 lite capture card. In my example, I'm using the Xbox Series X gaming console as the input device, Sony Bravia XF9005 television as the screen, and my PC with OBS installed as the device to capture the gameplay video (and audio) from the Xbox. To achieve this, I connected the Xbox Series X to the HDMI IN port of the EVGA XR1 lite with the supplied HDMI cable. I then connected the HDMI OUT port of the capture card to one of the HDMI inputs on my Sony TV with a second HDMI cable (not supplied with the XR1 lite). Finally, I used the supplied USB Type-C cable to connect the capture card to a USB 3.0 port on my PC.

You should now turn on your input device (the Xbox console in my case) and go to OBS. In OBS, create a scene and add a video capture device as a source.
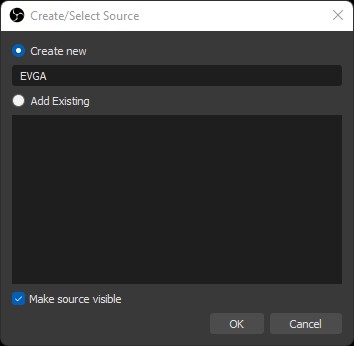
Select "Create new" and give it a name.
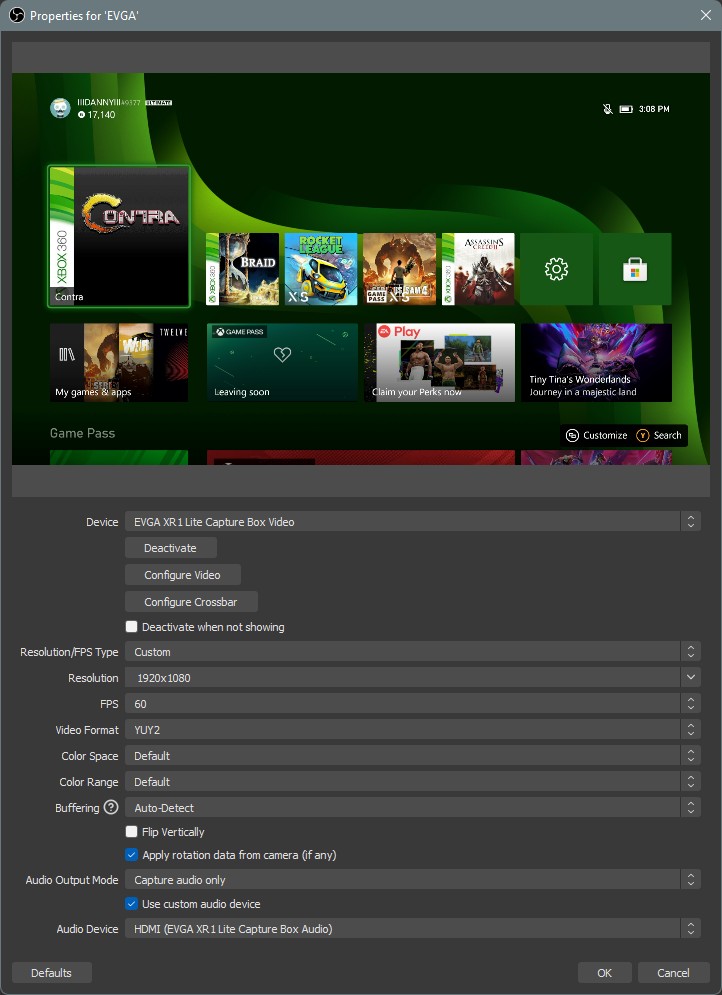
The capture card will have most likely already been detected and should show a picture in the preview window. If not, simply select the "EVGA XR1 Lite Capture Box Video" from the Device dropdown menu. If you don't see that option, something went wrong when connecting the capture card to your PC. Try a different USB port or cable. While you're welcome to leave the "Resolution/FPS Type" setting at Device Default and be on your way, switching it to Custom, you can adjust the settings, such as resolution, framerate, and video format (NV12 or YUY2) on your own to have them in line with your preferred stream settings. For example, if you're streaming at 25 or 30 FPS, or 720p instead of 1080p, select those settings. In case you can't get the capture card to show anything after switching it from Device Default to Custom, or have a very limited selection of resolutions and framerates, this is again down to the USB connection between the capture card and your PC. I cannot stress this enough: a USB 3.0 port and good quality USB 3.0 cable, such as the supplied one, are mandatory. Finally, tick the "Use custom audio device" box and select HDMI (EVGA XR1 Lite Capture Box Audio) from the dropdown menu.
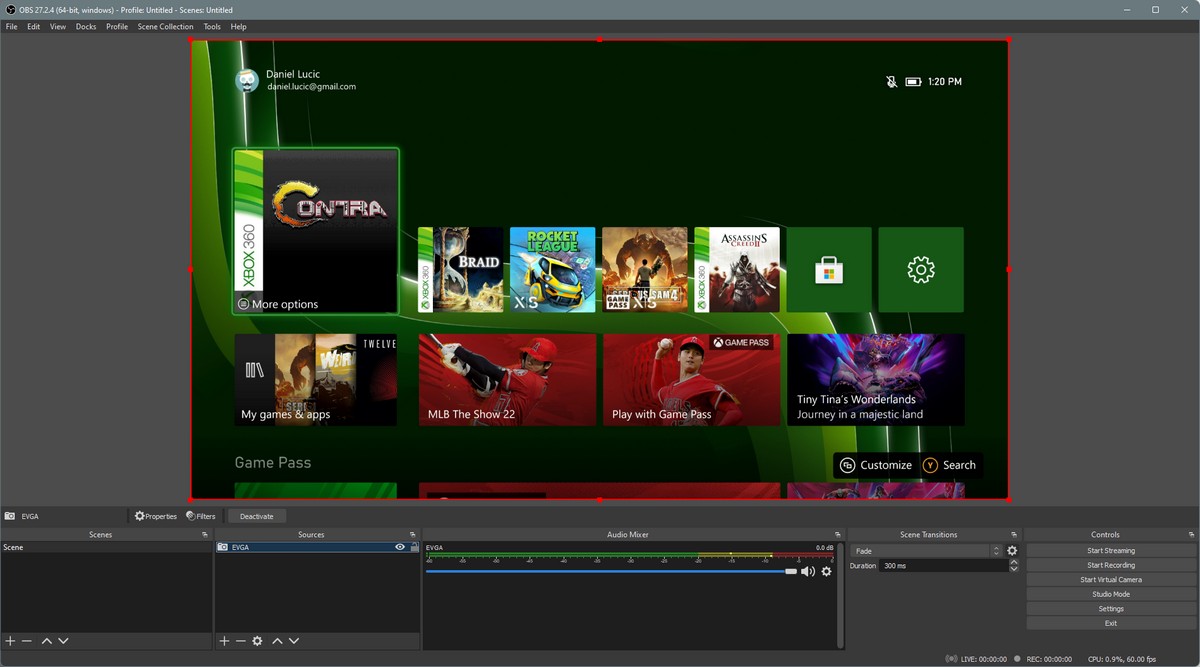
After setting everything up as described above, you should have your console's output visible in OBS. With that done, move on to adding other sources, such as your webcam input, lower thirds, overlays, and everything else you might want to use for your stream. The capture card will of course be visible in Audio Mixer as well, so you can easily adjust its volume, making your gameplay capture quieter in your stream without lowering the volume of what you're hearing while gaming.
The aforementioned setup procedure is nearly identical in any other recording or live streaming app and doesn't differ when using other video inputs, either. In essence, any signal you bring to the EVGA XR1 lite capture card via HDMI will be captured and displayed in OBS in up to 1080p@60 FPS, while passing through to the TV or monitor connected to the capture card's HDMI output with a framerate cap of 60 FPS and a resolution of up to 4K.
Performance
To demonstrate the performance of the EVGA XR1 lite capture card, I captured a bit of gameplay from the Xbox Series X. Take a look at the following video montage of the clips I recorded. Do keep in mind that YouTube butchered the quality of the recorded footage to some extent. Still, since the stuff recorded by this capture card will regularly end up on YouTube anyway, my video provides a relevant demonstration of its real-life performance.The overall performance of the EVGA XR1 lite capture card is excellent, especially considering its price range. The colors look very good, and there are no motion or compression artifacts, or pixelization. Anything of the sort you might spot in the YouTube video is added by YouTube itself. You're getting exactly what EVGA advertises: a smooth, uncompressed 1080p@60 capture with 4:2:0 (NV12) or 4:2:2 (YUY2) chroma subsampling. The XR1 lite runs circles around similarly priced competitors that use MJPEG encoding. Retro gamers should also note that the XR1 lite supports the 480p input resolution and handles it without a hitch of any kind.
With all that in mind, the EVGA XR1 lite leaves a great overall impression. As long as you're fine with it not doing HDR capture or passthrough of any kind and that it offers no 1080p@120 FPS capture or passthrough support, this thing will make you a happy camper as it's super affordable and excels at everything it set out to do.
Jul 5th, 2025 18:14 CDT
change timezone
Latest GPU Drivers
New Forum Posts
- How do you view TPU & the internet in general? (With poll) (80)
- EVGA XC GTX 1660 Ti 8GB ROM (11)
- Rx580 subsystem id (0)
- What are you playing? (23893)
- Do you use Linux? (677)
- Optane performance on AMD vs Intel (58)
- Frametime spikes and stuttering after switching to AMD CPU? (521)
- Stalker 2 is looking great. (187)
- b550m aorus elite not posting with new ram (7)
- Gigabyte graphic cards - TIM gel SLIPPAGE problem (131)
Popular Reviews
- NVIDIA GeForce RTX 5050 8 GB Review
- Fractal Design Scape Review - Debut Done Right
- Crucial T710 2 TB Review - Record-Breaking Gen 5
- ASUS ROG Crosshair X870E Extreme Review
- PowerColor ALPHYN AM10 Review
- Sapphire Radeon RX 9060 XT Pulse OC 16 GB Review - An Excellent Choice
- Upcoming Hardware Launches 2025 (Updated May 2025)
- AMD Ryzen 7 9800X3D Review - The Best Gaming Processor
- Sapphire Radeon RX 9070 XT Nitro+ Review - Beating NVIDIA
- NVIDIA GeForce RTX 5060 8 GB Review
TPU on YouTube
Controversial News Posts
- Intel's Core Ultra 7 265K and 265KF CPUs Dip Below $250 (288)
- NVIDIA Grabs Market Share, AMD Loses Ground, and Intel Disappears in Latest dGPU Update (212)
- Some Intel Nova Lake CPUs Rumored to Challenge AMD's 3D V-Cache in Desktop Gaming (140)
- NVIDIA GeForce RTX 5080 SUPER Could Feature 24 GB Memory, Increased Power Limits (115)
- Microsoft Partners with AMD for Next-gen Xbox Hardware (105)
- NVIDIA Launches GeForce RTX 5050 for Desktops and Laptops, Starts at $249 (105)
- AMD Radeon RX 9070 XT Gains 9% Performance at 1440p with Latest Driver, Beats RTX 5070 Ti (102)
- Intel "Nova Lake‑S" Series: Seven SKUs, Up to 52 Cores and 150 W TDP (100)