 37
37
Zotac GeForce GTX 295 1792 MB Review
A Closer Look »Card Disassembly
Since the disassembly of this card is so complicated we decided to give you one extra page with step by step instructions. Assembly is done the same way in reverse.Compared to the 9800 GX2 the disassembly process is considerably easier. Especially those dreaded plastic tabs that like to break quickly are gone. Still, you should be extremely careful while disassembling this card.

You start by releasing the screws on both sides of the top cooler assembly.
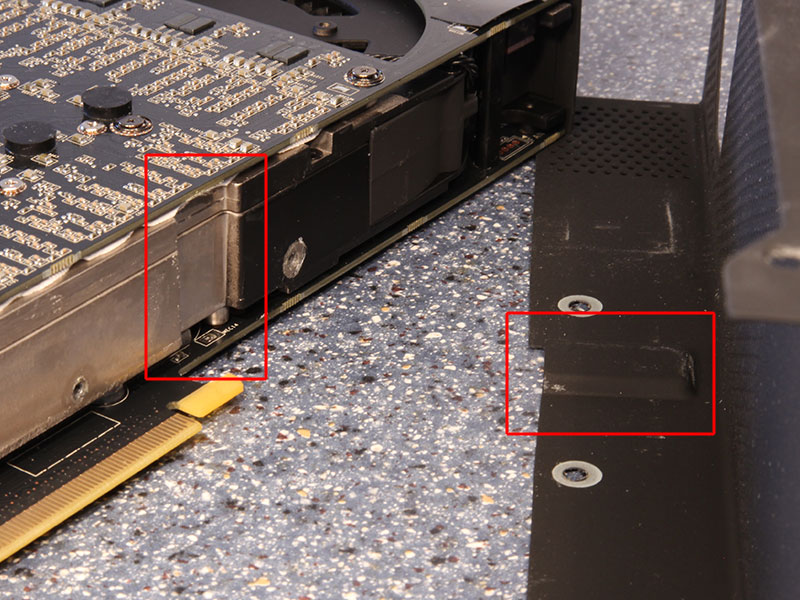
With the screws gone you can lift the top off. This requires a bit of force since there is a nudge that has to be pulled over the cooler base. Look at this feature, try to understand how you need to move the cooler top to get it off and you should be fine.


Now we can see how the GTX 295 is assembled. A central heatsink, cooling assembly is sandwiched between two PCBs which have their own GPU, memory and other components.
Both PCBs are interconnected by plastic flat wire cables (second picture) that act as an SLI bridge.


Now comes the hardest step unless you have the right tools. See all those screws with attached springs? On one side they are colored black and on the other side they are silver. They require a very small screwdriver and are screwed down very tight. If you can't find a screwdriver in that size the easiest way is to grab a pair of pliers and VERY CAREFULLY unlock the screws, then use a bigger screwdriver to get them out. Don't slip or you will end up with a nice NVIDIA Paperweight.


In the next step you have to remove the PCI slot cover. This is a two step procedure. Remove the two screws as shown in the pictures above.


Next, remove the two black screws fixing the front plate and the four screws fixing the DVI outputs to the front plate.

Now you can pull the two PCBs off the central cooler assembly. Start by applying force near the edges and work your way towards the GPU. Once there you will need a considerable amount of force to get over the suction power of the thermal paste. Again, be careful and don't rush things - take your time. Mission accomplished!

To give you an idea how complex the disassembly is, here is a photo of all the parts that were removed during the card disassembly.
Jul 18th, 2025 19:18 CDT
change timezone
Latest GPU Drivers
New Forum Posts
- Anime Nation (13052)
- What's your latest tech purchase? (24305)
- AI Job Losses: let's count the losses up, total losses to AI so far 94,000 and counting (35)
- lower score 5070Ti after replacing the PSU (0)
- TPU's Nostalgic Hardware Club (20539)
- 3DMARK "LEGENDARY" (329)
- Hatsune Miku x ASUS TUF Gaming Build (67)
- Ferrari themed mod cont. 4070s repaste (7)
- Stalker 2 is looking great. (213)
- Share your CPU-X Benchmarks! (6)
Popular Reviews
- MSI GeForce RTX 5060 Gaming OC Review
- Razer Blade 16 (2025) Review - Thin, Light, Punchy, and Efficient
- Thermal Grizzly WireView Pro Review
- Pulsar X2 Crazylight Review
- SilverStone SETA H2 Review
- AVerMedia Live Gamer Ultra S (GC553Pro) Review
- Upcoming Hardware Launches 2025 (Updated May 2025)
- Sapphire Radeon RX 9060 XT Pulse OC 16 GB Review - An Excellent Choice
- NVIDIA GeForce RTX 5050 8 GB Review
- Our Visit to the Hunter Super Computer
TPU on YouTube
Controversial News Posts
- Intel's Core Ultra 7 265K and 265KF CPUs Dip Below $250 (288)
- Some Intel Nova Lake CPUs Rumored to Challenge AMD's 3D V-Cache in Desktop Gaming (140)
- AMD Radeon RX 9070 XT Gains 9% Performance at 1440p with Latest Driver, Beats RTX 5070 Ti (131)
- NVIDIA Launches GeForce RTX 5050 for Desktops and Laptops, Starts at $249 (124)
- NVIDIA GeForce RTX 5080 SUPER Could Feature 24 GB Memory, Increased Power Limits (115)
- Microsoft Partners with AMD for Next-gen Xbox Hardware (105)
- NVIDIA DLSS Transformer Cuts VRAM Usage by 20% (99)
- AMD Sampling Next-Gen Ryzen Desktop "Medusa Ridge," Sees Incremental IPC Upgrade, New cIOD (97)