 6
6
Corsair Darkstar Wireless Review
Sensor & Performance »Build Quality
Overall build quality is solid. When shaking the mouse, a rattle comes from an indeterminable location. When applying lateral pressure, no creaking or flexing of the shell can be observed. Lastly, accidental clicks when slamming down the mouse do not occur unless Button Response Optimization is disabled within iCUE.Buttons

Main buttons on the Darkstar Wireless are good to very good. Pre-travel is fairly low, whereas post-travel is moderate to high. Button response is fairly snappy, though also a bit dull and muted, especially the right one. Despite being visually separated from the shell, button movement is fairly low even when provoked. Button stiffness is medium. A pair of TTC optical switches are used.


Side buttons are very good to decent. The two buttons next to the left main button have high pre-travel along with uneven actuation, though this may at least partially be by design to prevent accidental actuation. The side buttons proper on the left side all have very low pre and post-travel along with even actuation, though this may present an issue depending on one's grip and thumb size, as the thumb may end up hitting one of the rear-facing side buttons unintentionally. Otherwise, their size and placement is quite good, though I've found that hitting the upper-right button without hitting the button below it can be difficult. For the buttons next to the left main button, a set of low-profile 2-pin switches from Kailh (green plunger) is used. For the side buttons proper, three pairs of surface-mounted Omron switches (blue plunger) are used.
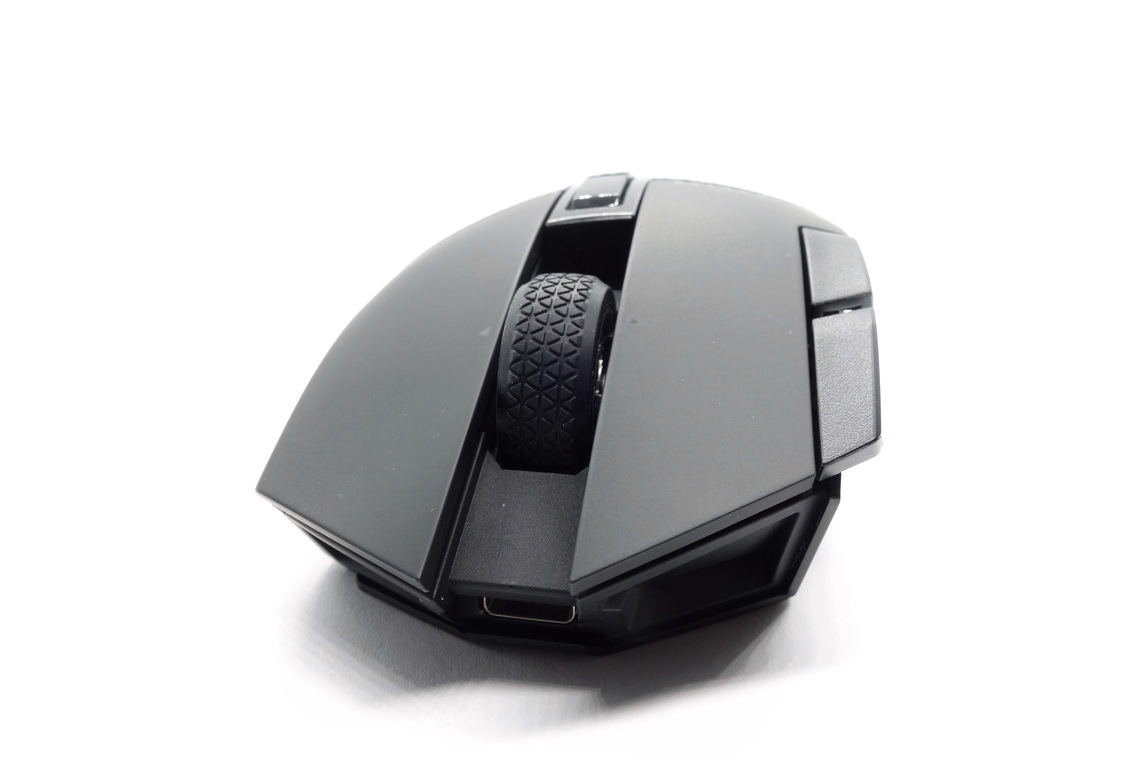
At the top of the mouse are two buttons for cycling up and down through the set software or hardware profiles, which work just fine. Another set of surface-mounted Omron switches (blue plunger) is used for these. The slider at the bottom switches between 2.4 GHz mode, Bluetooth, and off-state, and works just fine.
Scroll Wheel


The scroll wheel is very good. Noise levels are under control, and tactility is good, with clearly separated steps allowing for controlled scrolling. The encoder comes from TTC (green) and has a height of 5 mm. Actuating the middle (scroll wheel) click requires high force, and button response is quite weird and unpleasant. A surface-mounted switch from Omron (white plunger) is used for this one.
The scroll wheel can also be tilted to the left and right, giving access to two additional button functions as well as horizontal scrolling. I didn't encounter any issues with accidentally actuating the middle click when tilting the wheel. Two seemingly unbranded tactile switches (yellow plunger) are used for these.
Surface
The Darkstar Wireless has a smooth matte surface on the top and textured, hardened rubber on the sides. The coating is pleasingly soft to the touch, but does attract fingerprints, dirt, or the likes quite a bit. It is easy to clean, and there are hardly any signs of wear left after doing so. All in all, good materials.Button Sound Test
Disassembly
Disassembling the Darkstar Wireless is very difficult. Only a single screw is found beneath the front skate, which doesn't even need to be removed before the very end of the disassembly process. First, the side panel on the left needs to be removed. Two screws holding the back cover in place are found beneath it. After removing those, the back cover can be lifted, giving access to two additional screws, which also require removal. In addition, the side panel on the right side needs to be removed, which may require some added force, despite only being clipped in. The top shell is fixated with another two screws in need of removal here, along with the single screw under the front skate mentioned earlier. At last, the top shell can be lifted, though it still is clipped in at the front, dislodging which can be tricky.The internal design is complex. First we have the CPI-button PCB screwed to the top shell. From here, an auxiliary PCB holding several LEDs is connected through a ribbon cable, while the CPI-button PCB itself is connected to the main PCB through a ribbon cable as well. The side-button PCB likewise is connected through a ribbon cable to the main PCB, and holds eight switches in total. Both the main button switches and the scroll wheel sit on their own PCB slotting into the main PCB, and the plastic assembly holding the scroll wheel is part of the tray carrying the battery, while the wheel encoder is encased in the scroll wheel itself. Finally, five screws in total, two of which have a hex socket for the main-button PCB screws to screw into, are used to affix the main PCB to the bottom. The MCU is a Nordic nRF52840, whose datasheet can be found here. In addition, a Macronix MX25R1635F, which is a serial NOR flash memory, and whose datasheet can be found here, is located on the underside of the main PCB. Production date for the main PCB is the 47th week of 2022.


As for the soldering and general quality of the PCBs, I'm unable to find any noteworthy flaws.
Feb 21st, 2025 23:38 EST
change timezone
Latest GPU Drivers
New Forum Posts
- Is AMD Fluid Motion Frames a scam ? (5)
- Nvidia's GPU market share hits 90% in Q4 2024 (gets closer to full monopoly) (451)
- PBO issues on ASRock B650 PG Lightning (5)
- Modified drivers for X-Fi sound cards. (23)
- My broken XFX 480 8GB ”Reference” (16)
- 572.42 Drivers, Screen Blacking Out? (8)
- [Feature request] NIS and rBAR (12)
- Should I make a thermal maintenance on my GPU? (74)
- Thermal throttling Lenovo LOQ i5-13420H (1)
- Lenovo y50-70 undervolting + increase system performance for gaming (13)
Popular Reviews
- MSI GeForce RTX 5070 Ti Ventus 3X OC Review
- Gigabyte GeForce RTX 5090 Gaming OC Review
- Galax GeForce RTX 5070 Ti 1-Click OC White Review
- ASUS GeForce RTX 5070 Ti TUF OC Review
- Ducky One X Inductive Keyboard Review
- MSI GeForce RTX 5070 Ti Vanguard SOC Review
- MSI GeForce RTX 5070 Ti Gaming Trio OC+ Review
- MSI MAG Z890 Tomahawk Wi-Fi Review
- AMD Ryzen 7 9800X3D Review - The Best Gaming Processor
- Palit GeForce RTX 5070 Ti GameRock OC Review
Controversial News Posts
- AMD Radeon 9070 XT Rumored to Outpace RTX 5070 Ti by Almost 15% (302)
- AMD Plans Aggressive Price Competition with Radeon RX 9000 Series (269)
- NVIDIA GeForce RTX 5090 Spotted with Missing ROPs, Performance Loss Confirmed, Multiple Vendors Affected (263)
- AMD is Taking Time with Radeon RX 9000 to Optimize Software and FSR 4 (256)
- AMD Radeon RX 9070 and 9070 XT Listed On Amazon - One Buyer Snags a Unit (247)
- Edward Snowden Lashes Out at NVIDIA Over GeForce RTX 50 Pricing And Value (241)
- AMD Denies Radeon RX 9070 XT $899 USD Starting Price Point Rumors (239)
- New Leak Reveals NVIDIA RTX 5080 Is Slower Than RTX 4090 (215)