 0
0
G.SKILL Ripjaws KM570 MX Keyboard Review
Value & Conclusion »Driver
There is no software driver support for the KM570 MX keyboard, with all functionality and programming being hardware based. As such, I have chosen to combine the Driver and Performance pages into one here.Performance

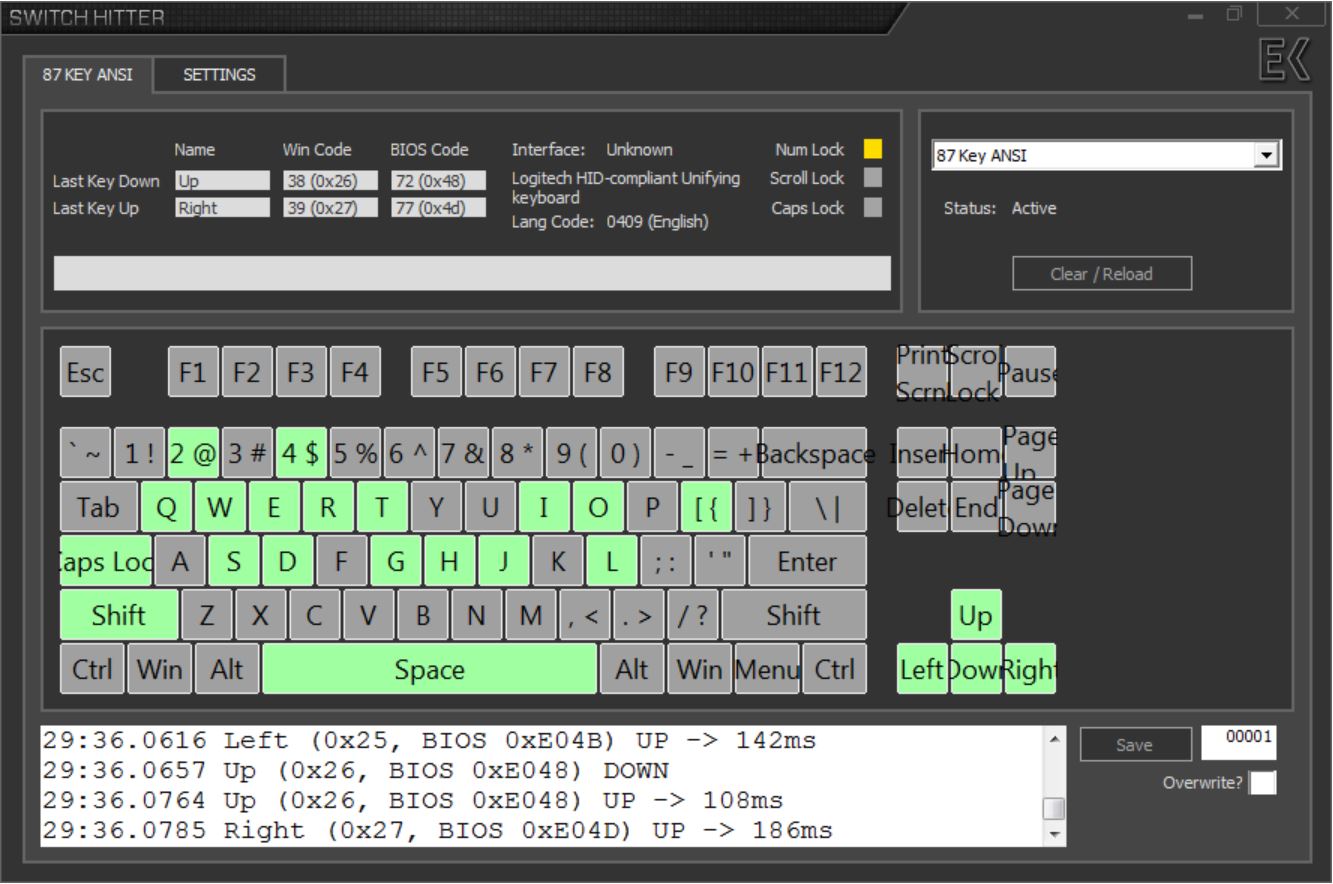
There is full N-key rollover USB enabled by default here, as Aqua's test confirms. You can toggle between N-key and six-key rollover using Fn + F6 if necessary. Similarly, no key chatter was detected using Switch Hitter.


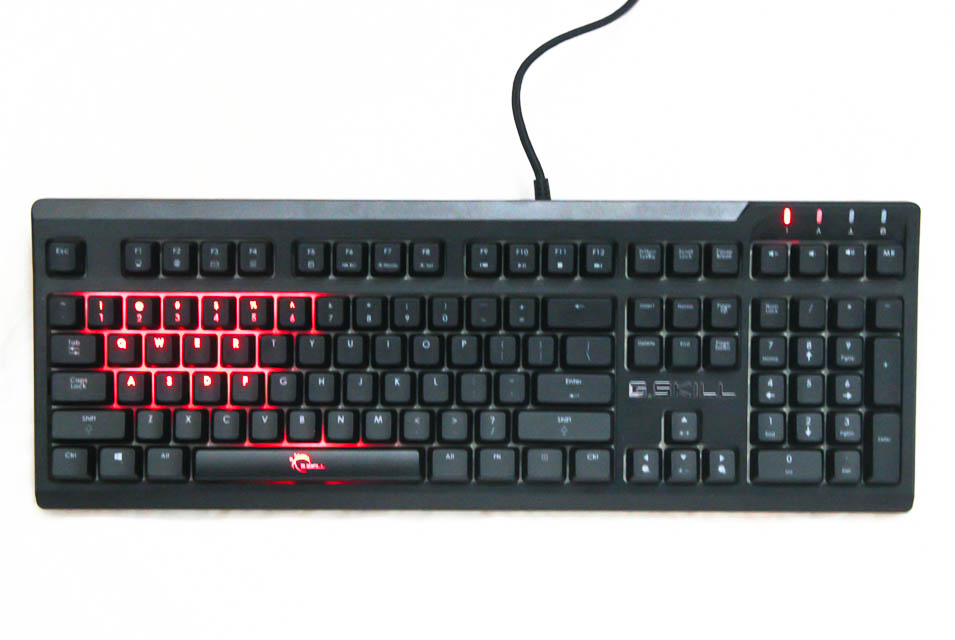
When you plug the keyboard in, all the keys are lit up by default. Here we can see that the secondary legends are not backlit as expected from the previous hands-on experience with the keycaps, but there is enough light bleed so you can tell what they are- especially at max brightness. There are several preset lighting options, including some effects which can be toggled through using Fn +F7, one of which is seen above and some effects seen below:
The function keys also provide secondary functions, as listed in the manual again, ranging from executing common applications (My Computer, Web Browser, Calculator etc) to customizing per key lighting. This is something I was not expecting to see in an otherwise budget priced mechanical keyboard, so I was pleasantly surprised. Here are the steps involved in per key lighting customization:
1) Press Fn + F8 to initiate the process. The Windows lock indicator LED will light up and flash consistently as a visual confirmation.
2) Press the key(s) you want to enable or disable lighting (if already lit). During the process, the key functionality will be disabled.
3) Press Fn + F8 again to complete, and stop the process. The Windows lock indicator LED will also stop flashing to confirm this.
Finally, Fn + Up/Down arrow keys help control the LED brightness whereas Fn + Left/Right arrow keys change the speed of the lighting effects. There are eight steps of brightness control, including off, so there is a good amount of control overall here.
The second set of functionality pertaining to gamers is the on-the-fly hardware macro recording:
1) Press the MR button on the top right corner to initiate macro recording. Unfortunately there is no visual indicator during this process, which I felt was an oversight considering the lighting customization has it.
2) Press the key you wish to assign a macro functionality to.
3) Press the key combination in the order you wish to be executed.
4) Press MR again to stop and complete the process.
This works well enough, but do note there is no control over the time gap between the key presses and they will execute immediately, in order. You can press MR during a macro execution to stop it, and pressing MR, the macro assigned key, MR again in that order will reset the key back to the original functionality.
In case you messed up somewhere, you can reset the entire keyboard by pressing and holding both Control keys for 3-4 seconds. The four indicator LEDs on the top right corner will flash on and off to confirm the reset.
As always, the sound of a keyboard is based on more than just the switch type. So when comparing sound clips, consider the keyboard as a whole. In this case, I have provided above an example sound clip of me typing on the KM570 MX sample at ~102 WPM. For context, you can find sound clips from other keyboards here including those with tactile switches. I did bottom out here although it is definitely possible to not do so if you practice. In terms of actuation and bottoming out, there is not much to say here except that the usual Cherry high QC carries over with an average actuation force of 45.15 cN for the MX Brown switches averaged across 20 keys on this keyboard. Bottoming out seemed regular too, and nothing jumped out that was different than the rest.
Jul 12th, 2025 00:57 CDT
change timezone
Latest GPU Drivers
New Forum Posts
- Can you guess Which game it is? (222)
- 'NVIDIA App' not usable offline? (7)
- What are you playing? (23920)
- RX 9070 XT freezing/locking up only on desktop, anyone else? (43)
- NVIDIA RTX PRO 6000 Workstation Runs Much Hotter Than 5090 FE (22)
- Quick charging your USB devicesUSB 3.2 Gen 2x2 Type-C® front-panel. (1)
- GTX 1050 GPU Owners Club (12)
- ASUS ProArt GeForce RTX 4060 Ti OC Edition 16GB GDDR6 Gaming - nvflash64 VBIOS mismatch (2)
- Will you buy a RTX 5090? (640)
- No offense, here are some things that bother me about your understanding of fans. (33)
Popular Reviews
- Fractal Design Epoch RGB TG Review
- Corsair FRAME 5000D RS Review
- Lexar NM1090 Pro 4 TB Review
- NVIDIA GeForce RTX 5050 8 GB Review
- NZXT N9 X870E Review
- Sapphire Radeon RX 9060 XT Pulse OC 16 GB Review - An Excellent Choice
- AMD Ryzen 7 9800X3D Review - The Best Gaming Processor
- Upcoming Hardware Launches 2025 (Updated May 2025)
- Our Visit to the Hunter Super Computer
- Chieftec Iceberg 360 Review
TPU on YouTube
Controversial News Posts
- Intel's Core Ultra 7 265K and 265KF CPUs Dip Below $250 (288)
- Some Intel Nova Lake CPUs Rumored to Challenge AMD's 3D V-Cache in Desktop Gaming (140)
- AMD Radeon RX 9070 XT Gains 9% Performance at 1440p with Latest Driver, Beats RTX 5070 Ti (131)
- NVIDIA Launches GeForce RTX 5050 for Desktops and Laptops, Starts at $249 (119)
- NVIDIA GeForce RTX 5080 SUPER Could Feature 24 GB Memory, Increased Power Limits (115)
- Microsoft Partners with AMD for Next-gen Xbox Hardware (105)
- Intel "Nova Lake‑S" Series: Seven SKUs, Up to 52 Cores and 150 W TDP (100)
- NVIDIA DLSS Transformer Cuts VRAM Usage by 20% (97)