Sunday, October 10th 2021

Windows 11 TPM Requirement? Bypass it in 5 Minutes
So you have a $2,000 Core i7-6950X HEDT processor, which you thought would last forever, but Windows 11 Setup stands in your way with its steep system requirements that include TPM and Secure Boot. What do you do? With Windows 11, Microsoft introduced new requirements for compatible hardware, and these are purely software-only checks—nothing really requires it. Besides the much-talked about TPM 2.0 spec compatible hardware Trusted Platform Module as a system requirement, there's also new requirements for UEFI Boot, and installation on a GPT partitioned drive (no more MBR boot for Windows 11).
While these requirements do make some sense going forward, this walls off a lot of potential users, i.e. everyone without a TPM 2.0 add-on card, or those with processors older than 7th Gen Intel Core "Kaby Lake," or AMD Ryzen 2000 "Pinnacle Ridge" series. We have discovered a quick and easy way to defeat these checks during Windows 11 Setup, including for that nagging TPM 2.0, and Secure Boot. Here's a step by step guide for fresh installations.
Update Oct 7th: At the end of this article, which is focused on "clean installation", we added a method that lets you perform the upgrade of an existing installation to Windows 11, without any TPM. For this same scenario Microsoft offers a method that downgrades the TPM requirement from 2.0 to 1.2, our method works without any TPM and also relaxes other requirements, like memory size, UEFI and MBR.
Update Oct 10th: Improved the steps for the "upgrade" installation, to mention that updates to the updater should be turned off. Step 1: Create the Registry Modification
After preparing your installation media (on another PC), open Notepad, paste the text below, save this file as "bypass.reg" on the bootable USB flash drive that's serving as installation media for Windows 11. You can also put just this file alone on a separate USB stick, the Windows installation environment will show it as additional drive. Step 2 Boot from that Installation Media USB Flash Drive
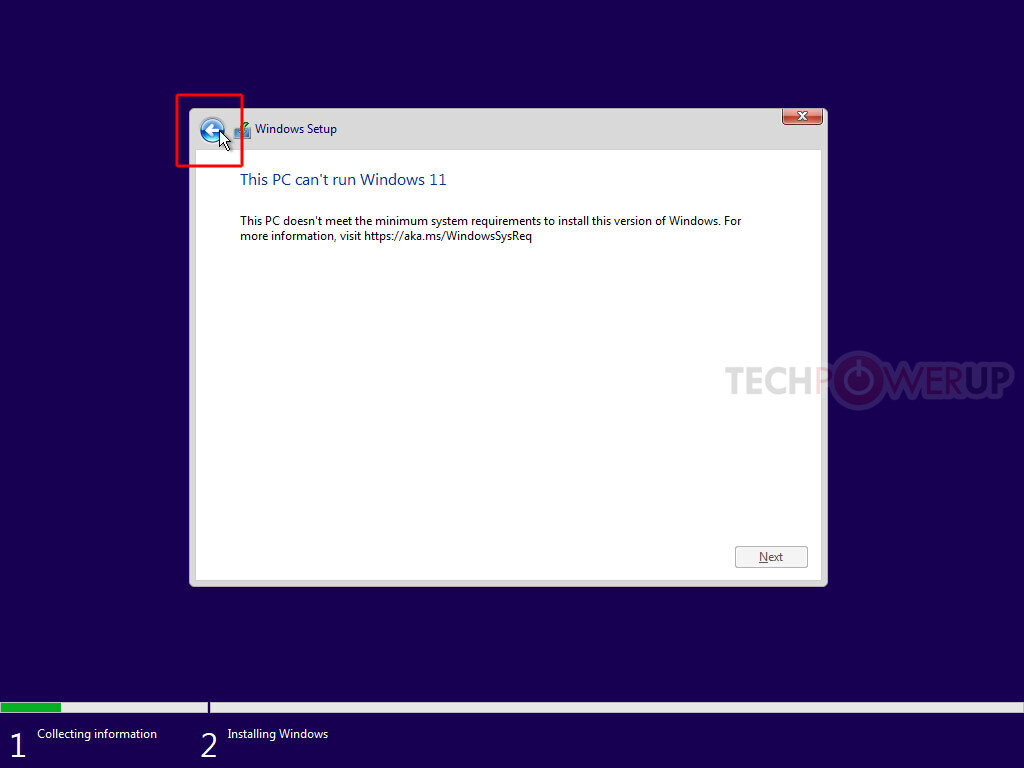
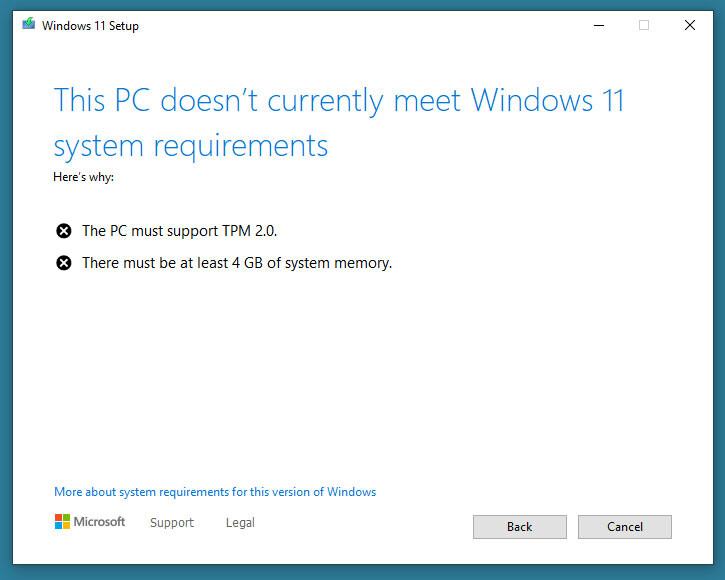
Now, simply boot from that USB flash drive, run Windows 11 Setup, and proceed until you hit the screen that says "This PC can't Run Windows 11." Here, click on the "back" button of the wizard (top left of the window), which takes you back to the previous screen.
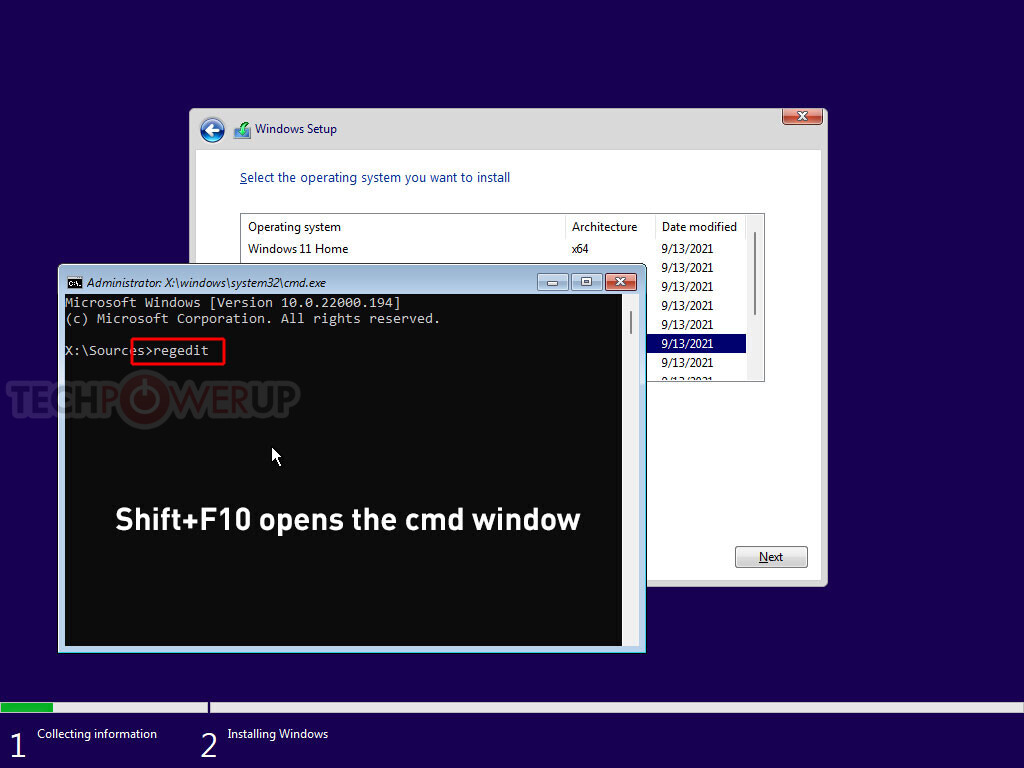
Step 3: Invoke a Command Prompt
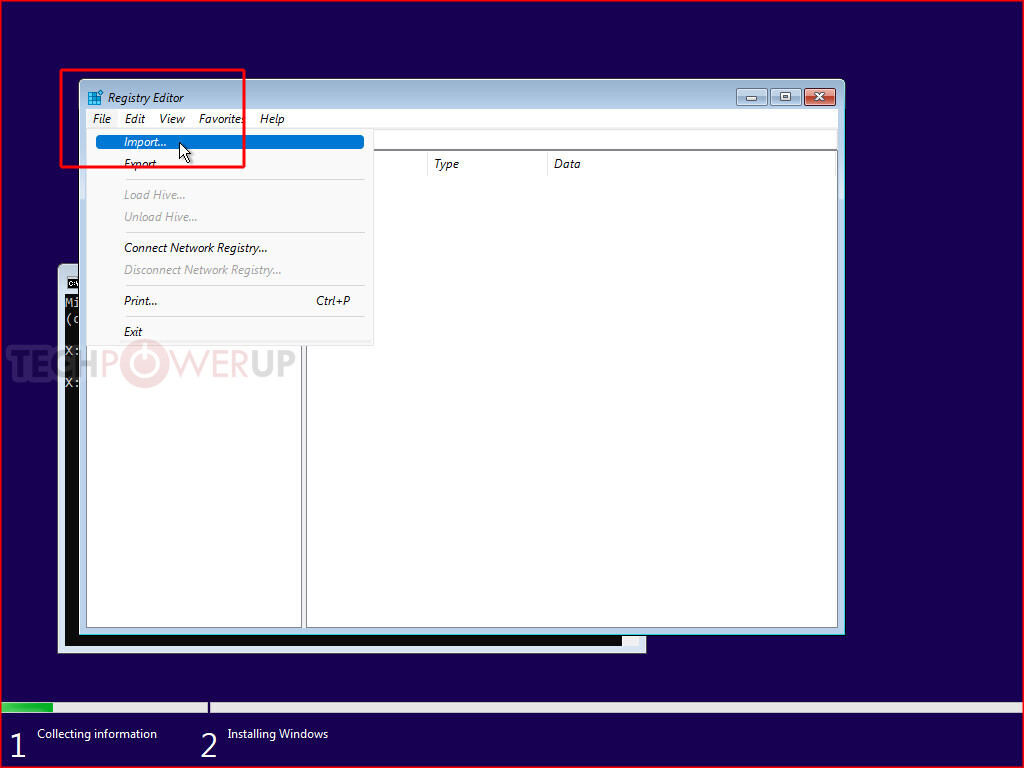
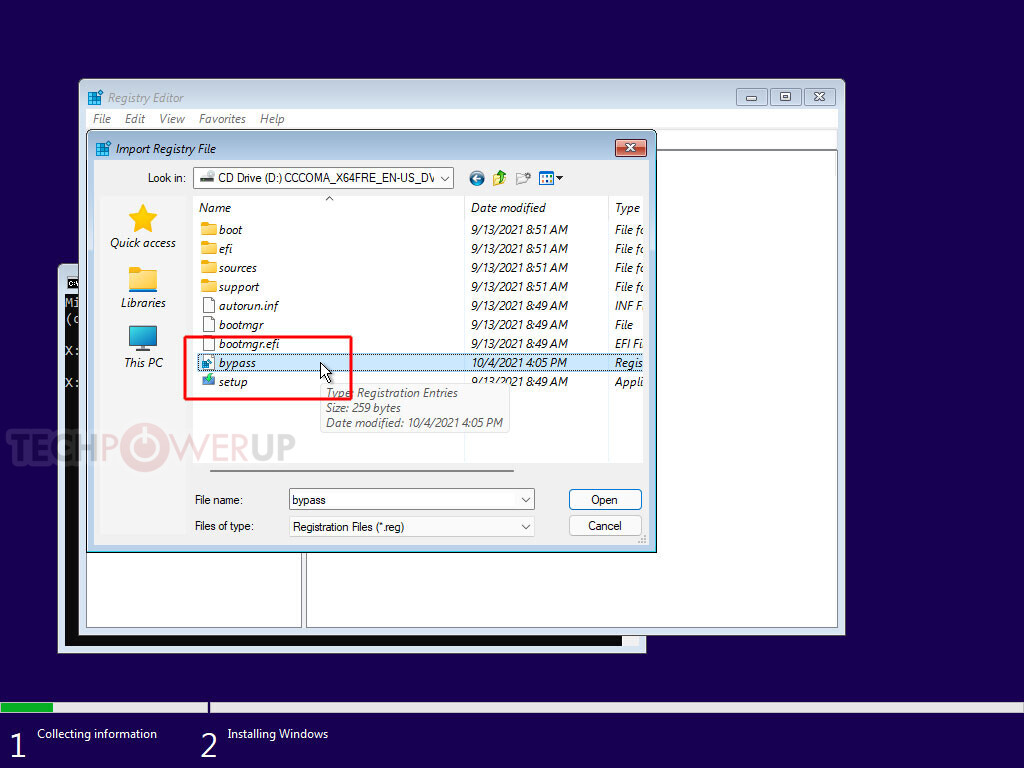
Press "Shift+F10" on your keyboard. This opens a Command Prompt window. Type "regedit" and hit Enter. Step 4: Get Registry Editor to Pick Up that Registry File You Made
With Registry Editor open, get it to import the "bypass.reg" file that's been sitting on your USB flash drive.


Step 5: Proceed with the Installation
That's it! Close all windows, and proceed with the installation. What Happened Here
The Windows 11 installation media, much like that of Windows 10 and Windows 8 before it, is essentially a bootable "live CD" of a Windows environment, with a singular purpose of installing Windows, or attempting to Repair your Windows installation. Logically, this environment needs the tools for such repairs, including a Registry Editor and a Command Prompt. It also has its own Windows Registry, which tells it how to go about installing Windows. With this Registry mod, you're making the installer overlook multiple system requirements, meeting, including "TPM Check," which checks for a TPM 2.0 compliant module (or Firmware TPM), whether Secure Boot (and its dependency of a disabled CSM) are met.
If you need additional help, let us know in the comments,
Bypass TPM and other requirements for Update from within Windows
Start the Windows 11 update software, click "Change how setup downloads updates" and select "not right now", or disconnect from the Internet before pressing "Next". The reason is that there's now a new version of the updater that disables the "back" button on the "Unsupported Hardware" screen. Click "Next", after some checking, a screen "This PC doesn't currently meet Windows 11 system requirements" appears. Now open the folder "C:\$WINDOWS.~BT\Sources" and look for the file "appraiserres.dll", delete the file. Make sure to delete the correct file, there's several "appraiser" files in that folder.
 Return to the Windows 11 updater (no need to restart it), click "back", and "next", done.
While these requirements do make some sense going forward, this walls off a lot of potential users, i.e. everyone without a TPM 2.0 add-on card, or those with processors older than 7th Gen Intel Core "Kaby Lake," or AMD Ryzen 2000 "Pinnacle Ridge" series. We have discovered a quick and easy way to defeat these checks during Windows 11 Setup, including for that nagging TPM 2.0, and Secure Boot. Here's a step by step guide for fresh installations.
Update Oct 7th: At the end of this article, which is focused on "clean installation", we added a method that lets you perform the upgrade of an existing installation to Windows 11, without any TPM. For this same scenario Microsoft offers a method that downgrades the TPM requirement from 2.0 to 1.2, our method works without any TPM and also relaxes other requirements, like memory size, UEFI and MBR.
Update Oct 10th: Improved the steps for the "upgrade" installation, to mention that updates to the updater should be turned off.
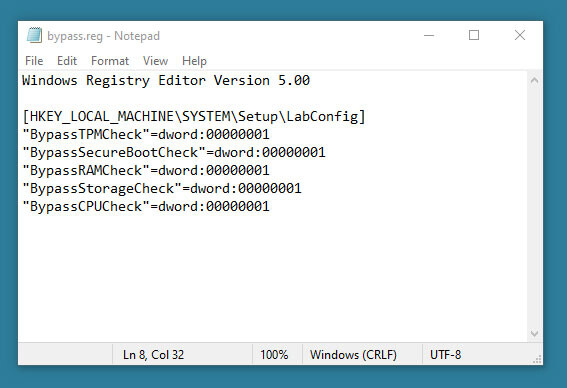
After preparing your installation media (on another PC), open Notepad, paste the text below, save this file as "bypass.reg" on the bootable USB flash drive that's serving as installation media for Windows 11. You can also put just this file alone on a separate USB stick, the Windows installation environment will show it as additional drive.
Windows Registry Editor Version 5.00Copy and paste the text, including the "Window Registry Editor Version 5.00" part, it should look like in the screenshot below. Also, make sure to save as "bypass.reg" and not "bypass.reg.txt", which can happen if you use notepad and have "Show file extensions" turned off in Explorer (the default).
[HKEY_LOCAL_MACHINE\SYSTEM\Setup\LabConfig]
"BypassTPMCheck"=dword:00000001
"BypassSecureBootCheck"=dword:00000001
"BypassRAMCheck"=dword:00000001
"BypassStorageCheck"=dword:00000001
"BypassCPUCheck"=dword:00000001
Now, simply boot from that USB flash drive, run Windows 11 Setup, and proceed until you hit the screen that says "This PC can't Run Windows 11."
Step 3: Invoke a Command Prompt
Press "Shift+F10" on your keyboard. This opens a Command Prompt window. Type "regedit" and hit Enter.
With Registry Editor open, get it to import the "bypass.reg" file that's been sitting on your USB flash drive.

That's it! Close all windows, and proceed with the installation.
The Windows 11 installation media, much like that of Windows 10 and Windows 8 before it, is essentially a bootable "live CD" of a Windows environment, with a singular purpose of installing Windows, or attempting to Repair your Windows installation. Logically, this environment needs the tools for such repairs, including a Registry Editor and a Command Prompt. It also has its own Windows Registry, which tells it how to go about installing Windows. With this Registry mod, you're making the installer overlook multiple system requirements, meeting, including "TPM Check," which checks for a TPM 2.0 compliant module (or Firmware TPM), whether Secure Boot (and its dependency of a disabled CSM) are met.
If you need additional help, let us know in the comments,
Bypass TPM and other requirements for Update from within Windows
Start the Windows 11 update software, click "Change how setup downloads updates" and select "not right now", or disconnect from the Internet before pressing "Next". The reason is that there's now a new version of the updater that disables the "back" button on the "Unsupported Hardware" screen. Click "Next", after some checking, a screen "This PC doesn't currently meet Windows 11 system requirements" appears.

261 Comments on Windows 11 TPM Requirement? Bypass it in 5 Minutes
Ms released a cpu ignore workaround
Whether it has a tpm module or bios updates well all I can say is at least they didn't have a bsod live broad cast
Although they would have incompatible hardware excuse this time :laugh:
But that's just me guessing. Irl, today, the restrictions seem completely arbitrary.
Also, making early adopters install from scratch if they want the latest security features was nice touch :rolleyes:
The better choice would be to make them a soft option and not force them on people. We'll see if the person(s) who made that decision continue with their head up their bum(s)..
Best way to show ms is not to use 11.
Even on compliant hardware
That said, even though my PC meets the requirements, I haven't upgraded. Not to stick it to Microsoft, but because I much prefer being able to move the taskbar sideways. Monitors are wide, vertical space is at a premium, you know...
Edit: For a bit of context, I was on 7 since it was in beta, I skipped 8 and 8.1 and hopped onto 10 shortly after release. (I've been with Windows for longer than that.)
Paste the script below into a text document and save as:
autounattend.xml/ all docs.
Place this file in the root of the installer:
You choose the language where to install, name or password and that's it. Install Windows 11 on any PC or laptop.
Both upgrade and clean install.
Also, you left your product key in the code.
This is not criminal, these are Generic product keys:
Windows 10 Home Single Language: 7HNRX-D7KGG-3K4RQ-4WPJ4-YTDFH
Windows 10 Home: TX9XD-98N7V-6WMQ6-BX7FG-H8Q99
Windows 10 Pro: VK7JG-NPHTM-C97JM-9MPGT-3V66T
Must be activated after installation!
Was just putting it out there about the product key. Didnt know if it was intended or not.
And yes, rufus does all this automatically